The Find
One night I found a small brass lamp with a pleated shade, the kind you might see on an end table or as a night light. I don't have a full 'before' picture because I once I got it home I was excited and started taking apart the shade (the shade makeover will be described in part 2).
Here is the lamp once I started taking it apart. The surface was pitted and I had an urge to bring some bring color into the space rather than trying to shine up the metal.
 |
| Brass lamp dis-assembly |
All of the pieces were threaded on to this central rod.
 |
| Brass lamp dis-assembly: center rod |
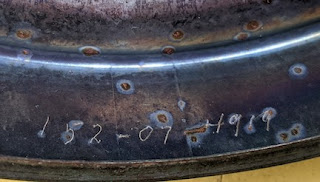
This number is scratched on the inside of one piece, I have no idea what it means.
 |
| Number scratched inside the brass lamp |
To keep track of the pieces, I used a marker to write the order and the direction it was facing as I disassembled the lamp parts.
 |
| Lamp body piece number '7', direction facing 'up'. |
The Makeover
I used a few coats of glossy green spray paint to cover the metal. All spraying was done outside over the course of a nice day. I've learned the hard way not to use spray paint when it is too cold, the paint will develop what look like scales. Also, be sure to hold down the edges of your newspaper, otherwise there will inevitably be a gust of wind to fold the paper onto your paint whilst it dries.
 |
| Glossy green spray-painted lamp body pieces |
I reassembled the lamp and purchased a lamp wiring kit so that I could install totally new wiring. This was also good practice, fun, and so so easy to do!
 |
| Reassembled lamp with new wiring, almost ready. |
Conclusion
The lamp body makeover didn't take much time for each step, but with the spray painting there was a bit of back and forth, as usual. It goes something like this: shake can, spray, wait to dry, shake can, spray again, wait to dry, discover yet another spot that you missed, shake can, spray again, wait for the paint to dry, decide you are done with the painting, wait 24 hours before reassembling.
I'm pleased with the glossy emerald green finish and the classic turned wood lamp body shape. In the corner of the final photo you can see the shade waiting for some freestyle attention!
 |
| Freestyled lamp body with glossy green paint and new wiring |
Happy freestyling, and don't be afraid to paint your finds to fit your style!