Tuesday, June 11, 2019

Cutlery? Oh I've got it in the bag.

Cutlery set and pizza cutter!
Price: Free.

Silverware set, in the bag.


Forks, spoons, and knives are so easy to come by in plastic form these days, but I prefer to use metal utensils.  They just have a better feel to them, and are usually easier to clean and not assumed to be disposable.  I have a set at work that I can clean and store in a drawer so I'm not lugging extra weight around in my backpack.  But aside from all that, I found a silverware set (and BONUS pizza cutter) recently.  I do not need more silverware, I have two sets, and three if you count some fancy old stuff that is still bagged up from when my mother gave it to me.  However, I have a friend who is moving and setting up a new place, so all those kitchen supplies are welcome. It is surprising how quickly those odds and ends can add up in cost when buying them new, even in terms of time spent on shopping.  So I'd like to thank whoever was so thoughtful that at least they neatly bagged this silverware set before discarding it.  You've made this freestyling particularly easy.

Happy freestyling.

Tuesday, May 28, 2019

It's more than just a random pile of metal

I own two folding metal platform bed frames, and they are so convenient.  Lightweight, easy to carry, easy to pack, and they remove any need for a box spring. I'm still unclear on why people still buy box springs to put under their mattresses when you could just use a platform, but maybe the rest of the sleep-using population just needs to know they are out there.
Having assembled two metal bed frames (in two different styles), and having found and gifted away at least one more, I know what they look like. Even when they are not at their best, like when someone has tossed one into a rubbish bin. Sigh, such a waste.

One that has been thrown away might look like this....

all askew

Instead of seeing a random useless pile of black powder-coasted metal, I see something that would be absolutely perfect for a friend who will be moving soon and needs to furnish a new studio apartment. It took me a few minutes to unscrew the wingnuts from the cross-brace pieces (no special tools were required) and then fold down the frame.  I knew from past experience that these metal bed frames, once folded down, will fit in the trunk of a car. You don't even need an SUV, a regular taxi will do just fine.  So that's what I used to transport this salvaged piece over to its new home.  A $10 taxi ride that netted a bedframe that would normally cost over $100.  Not bad for a few minutes of effort.

Happy freestyling.

Tuesday, May 21, 2019

Grilled to meet you

There have been times where I have seen used grills discarded on the loading dock. I'm not just talking about the counter-top plug-in electric grill style, but the outdoor charcoal-requiring type that involve open flame.  They seem like they would be SO EASY to give away. Lightweight, metal, sort of self-sanitizing (or at least easy to clean), and yet sometimes they just don't make the moving van cut.  In the past I've never grabbed one of these discarded homages to fire because - truth be told - I'm not much of a griller.  
Apparently this is shocking,  even to my friends who already know my eccentricities.  
(Which I, in turn, find surprising.)
Why this should be shocking I don't know, but apparently there are people who, like, worship the idea of grilling as some mandatory element of a good summer.  That's cool, I'm happy to eat their food. I do like eating outside.  And, even more important, I do love finding stuff that people have already told me they want, for free.  In early April a friend mentioned how her husband was so excited to grill this summer, but was bummed out because he didn't have a grill and didn't want to buy one.
So I filed that tidbit away.

One magical early spring evening, I saw this.

a grill, discarded.

A tiny lil' grill!

The garbage gods were really smiling that night, because just like it was meant to be, there was even a laundry basket and some fresh towels that I used to pack it all up and carry it away.  It was lightweight, I just didn't want the metal banging around while I was walking.


a grill, rescued and slightly disguised for transport


Yes, I'm sure I looked odd walking around with a laundry basket in the early evening, but whatevs.
I was freestyle killin it.

The recipients were overjoyed, and now have the, apparently necessary, ingredient of summer fun.

Happy freestyling.

Tuesday, April 30, 2019

Switching it up (electrical pun!)

How to investigate, diagnose, and repair a loose electrical switch

About a year ago (or more, who's counting at this point?) I found a lamp.
Not just any lamp, but national name brand, cool art deco-ish shape, and brushed silvery color that actually matches some of the other lighting I own.  Undinged, undingy, unhurt, and unclear why anyone throw this away.  It even worked when I plugged it in with a bulb,
and then it didn't....
and then it did....
so ok, it was a bit fiddly depending on....something unseen.
Maybe the bulb? (no, that's fine)
Maybe the cord position? (seems to not like being moved,  hmmm)

Why I decided to switch the switch


The unreliable connection led to concerns about there being a potential short somewhere, and a potential risk that should be fixed before I left the lamp plugged in. So I unplugged the lamp and set it on a shelf where it vaguely bothered me while sometimes fading into the background among other visual noise and ongoing projects.  Then, whatever it is about spring that makes people clean and organize hit me. I was going to order supplies to rewire the whole lamp and started watching videos to try to learn what I would need.  I learned that the switch type that sits on the cord is called on 'on line' or 'in line' switch, and the wheel-y version is known as a 'thumb wheel cord switch'.

Ah hah! Maybe that was something I could take apart and look inside of. If I saw a goblin inside chewing on the wire that would be an obvious diagnosis of what was causing the flickering.

What do you look like on the inside?


So I opened it up. Just one tiny screw to open! No goblins though, just some switch innards.

Honestly the wheel switch apparatus seemed kind of rinky-dinky, with these little metal prongs that had to pierce through the cord, which they barely did. In the picture below I'm touching the prongs with a pencil. Those little brass pieces were part of a large curved piece that was not affixed to anything, one sort of fell out with a little help. Not a good idea for an electrical contact, just sayin'. Also the wheel mechanism didn't turn very smoothly.  (Apparently as a result of this experience I'm becoming a bit picky about lamp switches.)

those little pointy bits are the supposed connection points

How you can replace an on-cord electrical switch (always follow manufacturer's instructions)


I decided to try to replace the switch, the existing switch didn't look very robust (and maybe I had messed it up while opening it?) and that would be a cheap first repair diagnostic.

I found this more substantial looking switch at my local hardware store (cost approx $7.50). Although the entire assembly is larger the rocker switch seemed like a better solution than the wheel switch because there would be fewer moving parts.  This little package came with directions.  (If this is your first time replacing an in-line switch I highly recommend getting that option instead of the switch that comes in a baggie with no directions. Right???)


Here is a side-by-side comparison of the new (replacement) switch already installed and the old switch.  The new switch had screws to hold the stripped ends of the wire in place, and a little clip on each end to hold the cord in place as it entered the housing. It just seemed better.
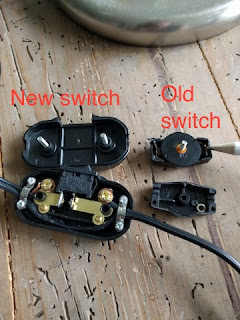
Out with the old and nonfunctional!


Here are all the tools I ended up using:
-New replacement switch
-Wire cutter tool (already owned), sort of useful
-Scraping blade (since I couldn't find a razor blade to cut the cable, and the wire cutter tool wasn't doing exactly what I wanted)
-Pencil, for pointing, and pushing the cord wire under and around the screw
-Tiny screwdriver (already owned, essential)

The right tools make all the difference


The final product is a functional switch and a lamp that I do NOT have to re-wire.

The future is looking bright!


Happy freestyling! Electrical work still makes me nervous, but this was fun to learn and relatively easy to execute - my kind of repair (because it worked the first time).