Tuesday, June 30, 2015

Ikea Lack table makeover with adhesive paper

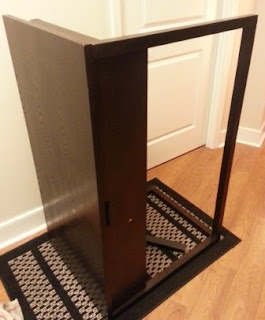
The Ikea Lack end table, already the subject of many a makeover (aka "hack"), but here is one more for the pile.  I found this free table in a discarded furniture pile, a few chips and scuffs, but in relatively good shape for something made of particle board.


 Originally I thought about painting the table, but then I remembered that painting is messy and I'm less than enthusiastic about cleaning up from painting. So, no to painting.  Then I thought about covering the table with marbleized paper and securing it using modge podge.  Then, again, I remembered that using modge podge is pretty much like painting and that  I'm still lazy when it comes to furniture crafting .  So how to transform this boring and too dark end table into something decentish?

One night in design blog land I read about people covering tables with contact paper, ding!  Easier than painting, and all the fun of giant stickers.  In the name of thrift I decided against purchasing the beautiful and expensive faux marble paper that cost 5x more than the original table, and went with one of the options available at the local hardware store.


 Covering the table took about 1.5 hours since I was moving slowly and trying not to bang things around.  I used almost the entire 9 foot roll to cover the table (21x21 inches square on top) and the 4 legs. I also added the green felt floor protectors to the bottom of each leg. Stickers on top of stickers.


Below is the partial reveal of the finished product.

  I actually think the trellis pattern is nice, interesting but not too crazy.  I selected it because it reminded me of furniture with bone inlay or interesting painted designs. Some examples are shown below. If you close one eye and squint with the other maybe my table will look as cool as these.


Pretend that I was thinking of all of those cool pieces above when I picked this design.  
The finished product is shown below.

Ready to hold your stuff and things.

The brighter stripe down the middle is not a figment of your imagination, it is where the two pieces of adhesive paper overlap.  Luckily the paper is re-positionable, otherwise there would have been zero hope of coming close to matching the pattern.

  It would be nicer if the paper wasn't so sheer, or if I was ambitious enough to do 2 layers and have the white be brighter, but I think $4.99 is enough of an investment for now.  My plan is to use this as a coffee table (which we didn't have before), but it might get pressed into service holding plants on the balcony.

Happy freestyling!

Tuesday, June 9, 2015

Why you should accept spontaneous dinner invitations


I love it when other people do their spring cleaning, especially if they are thoughtful enough to leave things outside for me to find.  One night after spontaneous dinner at a friend's house I came across a large silver-color frame with a matted print inside, and cracked glass.
   (Pardon the grainy photo, it was taken at night so I had to lighten it up a bit.)

Cracked glass, but worth the weight of carrying it home.

 Even though the glass was cracked I carried the whole thing home a few blocks.  Nothing like some light lifting of freestyle finds after dinner to make the evening feel like a true adventure.

Oh glass, why you gotta be that way?
 Once home I was able to safely remove the glass and safely dispose of it inside a cardboard box.  After cleaning the frame I had to find a suitable new piece of art to frame since the original print, while striking, doesn't flow with the rest of our decor.

Solution, a map!


I found a colorful city map  with the right dimensions to fit the existing mat opening.  I haven't replaced the broken glass with any new glazing material, but with the original backing, matting, and spring clips the piece looks neat and tidy.

Happy freestyling.

Tuesday, June 2, 2015

A dark and damaged desk gets a second chance

Desks are nice, especially when they are free!
This one showed up a little damaged back in March, the left leg had detached but was sitting next to the rest of the desk when I found it.  Thank you mystery furniture disposer for keeping all the parts together!

Looking at the back of the desk, there should be a U-shaped leg at the top.

The clean lines and nice drawer feature made me think that the obvious repair would be worth the effort.  All I had to do was re-attach the L-shaped part of the leg to complete the total U-shape of the design. Easy, right?


 The leg was probably snapped off when attempting the move the desk. The top is rather heavy, especially with the drawer in place. The damage to the left leg connector is visible in the photo below.

 For some reason I thought it would be a good idea to superglue a piece of paper onto the exposed particle board, so it would stop shedding.  It worked, but wasn't required.


My plan was to add external pieces to join the piece that had snapped off back onto the rest of the desk, and the diagonal attachment points.  I purchased synthetic shims and 1-inch wood screws (maybe $6 total), thinking it would go quickly with my little drill.

Synthetic shims join the L-shaped piece back to the rest of the desk at two points.
 Turns out synthetic shims are harder to drill through than I thought. It was possible, but it took waaaaay longer than expected.  Maybe a stronger or faster drill would have helped. Superglue was used liberally throughout this project, it worked way faster than drilling those shims!
Luckily the repairs are on the side of the desk, not the front.  

In the photo below you can see the light brown shim attached at the top left side of the desk. Most people don't notice it until I point it out, and so far the desk seems stable.


 From the front, sleek and shiny!  
Ready and waiting to support all your deskly needs.

(ignore the craft supplies stacked on the sides) 

Happy freestyling, and may the force of power tools be on your side.