Showing posts with label white. Show all posts

Tuesday, January 28, 2020

From protein powder to plant home

Plastic planter made for free

Earlier this summer I was casting around for small, lightweight, and weather-resistant planters to use on our balcony.  And free, they had to be free because I'd already spent enough money on plants and didn't want to buy things that I would likely have to store indoors over the winter. 
 I must admit that prewashed salad clamshells are pretty baller because they meet those requirements and are in plentiful supply, but I was hoping for things that were not too obviously reused food containers.  A friend offered up a few empty plastic containers that originally contained protein powder.  Lightweight, weather-resistant, and no printed label on the basic white plastic? 

Yes please.


I drilled a few holes in the bottom to give them drainage.
The drainage holes should probably be larger to allow for more air circulation, but I tried to compensate by drilling extra holes.

I added a lavender plant to each, put them on a balcony, and crossed my fingers hoping that the plants would survive and maybe even flower. 

Conclusion

Still waiting for those lavender flowers....

Happy freestyling!

Tuesday, January 14, 2020

Woodsy cachepot makeover

Always take the ceramic cachepot

A few types of freestyle items are almost ALWAYS useful.  These almost-always-useful items include metal wire shelving (preferably with shelf clips), picture frames with front glazing intact, and ceramic cachepots and planters (cachepots do NOT have a drainage hole in the bottom, planters generally do have a drainage hole, but sometimes the words are used interchangeably just for extra uncertainty).  I say that cachepots and planters are almost-always-useful items because I do a lot of container gardening, and having spare pots makes it easy to split plants and give them away.  So when I saw this intact ceramic cachepot, you can guess what my reaction was.....take it!


Ceramic cachepot with wood texture and bird detail
Woodsy ceramic cachepot


Now, I know what you might be thinking --  this cachepot featuring faux bark with birds and flower detail looks a bit faded.  The birds might have been painted at one point, you can see a little trace of red on the neck of the leftmost cardinal, and there was a bit of yellow left on the bottom of the flower, but the paint on those details had mostly worn off.  I offered it to a few friends, thinking someone might light the vintage charm of it, but no one was interested in the woodland themed cachepot.  Since the brown color didn't really fit into my white cachepot color scheme I decided to do a quick makeover with white satin spray paint.


Cachepot makeover

I didn't use any sort of primer when spray painting this ceramic cachepot because I don't expect it to get a lot of handling.  I did tape off the inside of the cachepot because the inside already had a shiny white glaze that I didn't want to cover.  I setup a little spray station in the basement and gave a few coats with the suggested drying times in between.  With all the nooks and crannies of the faux bois texture and the bird/flower detail it was important to spray in different directions to get full coverage. The final result is below, after about 2 - 3 coats of satin white on the outside.


Ceramic cachepot after makeover with satin white spray paint
Spray-painted ceramic cachepot


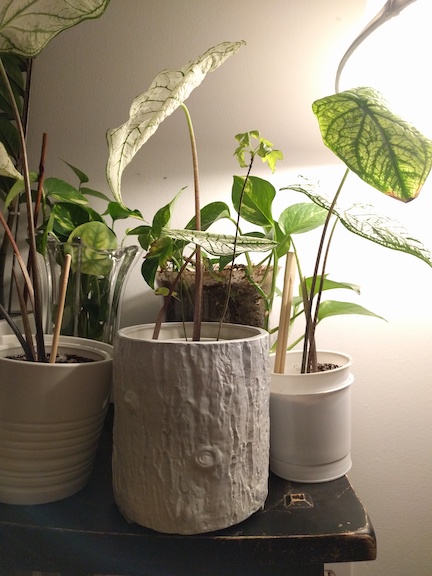
Here is the cachepot in its current home, holding a Caladium plant (itself a freestyle gift from the sub-tropic garden of some friends).  Here it is crowded not-very-prettily with some other plants in a variety of planters - including one made of glass in the back.  Good sunlight is at a premium in my apartment, so crowding happens more often than I'd like!  If I remember to take a better picture I'll replace this one, but for now that's what I have. :)

Ceramic cachepot after makeover with satin white spray paint with Caladium plant
Cachepot with Caladium plant


A Surprise Online Find After The Spray Paint Makeover

After I'd finished this project I was pleasantly surprised to see a not-too-dissimilar planter to mine for sale on rather stylish website ( not-too-dissimilar if you squint and look at mine in dim light that is). Here is a screen grab of the 'Ceramic Rose Pot' for sale, the large size is 6.5 inches tall - about the same size as my freestyle find. 

https://www.shopterrain.com/


Conclusion

The large version of the cachepot on this website sells for $38 - I got mine for the cost of washing a pot and a $5 can of spray paint.  Cheers to seeing the makeover potential of that faded ceramic cachepot in the discard pile!

Happy freestyling, or almost freestyling, whichever way your project takes you.

Thursday, December 27, 2018

White picket fences....of plastic

When I saw these two white picket fence planters outside my door I thought, 'aha! Someone who knows I like free (and plants) has been here!'  True to form, they were a friendly find from someone who also enjoys a good deal but didn't have a green thumb. I assume they are planters, or cachepots, what else would they be, right? 
white picket fence plastic planter
So free and so clean clean.

These lil' white picket fence containers cleaned up just fine.  The color was right but I didn't have a good space for them, luckily a new friend moved to town and needed some plants. Perfect timing!  I was able to take some small pothos cuttings and snake plant (Sansevieria) cuttings to get my friend started on their indoor greenery landscape.

So happy together

That's it. A rather simple story, which played out a few months ago, but a nice way to pay it forward with plants.

Happy freestyling and gardening!

Thursday, November 8, 2018

Hook me up!

For over a year I've had a coat rack serving as an all-purpose clothing catch-all, which made sense because it was free and it served the purpose of holding clothes that weren't quite dirty, purses that were probably going to be used again soon, and a big floppy hat with nowhere else to go.  However, at some point I started to realize that having a circular standing item in a corner meant that it was all too easy to loose track of items buried towards the middle, and it just looked a bit......looming.  It made the corner feel cluttered, with all the bulk of the clothes jumbled together.  I'll spare you a picture of the hodgepodge, and instead provide a visual of the item itself.
Coat rack, on the way out the door.

Very functional, and easy to disassemble, but I've posted the coat rack for free, hopefully someone takes it.  I don't need it because I've replaced floating hooks with wall hooks - or rather, drawer pulls attached to the wall to serve as hooks.  Looking online and browsing randomly in stores it seemed like all the hooks were either huge with very visible attachment screws, multiple hooks mounted on some larger wood piece that was probably too large for the given wall space, or pretty but possibly too delicate, and they were all more than I wanted to pay.  I might have seen this online, who knows where the idea came from, but I started to wonder about drawer pulls and if they could be used as wall hooks - probably inspired by those achingly pretty drawer pulls at Anthro*******.  I found two tutorials online that confirmed yes! this can be done and yes! it is quite easy. One tutorial is from this site, so if you don't believe me, believe the professionals at another blog.

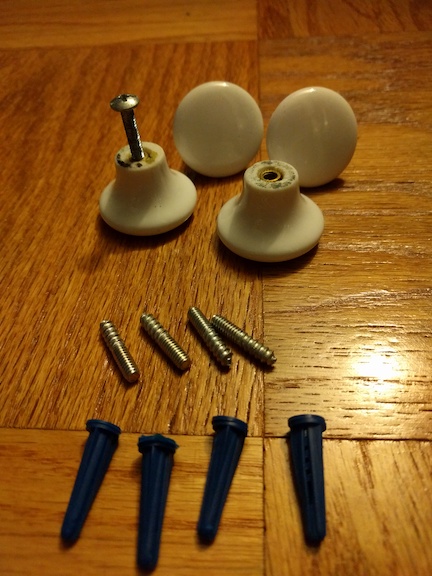
I had a set of white ceramic drawer knobs that were scavenged from a dresser somewhere in the distant past, they had even been used as knobs on the green dresser at one point - before being swapped out for gold beetles.  These knobs, sitting in my own bin of salvaged hardware all along, were just what I wanted - sleek, smooth, and free.  I brought my knobs to the hardware store, where luckily I could buy exactly the number of hanger bolts required and test them to make sure they fit the knobs - I appreciate only having to buy the amount needed for a project rather than a bundled set. I did get extra drywall anchors, because those have been known to break during installation.

ceramic drawer pulls, hanger bolts, drywall anchors
The hanger bolts have two different halves, a flat end with narrower threads that fits into the knob, and the other end with wood-screw-width threads that goes into the drywall anchor.  It is easy to tell which end is which, I recommend attaching the hanger bolt to the knob first, then screwing the whole thing into the installed drywall anchor.

Hanger bolt, inserted into ceramic drawer knob

Pre-drilling the holes, hammering in the drywall anchors, and screwing in the knobs took less than 10 minutes. So easy!  I started with a small drill bit to pre-drill a hole and then moved my way up until the bit size was still a bit smaller than the drywall anchor, but the was because these were hammer-in rather than screw-in drywall anchors.

Drawer knob, now wall hook

The result, a lovely set of sleek and functional hooks that blend in to the wall, but are ready and waiting to hold the clothing parade of the modern city dweller.

Multiple new wall storage options

Happy freestyling, and don't worry about taking hardware, you never know what new purpose it might serve!

Tuesday, June 5, 2018

Back in the saddle, scrounging the sidewalks and ending up with ridiculously large things to carry

Life's twists and turns mean that sometimes I am away from the blog for one reason or another.  The past year has seen a few locational changes, and continuous lessons in 'this is what you have, make it work somehow.'  No complaints about that here, such challenges go along quite well with the freestyle ethos. Waste not, want not, appreciate the abundance around you.
Practice gratitude, and as always - see the potential.

It's also ok to mutter under your breath about the weight of that potential when you decide to pick up this shelf and start carrying it.


It sounded like a good plan, just carry it down a block or two until you reach a busy street. Even though it's evening surely a cab will go by.....
Yes, they went by, and didn't stop. Or they didn't see me waving. Or they didn't want to pickup a woman with a shelf on a random Tuesday night.
Who knows. I do know that I made it to the subway, yay for elevators!

I knew right away I was going to paint this shelf, to cover a little repair and to match the rest of my apartment. I used Benjamin Moore Decorator's White in a pearl finish.
 Why pearl?
Because the hardware store was out of the glossier paint in the right size and base, and I didn't want to wait for a restock.

I dutifully, and reluctantly as always, sanded down the piece to rough up the finish.  There are no photos of that step. I dislike sanding.

After the first coat of paint it was clear I would need a second. It was also clear that I wish I had a little roller, but they didn't have any good ones at the store, so again, I made do with a brush.


Here's the finished product, styled with some odds and ends. The floor lamp behind the shelf is also a freestyle find from ages ago.


Eventually this painted shelf will get filled with books, because really, if I only wanted a place for a globe and some knickknacks would I even need a shelf in the first place? 

Happy freestyling and sidewalk finding!

Tuesday, March 28, 2017

A happy square

Walking home from a friend's house I passed through a residential neighborhood full of cute houses and a long established practice of leaving free things on the sidewalk.  Could a post-brunch winter walk have any more potential? 

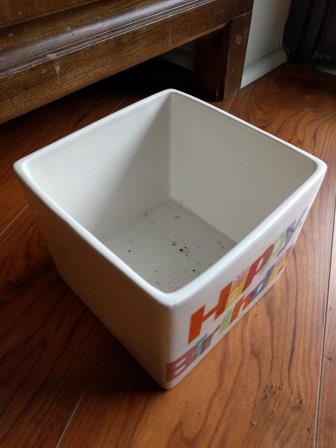
In front of one house I came across this square ceramic cachepot with the words HAPPY BIRTHDAY on one side.  I suspect at one point it contained an arrangement built on florist's foam or perhaps something edible. Either way, I washed it well and it's mine now.


It was the perfect size for a Christmas cactus that had been living in a transparent glass planter surrounded by shells (looked fine, but made it difficult to lift the plant out to check for excess water).
Luckily the wording is only on one side of the planter.


Now this lovely little square pot lives on the shelf near the window next to the hippo planter (with the Haworthia) and near the pothos cuttings that I hope will survive their transplant from water to dirt.


Don't trash it, let someone else treasure it!
Happy freestyling.

Tuesday, October 25, 2016

White, bright, and out of my sight

I had a wonderful pair of Ikea Urban chairs on my porch the whole summer.  They were lightweight but not flimsy, pretty comfortable for an un-upholstered chair, and apparently are made out of some reinforced polypropylene.  I think they look a little futuristic.

Whatever, they were nice for the price of $0.  With fall rolling around I thought it was time to do a little patio rearranging and increase the light transmission into the living room for the winter months in the hopes of keeping the remaining houseplants alive through the winter.  So the chairs went up for grabs and some friends with a large deck and a penchant for dinner parties snagged them.

Here they are on the patio, just waiting for a party!


Happy Halloween, and Happy freestyling.

Tuesday, October 4, 2016

Yucca luck-a

Found: possible yucca plant in white Ikea cachepot, half-dead. One of three stalks was totally dried out and I pulled it out before removing.  The other two have signs of life.
Hopefully with water and sunshine this yucca with have some luck-a recovering from the tip necrosis that was affecting most of the leaves.
Some detail shots of the greenery, because why not?


Happy freestyling, don't be afraid to try your hand at plant doctoring.

Tuesday, August 23, 2016

Polluter to purifier - part 2

Regular readers may remember the first polluter to air purifier post, where I converted an old wax-in-glass candle into a planter.  That particular find actually came with two discarded candles, and here is the story for the small white glass cylinder.

The finding...


The cleaning...

waiting for a second life


And after I had re-potted a spiky little aloe into the glass.
 Note: When planting succulents in containers without drainage holes you have to be very conscious about NOT overwatering them.


So there you have it, two different wax-filled glass candles, saved from the garbage dump and given new life as planters.

Happy freestyling and gardening in whatever space you have.

Tuesday, April 19, 2016

Maybe Haworthia *is* a utensil

Almost anything can become a planter, especially if it is ceramic.  I like the shape, and more importantly the price, of this small stoneware crock at a discount store. 


Since planters and cachepots can be more expensive than the plants themselves I've started to keep my eyes open for low priced ceramics wherever they may be.  This one was in the kitchen wares section and only $5.99. I'll take it.

My Haworthia succulents keep producing offsets (plant babies) and I have to keep finding new homes for them or repotting the mother plant into a large container.  This one was pretty simple.   I often use coffee cups for succulent planters, because they are free and its easy to poke holes in the bottom for drainage.  The utensil crock was taller than the coffee cup but that issue was easily solved by adding a little step (made out of part of another coffee cup cut down to size)  for the plant cup to sit on.


Voila!  Another example of kitchenware to cachepot.


Even though I don't usually give my succulents their own chairs I think this ones looks pretty good on the slipper chair, maybe it will just hangout there until it has to move.


Happy freestyling!

Tuesday, April 12, 2016

Cookware cachepot (otherwise titled "How to reuse a broken pot with no handle")

DIY: How to reuse old cookware by turning it into a planter

One of my roommates had used up the life of a metal cooking pot, somehow the rivets that held the handle to the bowl had gotten thoroughly rusted. I suspect that food got trapped in the crevices and provided a suitable environment for bacteria to work their magic.  With some well applied force the other rivet holding the handle popped off and I was gifted the leftovers of a broken saucepot. I was overjoyed, new planter!

Although I do like the look of succulents in silveplate pieces like punchbowls with ornate handles this was just a plain saucepan with no lovely scrollwork or other ornamentation.  Also, the copper bottom contrasting with the sides made it obvious that it had started its life as cookware so after a thorough cleaning I decided to spray paint the whole thing white.

Here is the pot on its very fancy spray painting stand -- made out of a plastic jar that once held nuts and cardboard I found in the recycling.  High tech indeed.


I picked an unseasonable cold day when the outdoor temperature dropped BELOW the level recommended for use on the spray can. Whatever, not going to stop the creative process!  I kept the can indoors between coats so it wouldn't get too chilly.

Here is the pot after one coat, I was pleasantly surprised how well the paint stuck to bare metal even in the cold.


After three, or four, or maybe five coats of spray paint (with plenty of dry time in between) I called it quits. Enough with the painting-- I've got plants to tend to!

Here is the final product, now a proud cachepot holding a lovely peacock plant on top of another freestyle piece of furniture that I haven't even written about yet.


Happy gardening, and don't give up on that old cookware.  Give worn out pots or pans a new purpose in life with the magic of spray paint.

Happy freestyling!


Tuesday, November 10, 2015

Transfer treasure: White enamelware bowl

Transfer station.
Sounds so much better than 'place with giant garbage bins for you to separate recyclables and trash on a Saturday morning.'  Transfer stations are also know to have swap sheds, or give-n-take racks -- all things that are music to my ears.  During an autumn visit to a transfer station I found a lovely little bowl gathering dust in a nearly empty swap shed.

Top view, dust included

Such a lovely piece of white enamelware, only a few dings around the top rim, but otherwise in great condition.


Side view

Coincidentally, the next day I was walking by a parking lot flea market in another city when I spotted this bowl for sale.  $12 for a vintage white enamelware bowl.  Not bad, but mine was free!


I'm not sure what I'll use my new bowl for, but given its wide flat bottom and vertical sides it has the look of a potential succulent planter....

Happy freestyling!

Friday, July 17, 2015

Ragtag coffee table makeover - part 2, finished product

The ragtag coffee table repair and makeover continues!

Look at that lovely carving detail on the legs, who could resist? 

Scroll down for the rest of the repair story, and the final product.

After cleaning, the next step was to glue down the top center insert that was coming loose and a bit warped at one corner.  Below you can see the bright white line of glue. I also glued the same piece from the bottom, because why not?
 After glue had dried, and my online order for a palm sander arrived, I started sanding the top.

 I thought it would take 20 minutes.

It took 2 hours.

The combination of veneer and glue and a bit of water sort of gummed up the sandpaper. Not immediately, but I had to switch pieces and rinse it off a few times. 
Oh well, the point of this was to practice and learn. One thing I learned was that it is ok to apply some pressure to the sander so that the sandpaper can do its job.

Here is the top after I decided that I was done with sanding.
You can see that I went through the finish, and down to bare wood in some places.  This was mostly along the edges where I knew I would have to sand down the center insert because it had already warped a bit.  You can also see the glue. Note to self, next time use less glue so that you don't have to sand down so much of it.
 

The next day was the start of painting!  I decided to use white high gloss paint, mostly because it was free.  All the blogs say to apply primer, use a roller, maybe some paint extender..... 
Nope. None of that. 
I used a brush I found in a box of miscellaneous junk, and the paint was free.
Here is the top after 2 coats. It looks mottled because you can still see the original finish underneath.


After a few more coats on the top, i did one light coat on the center panel of the fake drawer front.  To whoever decided that a fake drawer was needed on a coffee table...
Thank you! 
You gave me an excuse to buy this lovely drawer pull.

So now the fake drawer has its own little bit of bling in addition to the decorative carvings.
 

Voila! 
The ragtag coffee table!

Now transformed into something that won't give you splinters and should do a decent job of holding magazines, drinks, and probably a plant or two.  
(Maybe I'll take another picture on a sunny day, but now, this is it!*)

Cost breakdown:
Table: free
Sander: $20 
Sanding paper: $6
Paint & brushes: free
Decorative drawer pull: $14


*Sharp-eyed readers might notice the trellis-print paper covered Ikea table in the back. 
It was briefly a coffee table, but now serves honorably as a plant stand.  
Always fun to reuse things from within your own home.

Happy freestyling!

Tuesday, July 14, 2015

Ragtag coffee table makeover - part 1

I looked at this coffee table for a few days before finally deciding to take it. The top was pretty damaged, and the center insert piece was loose with the corners slightly bending up in some places.

Also one of the corners looked like it had been chewed on by an animal....
 
What swayed me was that it wasn't made of MDF, but rather a mix of solid wood and plywood. The picture below shows the underside.


Step 1 was to glue the top center piece back to the frame.

As you can guess from the glue repair shown above, the top will need to be painted.  I thought white paint would be timeless, but wasn't sure if a painted top that would look odd with the wooden legs.
I wasn't entirely sold on the trendy white paint & wood grain combo that has been popping up in the blogosphere lately, but these examples helped me visualize what the final product could look like.


white round wood coffee table 

Artistic yet Practical Mid-century Coffee Tables : Simple But Interesting Design For White Coffee Table With Glass Tray For Vase And Wooden For Legs Design


http://www.nationalfurnituresupply.com/images/Modern/modern-table/modern-coffee-table/metal-coffee-table/Stylish%20modern%20metal%20base%20coffee%20table%20with%20white%20oak%20wood%20top.jpg


these legs are metal, but close enough


See part 2 for the reveal!