Showing posts with label hardware. Show all posts

Thursday, November 8, 2018

Hook me up!

For over a year I've had a coat rack serving as an all-purpose clothing catch-all, which made sense because it was free and it served the purpose of holding clothes that weren't quite dirty, purses that were probably going to be used again soon, and a big floppy hat with nowhere else to go.  However, at some point I started to realize that having a circular standing item in a corner meant that it was all too easy to loose track of items buried towards the middle, and it just looked a bit......looming.  It made the corner feel cluttered, with all the bulk of the clothes jumbled together.  I'll spare you a picture of the hodgepodge, and instead provide a visual of the item itself.
Coat rack, on the way out the door.

Very functional, and easy to disassemble, but I've posted the coat rack for free, hopefully someone takes it.  I don't need it because I've replaced floating hooks with wall hooks - or rather, drawer pulls attached to the wall to serve as hooks.  Looking online and browsing randomly in stores it seemed like all the hooks were either huge with very visible attachment screws, multiple hooks mounted on some larger wood piece that was probably too large for the given wall space, or pretty but possibly too delicate, and they were all more than I wanted to pay.  I might have seen this online, who knows where the idea came from, but I started to wonder about drawer pulls and if they could be used as wall hooks - probably inspired by those achingly pretty drawer pulls at Anthro*******.  I found two tutorials online that confirmed yes! this can be done and yes! it is quite easy. One tutorial is from this site, so if you don't believe me, believe the professionals at another blog.

I had a set of white ceramic drawer knobs that were scavenged from a dresser somewhere in the distant past, they had even been used as knobs on the green dresser at one point - before being swapped out for gold beetles.  These knobs, sitting in my own bin of salvaged hardware all along, were just what I wanted - sleek, smooth, and free.  I brought my knobs to the hardware store, where luckily I could buy exactly the number of hanger bolts required and test them to make sure they fit the knobs - I appreciate only having to buy the amount needed for a project rather than a bundled set. I did get extra drywall anchors, because those have been known to break during installation.
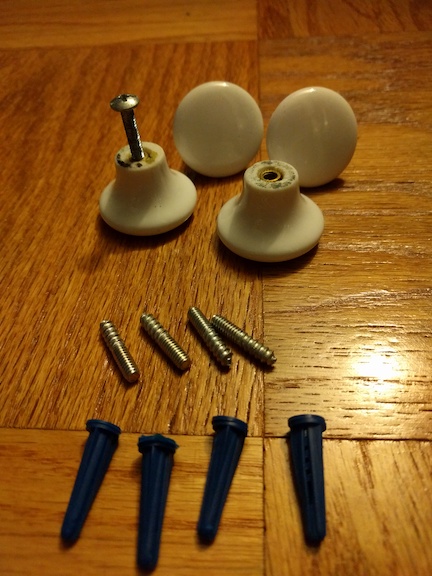
ceramic drawer pulls, hanger bolts, drywall anchors
The hanger bolts have two different halves, a flat end with narrower threads that fits into the knob, and the other end with wood-screw-width threads that goes into the drywall anchor.  It is easy to tell which end is which, I recommend attaching the hanger bolt to the knob first, then screwing the whole thing into the installed drywall anchor.

Hanger bolt, inserted into ceramic drawer knob

Pre-drilling the holes, hammering in the drywall anchors, and screwing in the knobs took less than 10 minutes. So easy!  I started with a small drill bit to pre-drill a hole and then moved my way up until the bit size was still a bit smaller than the drywall anchor, but the was because these were hammer-in rather than screw-in drywall anchors.

Drawer knob, now wall hook

The result, a lovely set of sleek and functional hooks that blend in to the wall, but are ready and waiting to hold the clothing parade of the modern city dweller.

Multiple new wall storage options

Happy freestyling, and don't worry about taking hardware, you never know what new purpose it might serve!

Tuesday, July 24, 2018

2-drawer dresser makeover

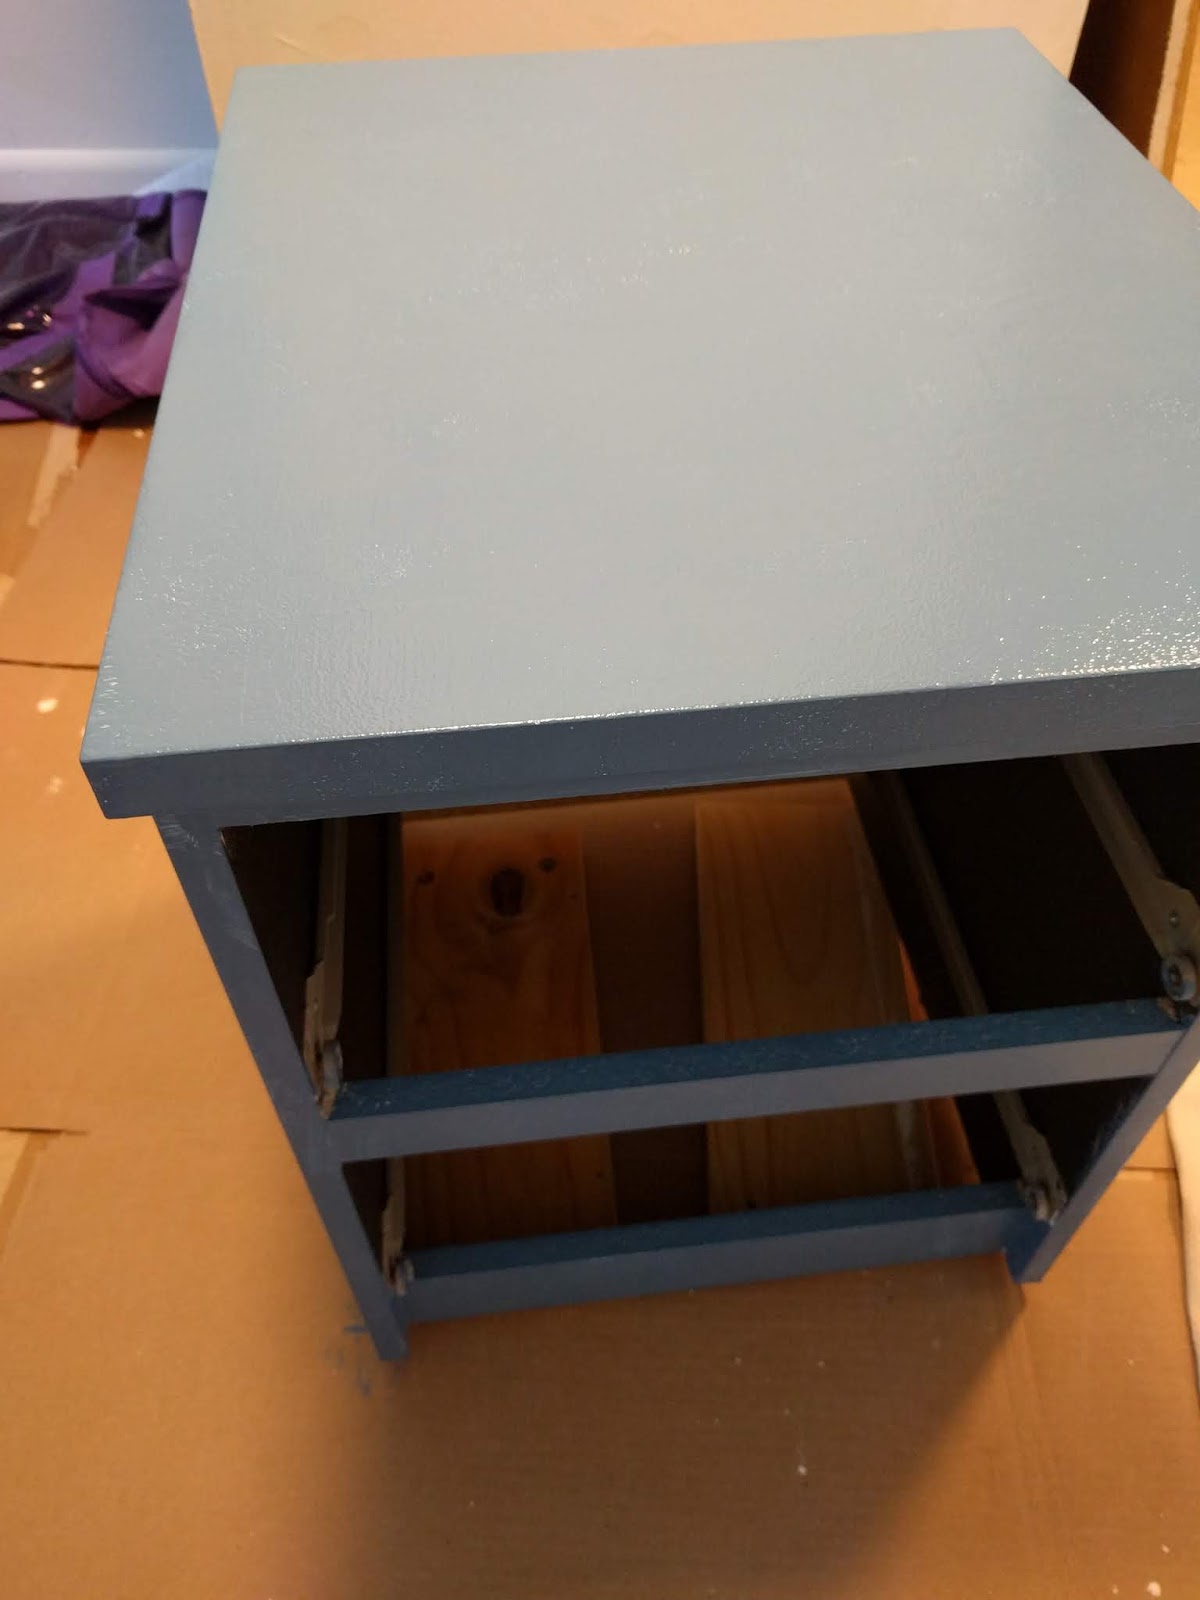
I found this small scandi-superstore nightstand/ small chest one night while cruising the discard pile.  Often these particleboard-based furniture pieces don't survive the un-gentle process of being discarded, can you see why?


You might not think there was anything salvageable in that sad pile of broken things, but somehow this little buddy had survived intact.


I thought it would be fun to try painting the outside, and if it all went wrong, well, that is sometimes the price of experimentation with paint.

Since there are many many painting tutorials out there, I'll just say that I sanded a tiny bit, and was patient enough to use primer.  Sanding might have been a mistake since this was particleboard. I used this Zinsser Zero because it said they were zero VOCs, and I was pleased that I couldn't detect any bad odors. I did have to stir a lot to get an even consistency of the primer on the brush, in retrospect the application would have been better with a roller.


I did two coats of primer because my brushwork leaves something to be desired.


I knew that this would also be a chance to use this pair of cool matching drawer pulls that I had in my collection. Yes, I collect hardware even if I don't know where it will be used. Sometimes it is the only thing I can rescue because of time/space/transport limitations. Sigh.  These had lost some shine, but I like the shape.  The desire to use these handles miiiiiight have been the impetus for this entire project, who's to say?


I had to drill holes in the drawers for the new handles, this was also an excuse to use a variety of drill bits. I ended up needing the 1/4", which is the largest in my set, and thus a possible message that I might need a wider range of drill bits.


After one coat of Valspar 'Sea Swirl' (applied with a roller) I knew there would need to be a second coat. There were also a few sort of vague bubble-lumps that looked like they had been caused by the top getting wet. Maybe from too much primer?  Not super obvious, but visible in a certain light.  I didn't see anything similar in the drawer fronts or the sides.


After the second coat and the ready to proceed with hardware installation.


Here it is all staged in a corner, not where it will eventually live, but good for the photos.


Love the drawer pulls! They strike me as greek-key inspired.  Perhaps they will get a new shiny metal coating some day.

The total project-specific cost was approx $20, here is the break-down:

Primer, $12 (with plenty left over for future fun)
Paint sample, $5 (approx half a can left)
Drill and bits, already owned
Hardware, $0 ( freecycle salvage)

I had thought about adding some little legs to raise the height, but that would involve adding some wood to make a base. I have scrap wood, so this makeover might just have a sequel. Stay tuned!

Happy freestyling.

Monday, May 26, 2014

Freestyle A Room, The Challenge, Post 2 - The dresser

This challenge started and ended a loooooong time ago, but you still get to enjoy the freestyle finds that went in to making this grad student bedroom and functional and low-cost space.
My original goal was to find as many of the following items as possible:
-desk
-mirror
-dresser
-bedside table
-metal bed frame, full or queen size
-shelving, (for closet or bedroom)
-desk lamp 
-other light fixtures
-hangers for closet


Below is the story of how we ended up with this fully functional dresser, for free!

One of the first finds for The Challenge was a wooden dresser, from only 1 block away. It is a solid piece with nice lines and all drawers intact, only missing some drawer pullsI think this dresser may have been sitting in a basement before coming in our life.  Once we hauled it home (thank goodness it was so close) the dresser got a thorough cleaning and a few days of baking powder treatment to absorb any lingering musty odors.

The ornate outline of the missing drawer pull hardware is visible on the drawer front.


Putting other FREESTYLE drawer pulls into service.
Detail: drawer pull originally salvaged from a discarded dresser in Brookline, reused for this dresser.

Detail: drawer pull from a previous find, reused for this dresser.
Some of the drawer corners were a bit loose so they got a glue treatment.


There were a few of these cool old porcelain knobs on the dresser when we found it. Below is a comparison, the knob on the left shows the original condition, the knob on the right has been cleaned.

Below is a detail of the top section. 

Voila! The finished dresser, in service on a sunny afternoon.


Happy freestyling!