Showing posts with label blue. Show all posts

Tuesday, September 28, 2021

Wicker Chair Makeover

The Find

I found two of these worn wicker chairs one night. They were lightweight and had a good shape to them, too bad someone put them out with the trash - but good that they were still salvageable!  I really liked the wide armrest and gracious curve of the backrest - nice lines.

White wicker chair sitting on grass
Wickerness.


The (Half) Makeover

The white paint on these wicker chairs was cracked, flaking, and overall in really poor condition. In addition, on some of the legs the wrapping was coming undone.  I fixed the loose wrapping with some super glue and clamps - that seemed to do the trick!

Wicker chair leg with loose wrapping
Coming undone


cracked paint on wicker chair
Cracked paint


Missing paint section on wicker chair
Paint missing on some fibers


It was clear that these chairs had spent some time exposed to the elements.  I've never refinished wicker furniture before, so this was a new process for me.  I decided that the first step was, AS ALWAYS WHEN PAINTING, surface prep!  So I used a stiff scrub brush to scour off the loose paint as best as I could.  Then I used a can of spray paint to try to get into all the nooks and crannies of the wicker.

Can of spray paint with 2X UltraCover Paint+Primer in color 'Ocean Mist' Gloss.
Ocean Mist spray paint can


The color I used was 'Ocean Mist', a very very pale blue. Wicker has many many nooks and crannies, and I used an entire can of spray paint on one chair without even fully coating it to my satisfaction.  It was maybe 1.5 coats in some spots, but only 1 coat in others.  This resulted in  "uneven" color across the chair.  On some of the chair-front the blue color was much more apparent because that part had received a second coat of spray paint.  I estimated that to spray both chairs and get full coverage with even color would take 3-4 cans of spray paint.  If I were planning to keep these chairs for a long time I would definitely consider that a fair investment in such nice patio furniture.  However, I knew these chairs were only going to be around for a few months, and in peak summer I don't actually spend much time sitting outside. So I stopped at one chair with as much coverage as I could get on the underside and topside.  You can see that the pale aqua color was starting to be visible, but that a few more coats would have helped smooth out the surface.

Detail of wicker after being spray painted
Ocean Mist - 1 coat


Here is the chair in its home-corner after getting as much spray paint as it was going to get from me.

Wicker chair sitting on wooden deck next to plants
Sitting pretty


Conclusion

The color-mismatched pair of wicker chairs hung out for a while and the newly spray-painted one held up nicely.  The chair shape was very comfortable, and if I had a larger and more permanent space I would have hung on to these curvaceous beauties!  But alas, they eventually went on to their next home, where I hope they will bring others comfortable repose.  

Happy freestyling - don't be afraid to shift your plans in response to a reality check!

Light blue wicker chair with pillow, on a wooden deck
Sitting prettier with a freestyle pillow


Sunday, August 15, 2021

Bonanza of Blue Patio Furniture

 The Furniture Finds

One two separate evening walks around the universe I came across a pair of blue patio chairs, and also a metal-frame loveseat with blue cushions.  All of these pieces had seen better days, and I'm guessing they had been sitting outside on a porch or patio for a bit.  But they all seemed intact (no loose legs or fabric rips) and ready to benefit from a good cleaning.

Pair of blue fabric and metal chairs stacked
Blue chair pair (stacked)


Loveseat with metal frame and blue cushions, front
Not feeling the love...seat


Metal loveseat with blue cushions, back
Loveseat, backside


The Cleaning

The two blue chairs were, despite a bit of dirt, in perfect condition. (Thank you curb givers!). So with a little soap + water + brush action they cleaned up nicely.


With the loveseat I was only able to wash the covers and the smaller (upper) cushions in a washing machine.  The seat cushions will have to wait until another solution presents itself, they will just stay as they are since the plan was to keep the piece outside anyway. But again, thank you curb givers for putting this out so it could find a new home.


The Conclusion

I have some friends who just bought a house and mentioned they were looking for patio furniture! 

What coincidence!  I realized that my limited patio space was best used for plants, not for lounge furniture (maybe if this were a large space - but it is not!).  So I offered up the blue beauties (and some orange and white pillows I had found and cleaned) and everyone was happy.

Look at this lovely setup!

two chairs and loveseat on a porch
Sitting pretty on a new covered porch.


Happy freestyling. Don't be afraid to take something, clean it or fix it up, and then offer it back up to the world as an act of kindness - someone will ALWAYS want it.

Tuesday, May 25, 2021

I-Loominating! Scrapwood frame loom for under $2

The Idea

Weaving seems like a fun, low commitment, low pressure hobby. No deadlines, lots of potential yarns and fibers to experiment with. Let's build a frame loom! Even better, let's build a frame loom for almost free using scrapwood, some screws already on hand, and a box of wire brads that cost less than $2. Yeah.

The Creation

I had some easy-to-handle sized scrapwood pieces, so I laid them out on the floor to see how big my loom would be if I didn't make any cuts.  I thought it might be nice to have a wider piece across the bottom, so I just went with these pieces as they were and decided to make a 'vertical' (portrait orientation) loom.

four pieces of wood in a rectangle sitting on the floor
Loom pieces


Not pictured in this post, but I happened to have a vat of indigo blue dye already on hand when building the loom, so I dipped the pieces in the dye bath just for funsies.  After the wood had dried for a few days I gave it a coat or two of shellac (already on hand from another project) because I wanted a smooth surface to minimize any yarn snagging.

Next step was the placement of small brad nails to hold weaving warp.  This stage is where I confirmed that I wanted to make a 'vertical' loom rather than a 'horizontal' loom. I laid out a piece of painters tape on each of the short pieces to make a straight edge and then measured 1 cm increments.  I then nailed in each brad at the marked increment.  I chose to use brad nails because they have a small head which seemed like it would make warping the loom, and later removing the warp, easier.

Loom pieces with green tape and small nails in a row along the tape edge
Tape measurements and nailed in warp supports


Tip: Do not nail your nails through the painters tape, nail it NEXT to the painters tape edge. The small space between each nail can make removing any stuck tape a bit tedious. I think I used tweezers at some point because I couldn't fit my finger between the nails.

Close-up of brads nailed into blue wood loom piece
Brads nailed in place


Once the brads were all in place I assembled the 4 loom pieces together, using two screws at each corner. If you only use one screw there is a possibility that the pieces could get 'out of square' with each other, and nobody wants a wonky loom.

Top of loom with white warp threads
Loom top with warp threads


Conclusion

The loom is heavier than if I had used MDF or some sort of thin plywood, but as far as a scrapwood loom that cost $2 and some time it works juuust fine.  Here it is with a test weaving showing that everything is holding together under the warp tension and (light) weight of the weft fibers.

completed blue loom with in-progress weaving on loom
Loom in action


Happy freestyling, or bargain creating if that is where the wind takes you!

Tuesday, May 11, 2021

Mood Mirrored Indigo

The Find

Textiles can be a tricky freestyle find, there is always a question of the lurking unseen microbial presence on whatever fabric has been sitting outside, unattended, for some amount of time.  And of course, things on the curb could always fall victim to a lifted dog leg. But if something is small enough to go STRAIGHT INTO THE WASHING MACHINE upon arrival at home, well, then, I feel pretty good. I've stayed in hotels, how different could it be?  Now that you've read my thoughts on freestyle textile find hygiene, let me tell you about ... a freestyle textile find!

I came across this cool pillow cover (with separate insert) embellished with numerous tiny mirrors, one of a few options in a giveaway box at the end of someone's driveway. So much sewing detail, possibly done by hand - I appreciate such work.  There is no tag on the pillowcase, but the fabric felt like cotton, so I immediately had an idea for a makeover.

White embroidered pillow sitting on ground
Freestyle pillow find on curb


The Makeover

I had an existing dye bath setup from some exploratory home-shibori fun in the color Indigo, and the dye type was one for natural fibers. So after a hot wash in the washing machine, the pillowcase went into the dye bath to sit for a while and (hopefully) absorb as much dye as possible.  Without any fiber information I wasn't sure how the results would look, but as a hedge I let the pillowcase sit in the dye bath for a long time. As in, it sat in the dye bath for multiple weeks. I also decided to order some dye fixative, since my previous shibori experiments had faded quickly without this critical ingredient.  Lesson learned.

Two bottles, one holding dye, one holding color fixative
Ingredients used to dye pillowcase


This is what the mirrored pillowcover looked like when it finally came out, lots of deep indigo color.  But would it hold?

Dark blue wet pillowcase hanging on towel rod
After the dye bath


There were hopeful signs that the dye fixative had done as promised since the color was dark even after rinsing the textile in cold water until the water ran clear.  But the true test is always the washing machine.

Conclusion

The indigo color held up well after a washing machine cycle, so I'm calling it a success.  Here it is, minimally 'styled' on a couch with two other throw pillows (yes, they were free too, the complimentary colors are a coincidence).

Indigo mirrored pillowcase sitting in front of two orange patterned pillowcases on grey couch.
Mirror mirror on the indigo blue pillowcase


Here are two detail shots that highlight the interesting diamond pattern embroidery.

Embroidery detail: angled view


Embroidery detail: front view


Happy freestyling, don't be afraid of a little elbow grease that might be needed to clean something and make it your own!

Tuesday, April 13, 2021

Shades of blue scrapwood table

The Find

I had a bunch of scrapwood not doing much of anything except gathering dust and pollen, so I decide to make a lightweight table for the patio. This was also a convenient and low-commitment way to experiment with a bunch of 99-cent paint samples I had on hand.

Scrapwood in a pile
scrapwood


The Re-use

This project didn't require too many cuts using the jigsaw, but it was more than I would have wanted to do with a handsaw.  The first cut was the large piece of pinkish plywood, cut approximately in half. The second set of cuts were for the legs, made out of various 2x4s. The pieces were assembled with glue and screws, then it was time to paint!

Three-legged table made of scrapwood


The painting was done in a gradient, I wouldn't attempt to call it ombre, but the inspiration was an overhead view of the ocean. The Glidden paint sample colors from lightest to darkest: 

Serene Sea (flat finish)

Cosmopolitan (flat finish)

Blue Oasis (flat finish)

Stunning Sapphire (semi-gloss finish)

Table top painted in four shades of blue from light to dark
Painted table top


Side view of table painted in four shades of blue from light to dark
Painted table, side view


Conclusion

With access to power tools the cutting only took about 10 minutes, the paint was allowed to dry for at least a day, then the top was covered with a coat of water-based polyurethane to improve water resistance.  Now I have a useful table at just the right height to serve as an occasional outdoor desk. Happy freestyling.

Tuesday, March 9, 2021

Y-urn-ing for another lamp makeover? Here's something for that.

The Find

I guess it is lamp season, or lamp discard season, or maybe I just notice lamps because they are functional, easy to fix, and fun to makeover. Either way, here is a story of making over a funny lamp that was designed to look like some sort of aged antique.  It was also sitting on the ground when I found it, which helped with the aged effect.

Lamp, discarded on ground, among leaves.
Lamp, discarded on ground.


The Makeover

After a thorough cleaning, which revealed that the aged crackle look was very much intentional, I was please to discover that the lamp electrical components were working just fine.  I was EVEN MORE PLEASED when a lampshade that I had randomly found (right? because it's lamp season??) a few weeks prior turned out to be a decent fit for the size and shape.

I had it sitting in a corner for a few days while I plotted the makeover. Every day confirmed that the aged crackled-ivory look of the 'vase' part of the lamp just was not cutting it.  It just sat there muttering, "I"m fusty," while I contemplated what color - or colors - to use.  I thought about matte black, matte white, or a dark clay red, but then the image of wedgewood blue plates popped into my head, and I kind of liked it.

Lamp in corner, with new drum shade
Lamp in corner, with new shade


While at the hardware store, considering the spray paint aisle, I realized that if I wanted to use spray paint I would have to wait weeks for the temperature to be warm enough outside. Unacceptable! When the freestyle makeover bug bites it must be dealt with immediately.  So I trundled over to the interior paint section and found the cheapest paint sample on the display shelf - thank you 99cent jars of Glidden. At that price I could experiment!  I found 4 shades of blue on the same sample card and got matte paint samples for each.  Once back to the workbench I started painting little samples to see how the colors really looked, and how they looked against the 'brass' color parts.

Lamp with different blue paint samples painted on
testing the waters...


The color that won out is called SERENE SEA, it was the lightest of the four. In the photo below it is super washed out by the bright lamp I had shining about 6 inches away while painting, and the paint was still wet.

Repainted lamp section in Glidden-brand Serene Sea.
Repainted lamp section in Glidden Serene Sea.


Conclusion

After looking at the lamp for a few days I'm pleased, but not overjoyed, with how it looks.  In an unexpected twist (thank you subconscious?) it coordinates with a different lamp in the room that has a brass body and a blue glass shade.  My plan is to look at it for a while longer and decide if I want to extend the current amount of blue, or paint any of the other lamp body sections.  For now I am very happy with how the paint covered up the original crackled-ivory look and smoothed out the texture a bit.

Post-makeover, blue vase lamp section.
Post-makeover, blue vase lamp


Happy freestyling, revamping, redoing, and all the DIY-ing!

Tuesday, August 4, 2020

Garden of freestyle delights - (another) scrap wood planter and a painting experiment

Upcycled Scrapwood into Painted Planter


When life gives you scrap wood, make scrap wood planters!  That has been my motto lately, and it has been fun to see what can be created out of a few leftovers by making as few cuts as possible.  The picture below is the bottom of the assembled planter while I was completing the last construction step -- drilling drainage holes into it. It's definitely made of leftover pieces, you can see someone else's pencil marks.

Bottom of scrap wood planter with drainage holes being drilled.


For this scrap wood planter I decided to try painting the outside with some really cheap poster paint.  The paint CLEARLY SAYS it is water-soluble, so I did not expect my paintings on the wood to last very long past the next rainstorm. But I was also curious about how much paint would sink into the wood and how long it might persist while living outside in the elements.

Here is the assembled planter before any painting.

Scrap wood planter and poster paint ready to use


I looked for some Art Deco inspiration, in the very loosest sense, and found a butterfly and a lotus - both of which seem like appropriate themes for garden art.  I have near-zero decorative painting skills, but this seemed like a good place to play around and try something new.

Painted Planter Results


I had 6 colors of the poster paint but didn't try to use them all, in this case simple was the goal.  

Below is the first side, painting inspired by an Art Deco jewelry piece I saw online.


Scrap wood planter painted with Art Deco butterfly motif

Below is the side that I painted with a lotus-inspired design. Van Gogh I am not, nor Monet.


Scrap wood planter painted with Art Deco lotus flower motif

Conclusion

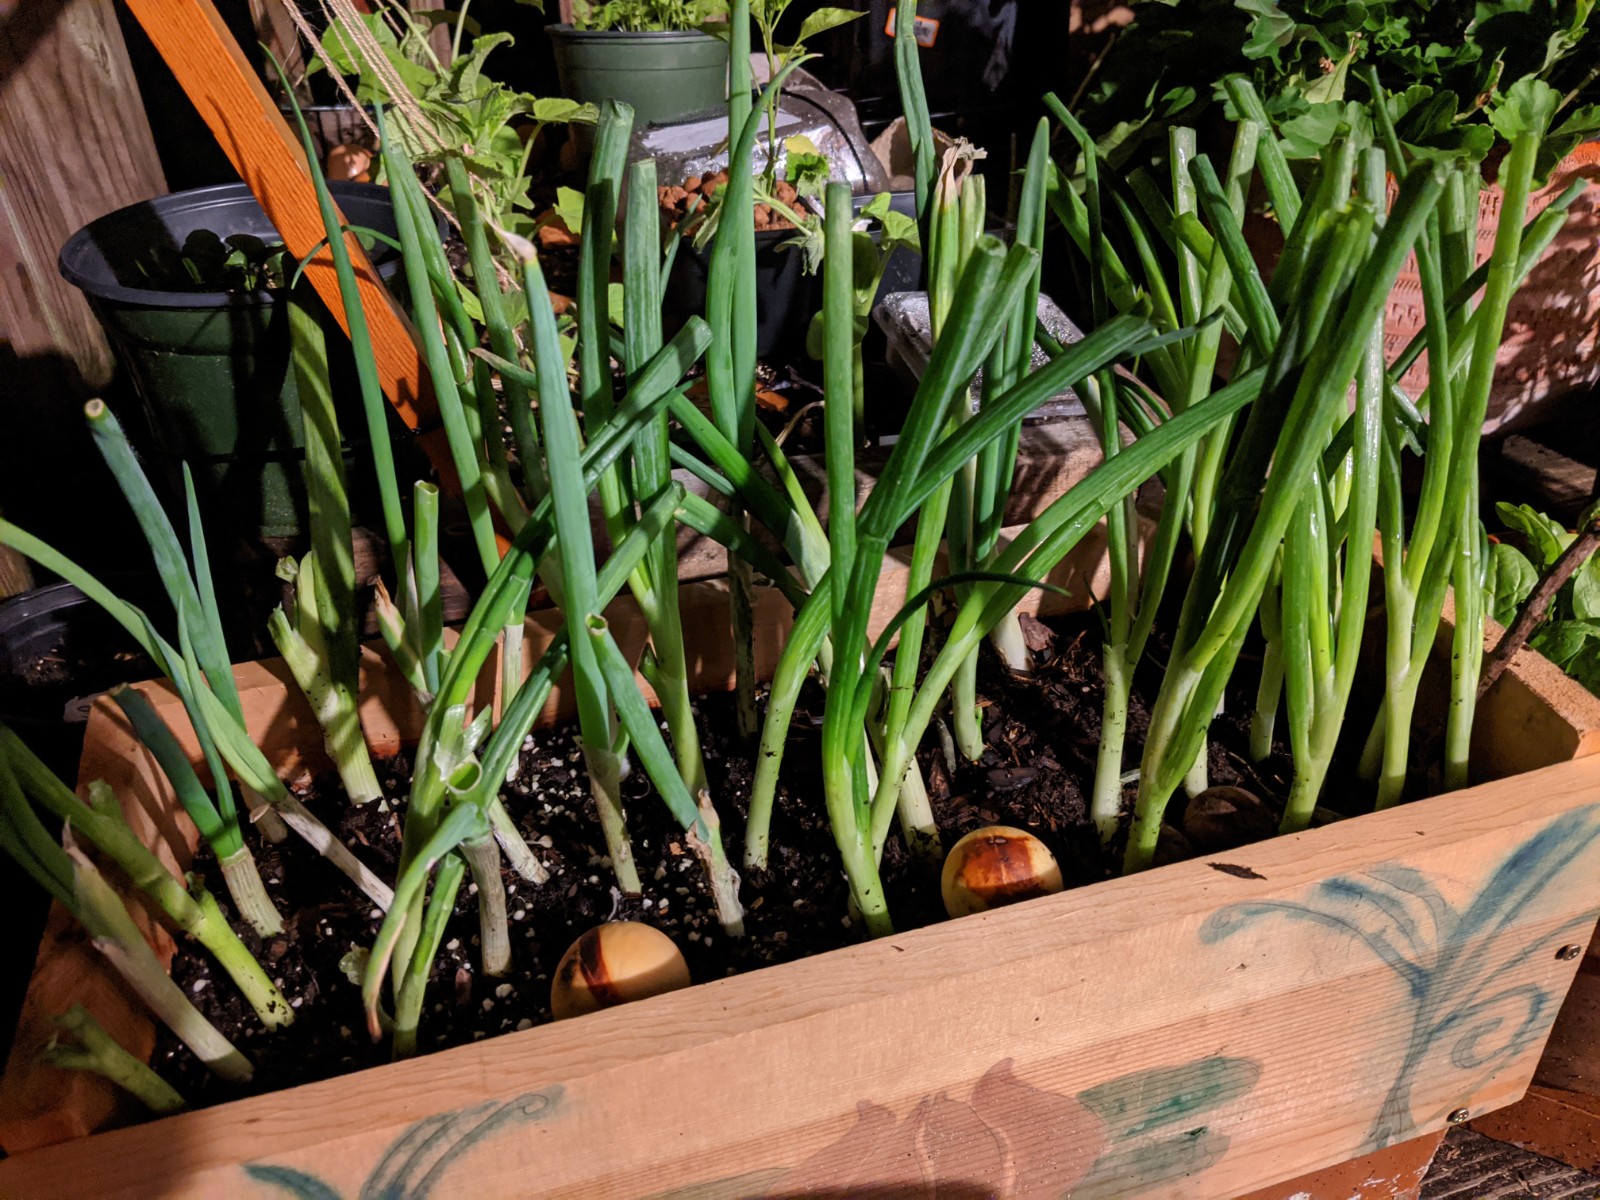
Lucky for this scrap wood planter painting experiment there was a rain event the very same night that I painted this planter and planted it with some scallions. (Yes, those are scallions purchased from the grocery store for 99 cents per bunch that I replanted in the garden.) The photos below shows how much washed away in that first rain event, just hours after the paint had dried.

Scrap wood planter with scallions and faded Art Deco lotus flower motif


Since the paint fades so quickly I wonder if this could be a technique to use if someone wanted to quickly create a 'weathered' look along new wood (it would be someone who had poster paint, but not other traditional aging washes like nails soaked in vinegar).  You could maybe use a mix of white, gray, brown, and black paint applications to mimic varied textures, let it sink into the wood and dry, and then wash the wood.  I have no idea if that would look reasonable or like a decrepit art project from some long-ago children's art attempt. 

This was a fun project, and all for the cost of a few screws and some $2 bottles of poster paint.  

Happy freestyle-garden-ing!


Tuesday, July 24, 2018

2-drawer dresser makeover

I found this small scandi-superstore nightstand/ small chest one night while cruising the discard pile.  Often these particleboard-based furniture pieces don't survive the un-gentle process of being discarded, can you see why?


You might not think there was anything salvageable in that sad pile of broken things, but somehow this little buddy had survived intact.


I thought it would be fun to try painting the outside, and if it all went wrong, well, that is sometimes the price of experimentation with paint.

Since there are many many painting tutorials out there, I'll just say that I sanded a tiny bit, and was patient enough to use primer.  Sanding might have been a mistake since this was particleboard. I used this Zinsser Zero because it said they were zero VOCs, and I was pleased that I couldn't detect any bad odors. I did have to stir a lot to get an even consistency of the primer on the brush, in retrospect the application would have been better with a roller.


I did two coats of primer because my brushwork leaves something to be desired.


I knew that this would also be a chance to use this pair of cool matching drawer pulls that I had in my collection. Yes, I collect hardware even if I don't know where it will be used. Sometimes it is the only thing I can rescue because of time/space/transport limitations. Sigh.  These had lost some shine, but I like the shape.  The desire to use these handles miiiiiight have been the impetus for this entire project, who's to say?


I had to drill holes in the drawers for the new handles, this was also an excuse to use a variety of drill bits. I ended up needing the 1/4", which is the largest in my set, and thus a possible message that I might need a wider range of drill bits.


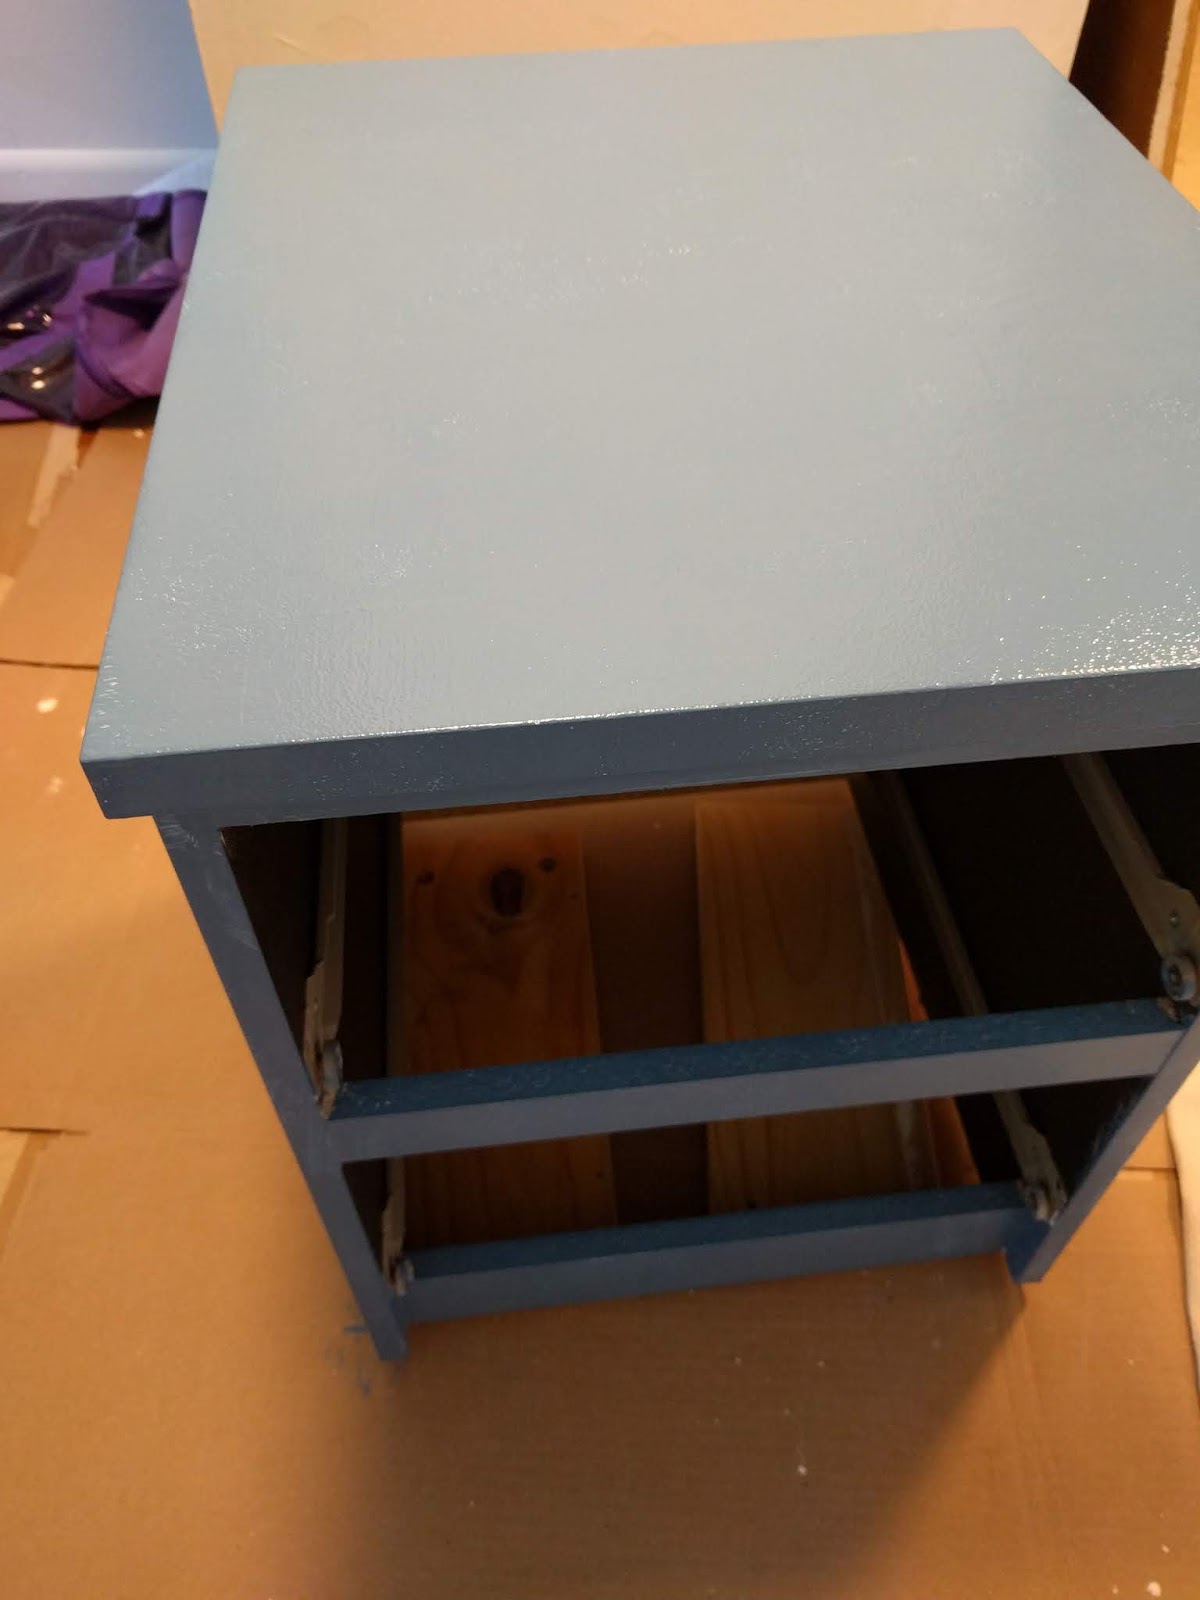
After one coat of Valspar 'Sea Swirl' (applied with a roller) I knew there would need to be a second coat. There were also a few sort of vague bubble-lumps that looked like they had been caused by the top getting wet. Maybe from too much primer?  Not super obvious, but visible in a certain light.  I didn't see anything similar in the drawer fronts or the sides.


After the second coat and the ready to proceed with hardware installation.


Here it is all staged in a corner, not where it will eventually live, but good for the photos.


Love the drawer pulls! They strike me as greek-key inspired.  Perhaps they will get a new shiny metal coating some day.

The total project-specific cost was approx $20, here is the break-down:

Primer, $12 (with plenty left over for future fun)
Paint sample, $5 (approx half a can left)
Drill and bits, already owned
Hardware, $0 ( freecycle salvage)

I had thought about adding some little legs to raise the height, but that would involve adding some wood to make a base. I have scrap wood, so this makeover might just have a sequel. Stay tuned!

Happy freestyling.

Tuesday, June 26, 2018

Reborn in teal (if only we could all do that)

I'm playing a but of catch-up on the postings, but luckily I've been emailing freestyle ideas and photos to myself even though I haven't been sharing them in a timely manner. Bear with me gentle reader, for thy patience shall be rewarded with the brightest of tables.

Do you remember this mix-and-match coffee table found with a warped top? I sanded the top down (very inefficiently as I recall) and painted it white to hide the monstrosity sanding job underneath.


It was a fine coffee table and footrest for many days, but eventually I reached a point where I didn't need the coffee table anymore, probably because I was going to move (again). Such a realization coincided with a friend wanting a low table for her office to hold plants. Perfect.

Recipient Friend wanted colorful, and thus, teal spray paint joined the party.


Not the most even first coat, but that's how things go when working in a new medium.
Eventually we got to a good point, or we ran out of spray paint, by now I don't remember.


Now she lives in glossy teal splendour, with a window view and some plants for healthy decoration. Not a bad reincarnation as table reincarnations go, or so I am told.

Happy freestyling!