Showing posts with label planters. Show all posts

Tuesday, August 4, 2020

Garden of freestyle delights - (another) scrap wood planter and a painting experiment

Upcycled Scrapwood into Painted Planter


When life gives you scrap wood, make scrap wood planters!  That has been my motto lately, and it has been fun to see what can be created out of a few leftovers by making as few cuts as possible.  The picture below is the bottom of the assembled planter while I was completing the last construction step -- drilling drainage holes into it. It's definitely made of leftover pieces, you can see someone else's pencil marks.

Bottom of scrap wood planter with drainage holes being drilled.


For this scrap wood planter I decided to try painting the outside with some really cheap poster paint.  The paint CLEARLY SAYS it is water-soluble, so I did not expect my paintings on the wood to last very long past the next rainstorm. But I was also curious about how much paint would sink into the wood and how long it might persist while living outside in the elements.

Here is the assembled planter before any painting.

Scrap wood planter and poster paint ready to use


I looked for some Art Deco inspiration, in the very loosest sense, and found a butterfly and a lotus - both of which seem like appropriate themes for garden art.  I have near-zero decorative painting skills, but this seemed like a good place to play around and try something new.

Painted Planter Results


I had 6 colors of the poster paint but didn't try to use them all, in this case simple was the goal.  

Below is the first side, painting inspired by an Art Deco jewelry piece I saw online.


Scrap wood planter painted with Art Deco butterfly motif

Below is the side that I painted with a lotus-inspired design. Van Gogh I am not, nor Monet.


Scrap wood planter painted with Art Deco lotus flower motif

Conclusion

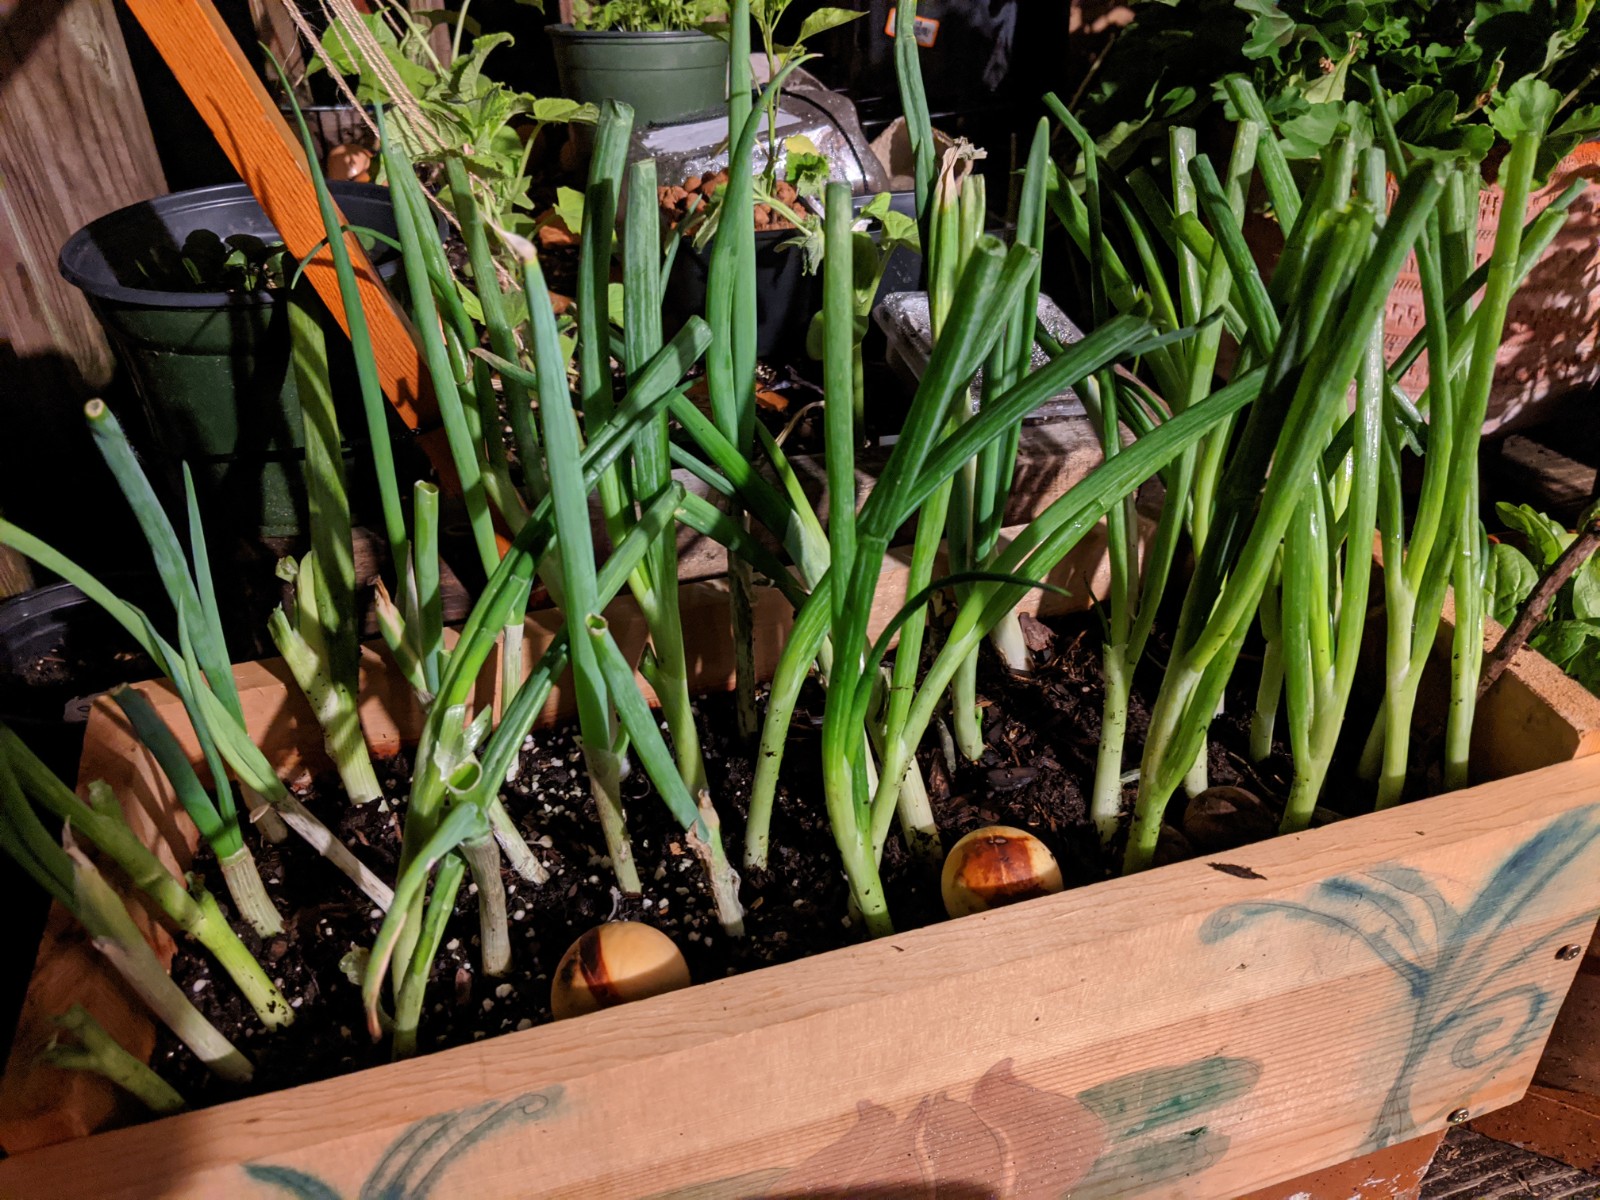
Lucky for this scrap wood planter painting experiment there was a rain event the very same night that I painted this planter and planted it with some scallions. (Yes, those are scallions purchased from the grocery store for 99 cents per bunch that I replanted in the garden.) The photos below shows how much washed away in that first rain event, just hours after the paint had dried.

Scrap wood planter with scallions and faded Art Deco lotus flower motif


Since the paint fades so quickly I wonder if this could be a technique to use if someone wanted to quickly create a 'weathered' look along new wood (it would be someone who had poster paint, but not other traditional aging washes like nails soaked in vinegar).  You could maybe use a mix of white, gray, brown, and black paint applications to mimic varied textures, let it sink into the wood and dry, and then wash the wood.  I have no idea if that would look reasonable or like a decrepit art project from some long-ago children's art attempt. 

This was a fun project, and all for the cost of a few screws and some $2 bottles of poster paint.  

Happy freestyle-garden-ing!


Tuesday, July 21, 2020

Garden of freestyle delights - Scrap wood tomato planter

Garden of freestyle delights

When you see a pile of scrap wood...

Does your mind automatically start calculating how big of a rectangle-ish box you could make? 

Seeing how pieces could be cut up, fit together, drilled through, and screwed into to make yet another thing that can hold dirt?

Well my mind was VERY MUCH in that space this spring when I had the urge to setup a patio garden space and try my hand at growing cherry tomatoes again. It's probably been a decade, but there is never a bad time to return to vegetable gardening!

The wood

There was a pile of wood that was sitting abandoned for a while, which upon closer inspection turned out to be the remnants of a table. Some of the pieces had this lovely dappled silver pattern from the weathering.

Close-up image of weathered wood texture
Close-up of weathered wood


I have no idea if the wood was deliberately stained grey or if that was a reaction from being left outside. Either way, beautiful! 

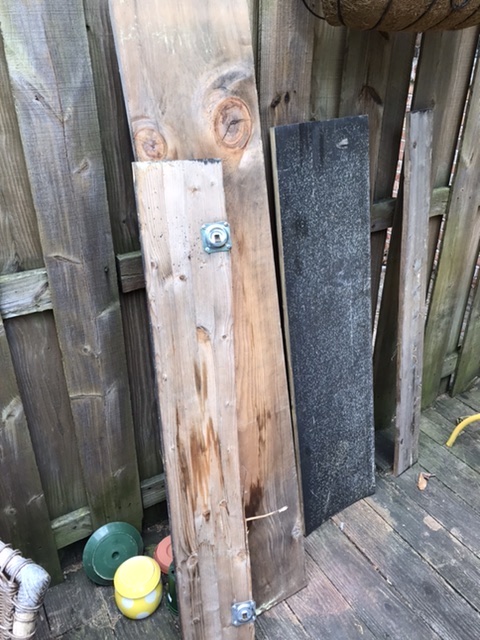
Once we got all the pieces to the workspace the design of the planter started to come together a bit more, but first I had to take some pieces apart.  You can see the metal attachment plates for table legs in the picture below.

Pieces of scrap wood from abandoned table
Scrap wood from abandoned table


Luckily I didn't have to try to pry these off with my bare hands, I had a few tools available at this point. The power drill was essential in deconstructing any unwanted parts and then building the planter with the L-brackets that I bought from the hardware store.


Supplies used to construct the scrap wood planter, saw, drill, brackets
Saw, drill, and L-brackets


The planter

It is much easier to hold pieces in the proper alignment and screw them together with two people, so I'm glad I had a friend to help with this job.  There aren't any pictures of the sawing wood or actually screwing the pieces together with L-brackets, but here is what the basic box looked like when it was done.


Rectangular planter made from scrap wood

In case you are wondering, there is a reason the back wood cross-piece is longer than the front. Aside from trying to minimize the amount of hand-sawing needed for this project I wanted extra space to attached a trellis at some future point since my plan was to grow cherry tomatoes.

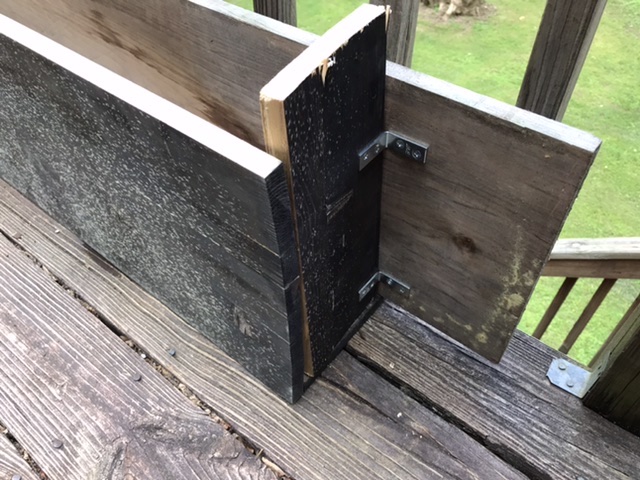
Below is a closeup of the end, you can see the L-brackets are on the outside here, because the inner space was simply too small to fit the drill.  You can also see that the front wood had bowed a bit, which is ok because this is a planter.

Scrap wood planter, short end with visible brackets
Planter end with visible L-brackets


From this top view you can see the L-brackets that were used on the inside of the planter box so that they wouldn't show from the font.  You can also see the drainage holes I drilled in the bottom using the largest available drill bit. Always always always consider the drainage!

Scrap wood planter from above with drainage holes visible
Planter from above with drainage holes visible


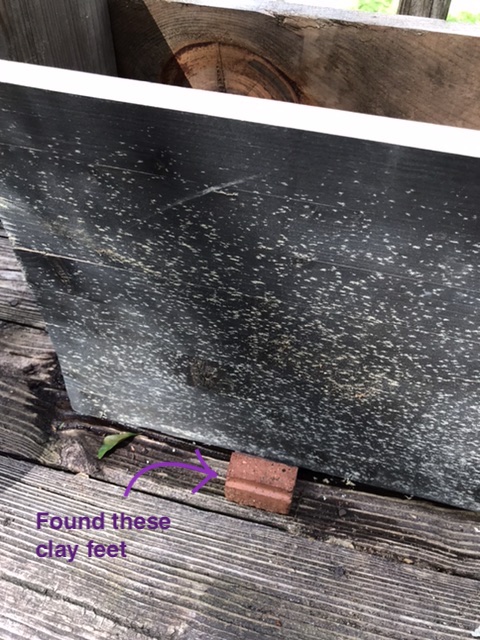
Part of thinking about drainage is looking at where your planter will be sitting. If a planter has drainage holes but is sitting on another surface that traps water then the situation can encourage mold or algae growth.  Similarly, a planter sitting on a wooden surface can trap moisture on top of the wood deck lead to unwanted effects.  So just like drainage, it is also important to consider ventilation and air flow.  In this case I proper up the planter a few inches on some ceramic feet that I had found in a give-away pile.


Scrap wood planter sitting on clay feet for elevation

There were only 3 ceramic feet so I had to space them carefully, but they held up to the weight just fine!  After getting the planter elevated and in the right position all that was left was to fill it with dirt and four tiny tomato seedlings.  For the cherry tomatoes I was limited to what was still available at the hardware store, and ultimately ended up with three 'supersweet 100 hybrid' strains and one 'black cherry tomato' strain.

Scrap wood planter with tomato seedlings


You'll notice in the above picture that there are peppers and rosemary plants attached to the railing above the cherry tomatoes.  I knew while building the tomato planter box that this garden arrangement would have to shift, and eventually I'd need to add a trellis or some sort of support for the tomatoes because I wanted to do string training.  An excellent description of why and how to do string training for tomatoes is available on this website.  Stay tuned for trellis and string-training updates in another post.


Conclusions

Rome wasn't built in a day, your garden doesn't have to be either.  In creating this freestyle garden the goal was to spend as little money (preferably no money) on large heavy objects like planters that won't be making the next move (whenever that happens).  This means keeping an eye out for free scrap wood, free ceramics whether large, medium, or small, and especially free plastic planters (way easier to carry than large pieces of wood).  See the potential!

Happy freestyling!

Tuesday, July 14, 2020

Garden of freestyle delights - metal hay rack planter

The Find

On a perfect spring evening I was out for a neighborhood walk and I can across a freestyle gardener's delight -- a bunch of freebies from someone who was clearly a serious gardener laid out on a lovely sweep of manicured lawn.

Gardening giveaways on trash night
So much potential


Part of me wanted to take it all, the grabby decorator crab part of me.  However, as I only had two hands and was for some silly reason already carrying a water bottle I had to limit myself. Treasure number one was obviously the metal trough (perfect for a fence!).  For treasure number two I was torn between the branch saw and some hedge clippers.  Since I don't have to maintain any trees around here I went with the hedge clippers since they were smaller (although probably heavier).

Metal + Coir = Lovely


These are the treasures after I got them home. There is a LOT of rust on those hedge clippers, which I still haven't cleaned off, but the main hinge still works and the handles are in good shape, so maybe I'll just leave that protective rust layer on the blades until I find I have a need to use them.  Anyway, the metal trough-looking thing is also known as a 'hay rack' or 'hayrack' planter because it looks like what you use to hold hay inside of a horse's stall.

Metal hayrack planter and rusty hedge clippers
Hayrack planter and hedge clippers


My friend was at first skeptical of this particular find (how do you hold the plants?).  But I explained that there were special liners for sale at the local hardware store and that this classic style would look luscious, but not messy, with trailing plants covering up the rusted spots.  So off I went to find a suitable sized liner made of coir (aka coconut fiber).  Lucky for me the local hardware store had one in just the right size.

Coir liner and metal hayrack planter
Planter and liner sitting pretty on a freestyle chair


Conclusion

I didn't want to drill holes through the fence, so instead I used some strong rope to hang the metal part from the top of the fence planks.  Then I placed the coir liner, filled it with potting soil, and added small wave petunia plants in shades of purple. I think the petunias were in 4" pots, I used three or four here.

Metal planter with purple wave petunias
Planted petunias 


Wave petunias are great for their repeated flowering and cascading 'wave' growth pattern, so I expected that it wouldn't take too long for them to grow over the front of the coir liner and soften the edge a bit.

The deep purple color is really lovely, here is a close-up in shot I took using a clip-on macro lens that fits over my cell phone camera.

Purple petunia flower center
Petunia center


Happy freestyling!

Sunday, June 28, 2020

Garden of freestyle delights - Planter for cucumbers

Garden of freestyle delights 

How a scrap wood planter came to be.

The evolution of a patio from a nondescript outdoor space into a garden during this time of quarantine has been a welcome relief. Projects provide purpose. Gardening is known to be therapeutic, and for me, an extra layer of joy is added when the creation of a garden becomes a cross between a freestyle treasure hunt and impulse plant-buying.  In these 'Garden of freestyle delights' posts I'm going to describe different projects that have been part of this garden evolution.
If this space had all been planned - as a whole - from the beginning it would probably look much different and be worthier of Monty Don's approval. As it is, I hope he would appreciate the spirit, the creative reuse, and the adventure of how it has evolved so far. So let's get into it.

It started with finding some free pots set out on recycling night, like these.....


3 gallon black plastic plant pot
Sturdy black plastic pot
Maroon hanging ceramic pot, sitting upside-down
Maroon ceramic hanging pot, upside-down


...and for a while it stayed quite modest.  
A few modest plants hanging out, waiting to see if they would get destroyed by insects, or birds, or the cat. 


Just a few pots on the edge of the patio. 
Nothing special. 
Hardly even noticeable.....


Then I got access to power tools and a whole new world of possibility opened up.
This meant that not only could I use freestyle planters (plastic, ceramic, etc) for gardening, but I could use freestyle scrap wood to MAKE MY OWN PLANTERS!!!!!  

Depending on where you live and the time of year there may or may not be lots of scrap wood out on the sidewalk. But let me tell you, in a warm-weather climate, during a time that coincided with spring cleaning AND a quarantine where people are at home AND beautiful weather for home renovations....
....yeah, there has been a lot of scrap wood out for free.

 If I had a truck to pick it up and a giant lawn I could make raised beds for days. But, as things stand I am mostly only taking what I can carry.  But I digress, let me return to the cucumber box.  I found a slightly rotting wooden table very close to the patio, and convinced a friend to help me move it. In my excitement I didn't take a 'before' picture. But it had two boards across the top, and two rectangles made of 2x4s for legs.


Construction

I realized that I could flip the setup of the existing table, use the table top as a base, and use the leg rectangles - stacked one on top of the other - as the sides for a planter.  I wouldn't even have to make any cuts with my glamorous hand saw.

Here is what the wooden pieces looked like after I removed the legs from the 'table top' pieces and laid them out to see what the planter would look like.  My plan was to secure the rectangles to each other, and secure the lower rectangle to the wooden base pieces using metal L-braces (purchased from a hardware store, using money).


I even saved the screws that I pulled out in case there was a way to reuse them. They were very rusty.


Remember how I mentioned that the table was 'slightly rotting'? Yeah, well, it has clearly been sitting outside for weeks (multiple months?), and there were mushrooms growing in the cracks. 
I took it as a good sign.


Here is the planter box after assembly and placement in the corner of the patio.  If this box were going to be moved often I would add a few more braces and brackets between the different parts, but the current plan is to use this for only one season.


You might notice that the planter box seems to be elevated off the deck. Good eye!  I didn't want the wooden base of the box to be sitting directly on the decking, so I stacked up some pieces of polystyrene to use as 'legs'.  I figured this setup would allow for airflow and better drainage. If polystyrene will last 10,000 years before degrading, then those legs should be able to handle the warm and rainy weather here!


The final step before adding the potting soil was to drill some more drainage holes in the base.  The two flat base pieces already had a slight gap between them from being warped and weathered, but I wanted more drainage. Drainage drainage drainage and no worries about rotting roots.


Since cucumbers are vining plants I wanted to add a trellis. Obviously I did not want to pay for a trellis.  In classic scavenged freestyle beauty fashion I found this pieces that appeared to be an old children's art easel out for the taking. I actually walked by it (along with various other discarded wood pieces) for a few nights before being able to pick it up using a friend's car (separate story there about looking for trellis supplies).  I took apart the V-shaped easel and used one half of it as a trellis base for these cucumber plants. The easel piece was just the right width to fit across the width of the planting box and to sit on top of the little shelf created by the long table-top-turned-planter-bottom pieces.  To give the cucumbers something to climb I added twine strings tied at the top, wrapped around each cross piece on their way down, and tied to another cross-piece of twine at the base. 


Conclusion

There you have it, a freestyle scavenged scrap wood planter box and trellis. The only costs for this project were the L-shaped brackets, the twine, the potting soil, and some small cucumber seedlings -- all from the hardware store.  Check back for other posts about creating a garden on the freap (free+cheap).

Happy freestyling and gardening.

"He that plants trees loves others besides himself."
--Thomas Fuller


Saturday, June 13, 2020

Garden of Freestyle Delights - Hanging Garden Using Leftover Mesh Produce Bags

Mesh of a bag

Single use plastics are generally bad, and yet really hard to avoid.  One specific type of single-use plastic that seems ripe for re-use is the open-weave mesh produce bag. You know the one I'm talking about. They look like discarded fishing gear (big problem, separate topic) but contain something delicious like avocados, oranges, or onions.  To open the bag to get at the delicious delicious food you usually have to cut or rip open the plastic mesh, leading to plastic bag bits everywhere. Then what to do with this meshy mess? Can it avoid immediate transportation to 10,000 years of landfill time?

The idea

At some point a dim dim lightbulb went off in my head and I realized that if these mesh bags were rated to hold 3 or 5 pounds of produce they could also be used to HOLD PLANTS AS HANGING PLANTERS.  So. Obvious.  I just had to see if I could get rid of the labels without destroying the mesh.
Here is an example of what I started with.

Citrus produce bag on yellow chair
Produce bag about to start a new life


Hanging garden of (something that was) eaten

After accumulating a few produce bags (shockingly quickly) I carefully removed the labels. Some brands have large labels that are just a tag on top (nicer for this project), and others like this citrus bag have big colorful plastic labels that are bonded along the whole length of the mesh. I'm sure there is a reason for this related to processing efficiency, but this style was much harder to remove without either leaving little bit of the label on the mesh, or tearing the mesh.  Good thing it was free.  Below is an example of what I ended up with.

 
Plastic mesh bag with label removed
Mesh bag post label removal


I had saved a set of four small hooks from some trash pile (I think they are the kind usually used to hold an over-the-door mirror if I had to guess) and they were the perfect size to fit over the fence cross pieces.  However, you could also use some string or twine to suspend these from a hook. I had some small planters that fit stably into the mesh and hung them up along the fence. Simple as can be.  The cut ends of the mesh were a little messy looking, so I gathered and folded the edges in a bit to make it look neater.  In case you're curious the plants are from left to right: begonia seedling, zinnias growing from seed, begonia seedling, nasturtiums growing from seed. If you're going to use your own mesh produce bags I'd suggest using square plastic containers instead of round ones, because you can poke the corner through the holes in the mesh to help secure the plant pot a little better.  Maybe this only matters if the hanging garden will be subject to gusts of wind. I think the blue bags came from onions, and the orange bags were from citrus purchases.  

Four mesh hanging bags with plants
Hanging garden, no tools required


So that's my first attempt at making a hanging garden out of leftover mesh produce bags. It keeps smaller containers away from foot traffic and adds some plant love to this awkward fence section.

Happy freestyling, and don't be afraid to experiment to make your own scavenged beauty garden setup!

Tuesday, September 6, 2016

Tiny and weathered wooden table

Sometime during the winter months I found a small table and matching chair, clearly patio furniture given the greyed weathered look of them.


I only took the table because the chair, although very solid and clearly well made, was in rougher shape on the surface.  The freestyle not taken, sigh, because sometimes you know you just don't have the space, time, or tools to fix something up.  At least I got a tiny table out of it though.

After floating around in a few spots I realized that the tiny table was a good size for my thrifted silverplate planter that holds a bunch of Haworthia succulents.


So now there is a happy little spot by the window where weathered wood, old silverplate, and plants co-exist in harmony and create a little stair-step effect for one corner of houseplants.


 Happy freestyling.

Tuesday, November 3, 2015

Free planters inspired some NQF gardening fun

yellow and purple mums, rockin' out

Plastic tubs, that is really all they are. Plastic tubs with holes in the bottom, and another plastic tub to catch the water so that everything looks tidy. So simple, so wonderful, and even more so when I found three adobe colored plastic planters on the loading dock in late summer, with the right dimensions for our balcony.  After a little bit of a wash, and a few weeks sitting on the porch (I was busy, it happens) the planters were ready for some action. But what to plant?  Late September is probably too late for edibles, although who knows what the weather will be like throughout autumn.  I was finally struck by the gardening inspiration spirit when I passed a rack of mums at the hardware store.


After two trips to the store, involving 8 mum plants, 10qt of potting soil, then another really heavy bag of potting soil I was well supplied to create my autumn garden.
You can see the mums arranged on the balcony, beautifying the world. 

Happy freestyling, and when life hands you planters, make a garden!

Sunday, May 10, 2015

Assorted small ceramic planters

At the same time as the larger blue and white planter in the last post, I also discovered these smaller ceramic planters.  The larger ones have no drainage holes, while the smaller ones have drainage holes but there were no matching trays to be found when they were sitting forlornly next to the dumpster. This was not a deterrent.


I don't know what plants I'll use, but now that I have more containers I am inspired to take some cuttings and get them started rooting in plain water.  This method has worked well for both pothos and begonia cuttings, sounds too easy, but after a few weeks roots appear.  So far all of the transplants have all survived after moving from their rooting-water bath to regular potting soil.  

The next step is to eat yogurt so I can repurpose the plastic containers as planters by poking holes in the bottom.  Those plastic containers will be the right size for the two larger pots.

Happy planting and freestyling!

Thursday, December 19, 2013

Not Quite Free - a case of the ooh shineeez!

Succulents + Silver = Sigh.

If you’ve read any of my postings since September 2012, you might have picked up on my expanding love affair with succulent plants. Thinking back I’d have to say it really started with the sad aloe plant that I inherited when I moved into the previous apartment.  Poor poor aloe, it sat neglected in a corner for who knows how long, slowly shrinking back towards the soil in the dim light. Not wanting to witness a plant death in slow motion I took responsibility for it and the little dude perked up after being moved to a sunnier spot and eventually repotted. 
  The apartment garden expanded again with the acquisition of a tiny fuzzy plant from a stand at the Harvard Square farmers market.  It expanded again to include a striped zebra plant I stumbled upon in the humid corner of a greenhouse. 


Zebra plant in summer sun

But the succulent container garden craze really took off in September 2012, after I got some from a friend's wedding centerpiece.  As a result I started looking around the web for tips on how to grow succulents, and that led to creative ways to display them in planters.  Enter the silver.  

I'm not the only one to adore this idea of combining succulents in silver containers, I think I actually cooed when I first saw it. 
via multiple sites on the interwebs
I've seen this same image of succulents in old silver champagne glasses here, here, and here.  Google it, you'll see, it is popular.  So whoever thought of it first, kudos, and thanks for sharing it, and thanks for giving me a reason to prowl the thrift stores looking for cheap silver-plate containers.  Back in September 2012 I went to a yard sale, not very common in Cambridge, but I found some silver cups in dire need of a new direction in life.  This where the not-quite-free part comes in, shhhh, they were $1 each.

I couldn't fit any of my existing succulents into the small mouths of these cups, so I got some other plants from the 'terrarium plants' section of Pemberton Farms.  The teensy plant pots had no labels and the one person working there couldn't tell me what they were. Exciting! Mystery plants.

Even after the move to a new city, the silver cups are still serving as planters, shiny shiny tiny planters.  More on that in another post.

Happy not-quite-freestyling.


Tuesday, February 5, 2013

NQF - Vintage ice bucket becomes a planter

[author's note: I thought I published this post earlier, but according to Blogger it was still a draft, so if you have seen it before, well, you know how it ends, if not, read on!]]

Say hello to the NQF.

Not Quite Free, a designation I'll use when there is something oh-so-worth-sharing that involved paying money somehow. Surprising perhaps, but it does happen.


I write this from deep within the throes of my succulent obsession.  Lately I find myself perusing the shelves of Central Square thrift stores with an intense eye for anything tarnished and ornately fashioned.  It can't just be silver, it has to be slightly aged.  It has to be ornamented, with some sort of scrolled, molded, or floral decorative motifs to have the right look I'm after to round out my vision for a shelf of succulents in silverplate planters.......

Behold the ice bucket!!


I thought the substantial depth would allow for a thick gravel layer at the bottom for adequate drainage of the plants.  Am I the first to post about re-using an ice bucket in this way? Probably not.  Did I know what I was doing when I decided to take out the old and crumbly lining/insulation that connected the ceramic insert to the silver? Most definitely no.  After my deconstruction I discovered that the white ceramic insert was just sitting on a rough wooden block to keep it from touching the metal.

I added planting materials (gravel, succulent/cactus potting soil) and my plants - a mix of purchases from a local florist and the Scandinavian superstore (who would have thought?).  Check out the results.


I should note that at first I thought this doohickey was a soup tureen.  It was Creative Roommate who said, "oh, it's an ice bucket, my Aunt ----- had one of those when I was growing up."  Nice.

Project costs
Ice bucket from the Goodwill: ~ $8.99
Plants (from 2 different stores):  ~ $15

While the planter and plants were not quite free, the inspiration certainly was.  Check out some the pictures that inspired me (below) or search for 'succulents and silver' to find your own favorites.
via Pinterest

via Garden Therapy featured on Shelterness

via Antiquechase
I'm impressed with the trophy cup on the left, it adds such nice height variation.

This won't be the last post describing succulents planted in silverplate containers, so stay tuned.
Happy not-quite-freestyling!


Tuesday, November 13, 2012

@Friends' - Blue planter finds a happy new home

Towards the end of summer/early autumn I went on a little plant-gifting and reorganizing spree.  Hoarding is not something I want to do, unless it is with local honey, because honey doesn't go bad, it is delicious, and has reputed antibacterial properties, they use it on turtles at the aquarium that come in with cuts..... Wait, what was I writing about? The awesome power of honey? No, no, plants, plants! Bring it back to earth. Right. In an effort to weed out my collection* I started foisting plants and plant pots on to my willing (or so they seemed) friends under the guise of 'gifts.'

One of these friends, 'Lady K,' was over while I was in the middle of a plant-splitting and re-potting session.  Just to set the scene, any re-potting session usually involves me sitting on the kitchen floor, surrounded by a mini-jungle, dirt in both bags and open piles, planters piled up within arms reach, all the while holding a knife and staring intently at root balls and rhizomes.  It is actually very satisfying, afterwards I feel like a plant surgeon. Lady K, who was there to see her boyfriend, not me, casually mentioned that she was looking to expand her plant collection and before you could say boo! I had wrapped up some Sansevieria trifasciata cuttings, placed them in a large blue pot, and told her how happy they would be to grow under her care.  And I was right, again.  She recently sent me a picture of the plant in its new home.


So be careful what you casually mention in the presence of a freestyler, you just might find yourself the recipient of the perfect item for your home / office / wardrobe, for free!

P.S. Without plants where would be no honey, so make your world a bee-friendly place.

*pun intended