Showing posts with label DIY; garden; gardening; plants; planters; DIY; plastic reuse. Show all posts

Tuesday, July 21, 2020

Garden of freestyle delights - Scrap wood tomato planter

Garden of freestyle delights

When you see a pile of scrap wood...

Does your mind automatically start calculating how big of a rectangle-ish box you could make? 

Seeing how pieces could be cut up, fit together, drilled through, and screwed into to make yet another thing that can hold dirt?

Well my mind was VERY MUCH in that space this spring when I had the urge to setup a patio garden space and try my hand at growing cherry tomatoes again. It's probably been a decade, but there is never a bad time to return to vegetable gardening!

The wood

There was a pile of wood that was sitting abandoned for a while, which upon closer inspection turned out to be the remnants of a table. Some of the pieces had this lovely dappled silver pattern from the weathering.

Close-up image of weathered wood texture
Close-up of weathered wood


I have no idea if the wood was deliberately stained grey or if that was a reaction from being left outside. Either way, beautiful! 

Once we got all the pieces to the workspace the design of the planter started to come together a bit more, but first I had to take some pieces apart.  You can see the metal attachment plates for table legs in the picture below.
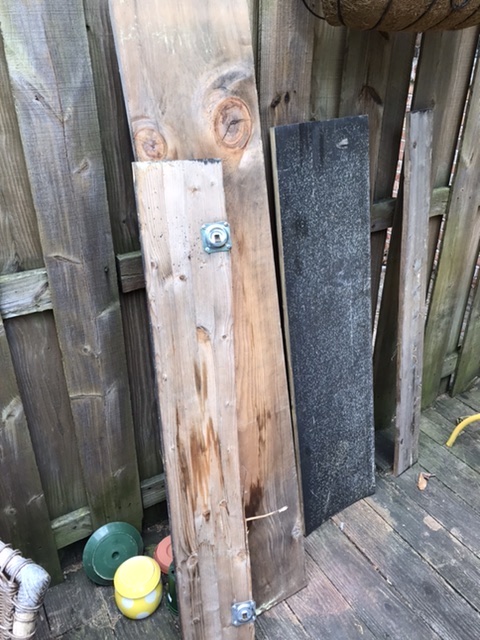
Pieces of scrap wood from abandoned table
Scrap wood from abandoned table


Luckily I didn't have to try to pry these off with my bare hands, I had a few tools available at this point. The power drill was essential in deconstructing any unwanted parts and then building the planter with the L-brackets that I bought from the hardware store.


Supplies used to construct the scrap wood planter, saw, drill, brackets
Saw, drill, and L-brackets


The planter

It is much easier to hold pieces in the proper alignment and screw them together with two people, so I'm glad I had a friend to help with this job.  There aren't any pictures of the sawing wood or actually screwing the pieces together with L-brackets, but here is what the basic box looked like when it was done.


Rectangular planter made from scrap wood

In case you are wondering, there is a reason the back wood cross-piece is longer than the front. Aside from trying to minimize the amount of hand-sawing needed for this project I wanted extra space to attached a trellis at some future point since my plan was to grow cherry tomatoes.

Below is a closeup of the end, you can see the L-brackets are on the outside here, because the inner space was simply too small to fit the drill.  You can also see that the front wood had bowed a bit, which is ok because this is a planter.
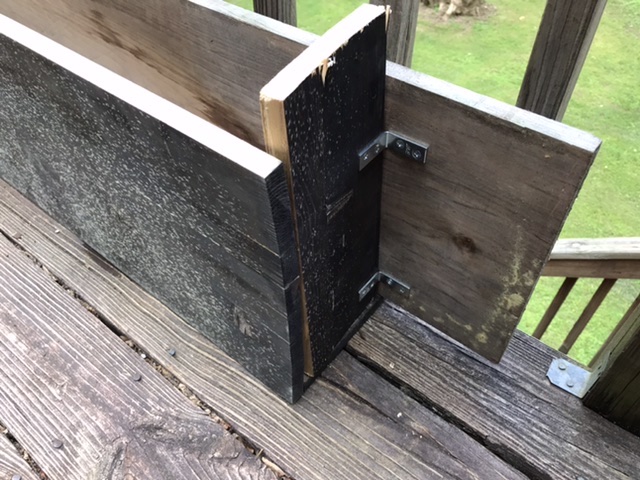
Scrap wood planter, short end with visible brackets
Planter end with visible L-brackets


From this top view you can see the L-brackets that were used on the inside of the planter box so that they wouldn't show from the font.  You can also see the drainage holes I drilled in the bottom using the largest available drill bit. Always always always consider the drainage!

Scrap wood planter from above with drainage holes visible
Planter from above with drainage holes visible


Part of thinking about drainage is looking at where your planter will be sitting. If a planter has drainage holes but is sitting on another surface that traps water then the situation can encourage mold or algae growth.  Similarly, a planter sitting on a wooden surface can trap moisture on top of the wood deck lead to unwanted effects.  So just like drainage, it is also important to consider ventilation and air flow.  In this case I proper up the planter a few inches on some ceramic feet that I had found in a give-away pile.
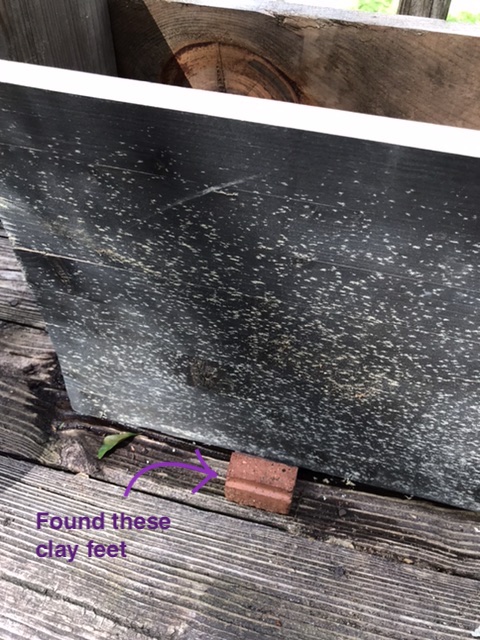

Scrap wood planter sitting on clay feet for elevation

There were only 3 ceramic feet so I had to space them carefully, but they held up to the weight just fine!  After getting the planter elevated and in the right position all that was left was to fill it with dirt and four tiny tomato seedlings.  For the cherry tomatoes I was limited to what was still available at the hardware store, and ultimately ended up with three 'supersweet 100 hybrid' strains and one 'black cherry tomato' strain.

Scrap wood planter with tomato seedlings


You'll notice in the above picture that there are peppers and rosemary plants attached to the railing above the cherry tomatoes.  I knew while building the tomato planter box that this garden arrangement would have to shift, and eventually I'd need to add a trellis or some sort of support for the tomatoes because I wanted to do string training.  An excellent description of why and how to do string training for tomatoes is available on this website.  Stay tuned for trellis and string-training updates in another post.


Conclusions

Rome wasn't built in a day, your garden doesn't have to be either.  In creating this freestyle garden the goal was to spend as little money (preferably no money) on large heavy objects like planters that won't be making the next move (whenever that happens).  This means keeping an eye out for free scrap wood, free ceramics whether largemedium, or small, and especially free plastic planters (way easier to carry than large pieces of wood).  See the potential!

Happy freestyling!

Sunday, June 28, 2020

Garden of freestyle delights - Planter for cucumbers

Garden of freestyle delights 

How a scrap wood planter came to be.

The evolution of a patio from a nondescript outdoor space into a garden during this time of quarantine has been a welcome relief. Projects provide purpose. Gardening is known to be therapeutic, and for me, an extra layer of joy is added when the creation of a garden becomes a cross between a freestyle treasure hunt and impulse plant-buying.  In these 'Garden of freestyle delights' posts I'm going to describe different projects that have been part of this garden evolution.
If this space had all been planned - as a whole - from the beginning it would probably look much different and be worthier of Monty Don's approval. As it is, I hope he would appreciate the spirit, the creative reuse, and the adventure of how it has evolved so far. So let's get into it.

It started with finding some free pots set out on recycling night, like these.....


3 gallon black plastic plant pot
Sturdy black plastic pot
Maroon hanging ceramic pot, sitting upside-down
Maroon ceramic hanging pot, upside-down


...and for a while it stayed quite modest.  
A few modest plants hanging out, waiting to see if they would get destroyed by insects, or birds, or the cat. 


Just a few pots on the edge of the patio. 
Nothing special. 
Hardly even noticeable.....


Then I got access to power tools and a whole new world of possibility opened up.
This meant that not only could I use freestyle planters (plastic, ceramic, etc) for gardening, but I could use freestyle scrap wood to MAKE MY OWN PLANTERS!!!!!  

Depending on where you live and the time of year there may or may not be lots of scrap wood out on the sidewalk. But let me tell you, in a warm-weather climate, during a time that coincided with spring cleaning AND a quarantine where people are at home AND beautiful weather for home renovations....
....yeah, there has been a lot of scrap wood out for free.

 If I had a truck to pick it up and a giant lawn I could make raised beds for days. But, as things stand I am mostly only taking what I can carry.  But I digress, let me return to the cucumber box.  I found a slightly rotting wooden table very close to the patio, and convinced a friend to help me move it. In my excitement I didn't take a 'before' picture. But it had two boards across the top, and two rectangles made of 2x4s for legs.


Construction

I realized that I could flip the setup of the existing table, use the table top as a base, and use the leg rectangles - stacked one on top of the other - as the sides for a planter.  I wouldn't even have to make any cuts with my glamorous hand saw.

Here is what the wooden pieces looked like after I removed the legs from the 'table top' pieces and laid them out to see what the planter would look like.  My plan was to secure the rectangles to each other, and secure the lower rectangle to the wooden base pieces using metal L-braces (purchased from a hardware store, using money).


I even saved the screws that I pulled out in case there was a way to reuse them. They were very rusty.


Remember how I mentioned that the table was 'slightly rotting'? Yeah, well, it has clearly been sitting outside for weeks (multiple months?), and there were mushrooms growing in the cracks. 
I took it as a good sign.


Here is the planter box after assembly and placement in the corner of the patio.  If this box were going to be moved often I would add a few more braces and brackets between the different parts, but the current plan is to use this for only one season.


You might notice that the planter box seems to be elevated off the deck. Good eye!  I didn't want the wooden base of the box to be sitting directly on the decking, so I stacked up some pieces of polystyrene to use as 'legs'.  I figured this setup would allow for airflow and better drainage. If polystyrene will last 10,000 years before degrading, then those legs should be able to handle the warm and rainy weather here!


The final step before adding the potting soil was to drill some more drainage holes in the base.  The two flat base pieces already had a slight gap between them from being warped and weathered, but I wanted more drainage. Drainage drainage drainage and no worries about rotting roots.


Since cucumbers are vining plants I wanted to add a trellis. Obviously I did not want to pay for a trellis.  In classic scavenged freestyle beauty fashion I found this pieces that appeared to be an old children's art easel out for the taking. I actually walked by it (along with various other discarded wood pieces) for a few nights before being able to pick it up using a friend's car (separate story there about looking for trellis supplies).  I took apart the V-shaped easel and used one half of it as a trellis base for these cucumber plants. The easel piece was just the right width to fit across the width of the planting box and to sit on top of the little shelf created by the long table-top-turned-planter-bottom pieces.  To give the cucumbers something to climb I added twine strings tied at the top, wrapped around each cross piece on their way down, and tied to another cross-piece of twine at the base. 


Conclusion

There you have it, a freestyle scavenged scrap wood planter box and trellis. The only costs for this project were the L-shaped brackets, the twine, the potting soil, and some small cucumber seedlings -- all from the hardware store.  Check back for other posts about creating a garden on the freap (free+cheap).

Happy freestyling and gardening.

"He that plants trees loves others besides himself."
--Thomas Fuller


Saturday, June 13, 2020

Garden of Freestyle Delights - Hanging Garden Using Leftover Mesh Produce Bags

Mesh of a bag

Single use plastics are generally bad, and yet really hard to avoid.  One specific type of single-use plastic that seems ripe for re-use is the open-weave mesh produce bag. You know the one I'm talking about. They look like discarded fishing gear (big problem, separate topic) but contain something delicious like avocados, oranges, or onions.  To open the bag to get at the delicious delicious food you usually have to cut or rip open the plastic mesh, leading to plastic bag bits everywhere. Then what to do with this meshy mess? Can it avoid immediate transportation to 10,000 years of landfill time?

The idea

At some point a dim dim lightbulb went off in my head and I realized that if these mesh bags were rated to hold 3 or 5 pounds of produce they could also be used to HOLD PLANTS AS HANGING PLANTERS.  So. Obvious.  I just had to see if I could get rid of the labels without destroying the mesh.
Here is an example of what I started with.

Citrus produce bag on yellow chair
Produce bag about to start a new life


Hanging garden of (something that was) eaten

After accumulating a few produce bags (shockingly quickly) I carefully removed the labels. Some brands have large labels that are just a tag on top (nicer for this project), and others like this citrus bag have big colorful plastic labels that are bonded along the whole length of the mesh. I'm sure there is a reason for this related to processing efficiency, but this style was much harder to remove without either leaving little bit of the label on the mesh, or tearing the mesh.  Good thing it was free.  Below is an example of what I ended up with.

 
Plastic mesh bag with label removed
Mesh bag post label removal


I had saved a set of four small hooks from some trash pile (I think they are the kind usually used to hold an over-the-door mirror if I had to guess) and they were the perfect size to fit over the fence cross pieces.  However, you could also use some string or twine to suspend these from a hook. I had some small planters that fit stably into the mesh and hung them up along the fence. Simple as can be.  The cut ends of the mesh were a little messy looking, so I gathered and folded the edges in a bit to make it look neater.  In case you're curious the plants are from left to right: begonia seedling, zinnias growing from seed, begonia seedling, nasturtiums growing from seed. If you're going to use your own mesh produce bags I'd suggest using square plastic containers instead of round ones, because you can poke the corner through the holes in the mesh to help secure the plant pot a little better.  Maybe this only matters if the hanging garden will be subject to gusts of wind. I think the blue bags came from onions, and the orange bags were from citrus purchases.  

Four mesh hanging bags with plants
Hanging garden, no tools required


So that's my first attempt at making a hanging garden out of leftover mesh produce bags. It keeps smaller containers away from foot traffic and adds some plant love to this awkward fence section.

Happy freestyling, and don't be afraid to experiment to make your own scavenged beauty garden setup!