Showing posts with label planter. Show all posts

Tuesday, July 12, 2022

Easy+lazy planter makeover

Freestyle Find

I found this round tapered vessel, and I think it's either a wastebasket or a planter.  It's wood (I think), which makes me lean towards a decorative wastebasket and not a "real" wastebasket that would be expected to hold wet things.  
close up view of wooden wastebasket with vertical grooves
wooden wastebasket


At any rate, it is the right size and shape for a plant cachepot, so that is what I decided it would be.
I found that the plastic top from a takeout container fit snugly (friction fit) inside the vessel an inch or so above the base.  
View Inside the wastebasket with plastic lid insert
Inside the wastebasket with plastic lid insert


This serves the double purpose of catching water and raising up the functional bottom so that the plastic plant pot that I had would sit closer to the top and be easy to remove.

View Inside the wastebasket with plastic lid and plant pot to test for fit.
View Inside the wastebasket with plastic lid
and plant pot to test for fit.


Makeover

In order to make the greenery of a plant stand out I tend to use light or white cachepots, preferably ceramic, but there are a few plastic and metal ones floating about the place.  It is just easier to keep a consistent look that way.  Every time I'm tempted by some scrumptious talavera pottery, funky hand-thrown vessel with a unique glaze, or just something silly and fun from a discount store it is much easier to say 'no' to a purchase if I have a defined palette of allowable plant pots in the home.  So, in its original 'as found' state, this wastebasket-future-cachepot didn't match with there rest of the container garden. Could I have sanded the outside and revealed the lighter wood? Possibly.  Would that have been closer to the rest of the cachepots? Yes.  But do I like sanding? No.  I also had a paintbrush and samples out as part of an ongoing chair project, so this just seemed like the right time for an easy+lazy planter makeover.
 
I used one coat of this sample paint and applied it with a brush because I wanted to get paint into the small grooves running vertically along the outside.  The paint sample color is 'Light Drizzle' with a satin finish, it is a very pale blue.
Paint sample, Light Drizzle color


The first coat didn't give perfect coverage, but I left it like that..... it's cool because it is distressed. Right?
Not just because I didn't want to paint a second coat?
Outside after one coat of paint


Conclusion

I repotted a rubber plant (yes, that had been free too) into the new plastic planter, and placed it inside the newly painted cachepot.  Success!

Newly painted cachepot and new free rubber plant
Newly painted cachepot and new
(also free) rubber plant


Happy freestyling, and don't overlook the power of paint!


Tuesday, December 8, 2020

Garden of freestyle delights - a round hayrack planter meets some hot pink mini chrysanthemums

The Find

While out and about for a walk I came across this tempting pile of garden giveaways. So neatly stacked up! Can you spot the black metal wire planter in the left stack? I took a few other things too...

Discarded garden supplies


The Fix

The round metal basket was very much in keeping with the style of some other finds and purchases sprinkled through the garden, including the first and second metal hayrack planters I found this summer.

I had to buy a slightly oversized coir insert because the superstore didn't have one that was an exact fit. I figured I could just fold in any excess, and I was right.

Conclusion

Wire metal planter with coir insert and hot pink mums.
Wire metal planter with coir insert and
hot pink mums.


One pot of dark pink mums was just the right size to fit inside of this freestyle find.

Happy freestyling, and don't be afraid to spend a few bucks to make that find beautiful!

Tuesday, October 13, 2020

Garden of freestyle delights - A cracked pot repair

The Find

A while ago I found this pot that was not just cracked, but also had a hole near the top.  

I took it anyway. 

Because free. Because planter. 

Broken unglazed pot sitting on yellow table
Broken unglazed pot


The Fix

In the same way that I fixed this large round pot with large cracks and this glazed green pot with multi-directional cracks, I decided to trust the fix to some 2-part epoxy.  I don't have a special applicator, I just used some small pieces of cardboard to mix the epoxy and then smear it on both sides of the crack.

Broken pot with epoxy applied


After I had applied the epoxy I let it dry and then got ambitious and wanted to scrap off some of the excess.  This caused the disturbed parts to turn white, normally the epoxy will dry clear, so I learned something new there.  Don't disturb the epoxy after it has started to dry!


Broken pot with epoxy dried, sitting on yellow table
Broken pot with disturbed epoxy, dried 


Although the cracks wind around quite a bit of the pot, they can still be hidden by turning the cracked side to the back.

Conclusion

I got some lovely hot pink snapdragons and decided they were the right scale of plant to use in this pot.  In order to prevent dirt from spilling out the hole I partially filled the pot with dirt, then placed a broken piece of pottery (found some months ago) on the inside of the pot, then added some more potting soil and the plant.

Pink snapdragons with repaired pot to be planted into
Snapdragons!


In order to prevent dirt from spilling out the hole I partially filled the pot with dirt, then placed a broken piece of pottery (found some months ago) on the inside of the pot, then added some more potting soil and the plant.

Top view of broken pot with dirt and ceramic shard
Potting soil and hole-blocking ceramic shard


From the side it looks like the broken pottery insert, although not a perfectly flush fit against the inside of the pot, it is blocking the dirt as intended.
Ceramic shard blocking hole in pot, outside view
Ceramic shard blocking hole, outside view


After I finished potting up the snapdragons everything looked great!  I didn't mind a bit of the epoxy showing, none of us are perfect.


Pink snapdragons in a newly repaired pot
Snapdragons in a newly repaired pot


Happy freestyling, don't be afraid to scavenge something and make it beautiful.

Tuesday, October 6, 2020

Garden of freestyle delights - a SECOND metal hayrack planter appears in the night

 The Find

While out for a walk one night I came across a surprising find, a metal hayrack planter (complete with coir liner, dirt, and some plants that looked relatively healthy).  Why was this surprising, at this point I shouldn't be surprised by anything left out on the sidewalk.  At the time it seemed like the garden-related giveaways and clean outs had slowed down, so perhaps that was the reason for surprise. 

Discarded hay rack planter with plants
Discarded hay rack planter

I didn't take it with me right away, but waited until I was on the way back and near the end of my walk. It is always a risk to walk away from something left out for free, but luckily no one had scooped it up while I was finishing taking my exercise.  I decided to get rid of the existing dirt and plants because I knew right away that I would be putting something new and colorful in this planter.  I had found my first metal hay rack planter in early spring and loved the classic style.  I had thought about buying more hay racks but ended up buying two metal baskets because they were the only things in stock when we went to the superstore garden center.  Don't get me wrong, I like the look of the baskets, but in a small space the hay racks are a better fit up against a fence to give maximum plant frontage.

Here is the outer metal-only part of the hay rack planter without the liner. You can see that there are attachments in the back if you want to hang the planter on screws or hooks. I didn't do that, I went an even easier route.

Metal hay rack outer frame with curve design
Metal hay rack outer part


The Hay Rack Makeover

I hung up the planter with some repurposed cording that had previously been used to hang up a set of individual plastic planters arranged in a pleasing geometry.  This bit of fence has seen quite a few different planting arrangements over the summer.  I planted some bright yellow mums to tie into the patio table color and some small Angelonia plants with purple flowers to carry over the purple from the neighboring hay rack planter full of purple petunias.

Metal hay rack planter with yellow mums and purple petunias in front
Hayrack planter with mums, angelonias, and petunias

Conclusion

I love the second hay rack planter, even though the metal frame has a different design from the first one I found.  Not-matching is pretty much par for the course when you get your gardening supplies for free!  I think the $1 yellow mums appeared in my world at just the right time too. I bought 5 pots of yellow mums for $5, and good thing that I did because that offer was gone within a week. 

Here are the two hay racks along the fence.  The original hay rack was planted with purple petunias, some of which are now long enough that I was able to drape them around the edge of the second planter.

Planters with yellow and purple flowers hanging from a wooden fence
The fence in all its planterly glory


Happy freestyling, and always think about donating before discarding!

Tuesday, August 4, 2020

Garden of freestyle delights - (another) scrap wood planter and a painting experiment

Upcycled Scrapwood into Painted Planter


When life gives you scrap wood, make scrap wood planters!  That has been my motto lately, and it has been fun to see what can be created out of a few leftovers by making as few cuts as possible.  The picture below is the bottom of the assembled planter while I was completing the last construction step -- drilling drainage holes into it. It's definitely made of leftover pieces, you can see someone else's pencil marks.

Bottom of scrap wood planter with drainage holes being drilled.


For this scrap wood planter I decided to try painting the outside with some really cheap poster paint.  The paint CLEARLY SAYS it is water-soluble, so I did not expect my paintings on the wood to last very long past the next rainstorm. But I was also curious about how much paint would sink into the wood and how long it might persist while living outside in the elements.

Here is the assembled planter before any painting.

Scrap wood planter and poster paint ready to use


I looked for some Art Deco inspiration, in the very loosest sense, and found a butterfly and a lotus - both of which seem like appropriate themes for garden art.  I have near-zero decorative painting skills, but this seemed like a good place to play around and try something new.

Painted Planter Results


I had 6 colors of the poster paint but didn't try to use them all, in this case simple was the goal.  

Below is the first side, painting inspired by an Art Deco jewelry piece I saw online.


Scrap wood planter painted with Art Deco butterfly motif

Below is the side that I painted with a lotus-inspired design. Van Gogh I am not, nor Monet.


Scrap wood planter painted with Art Deco lotus flower motif

Conclusion

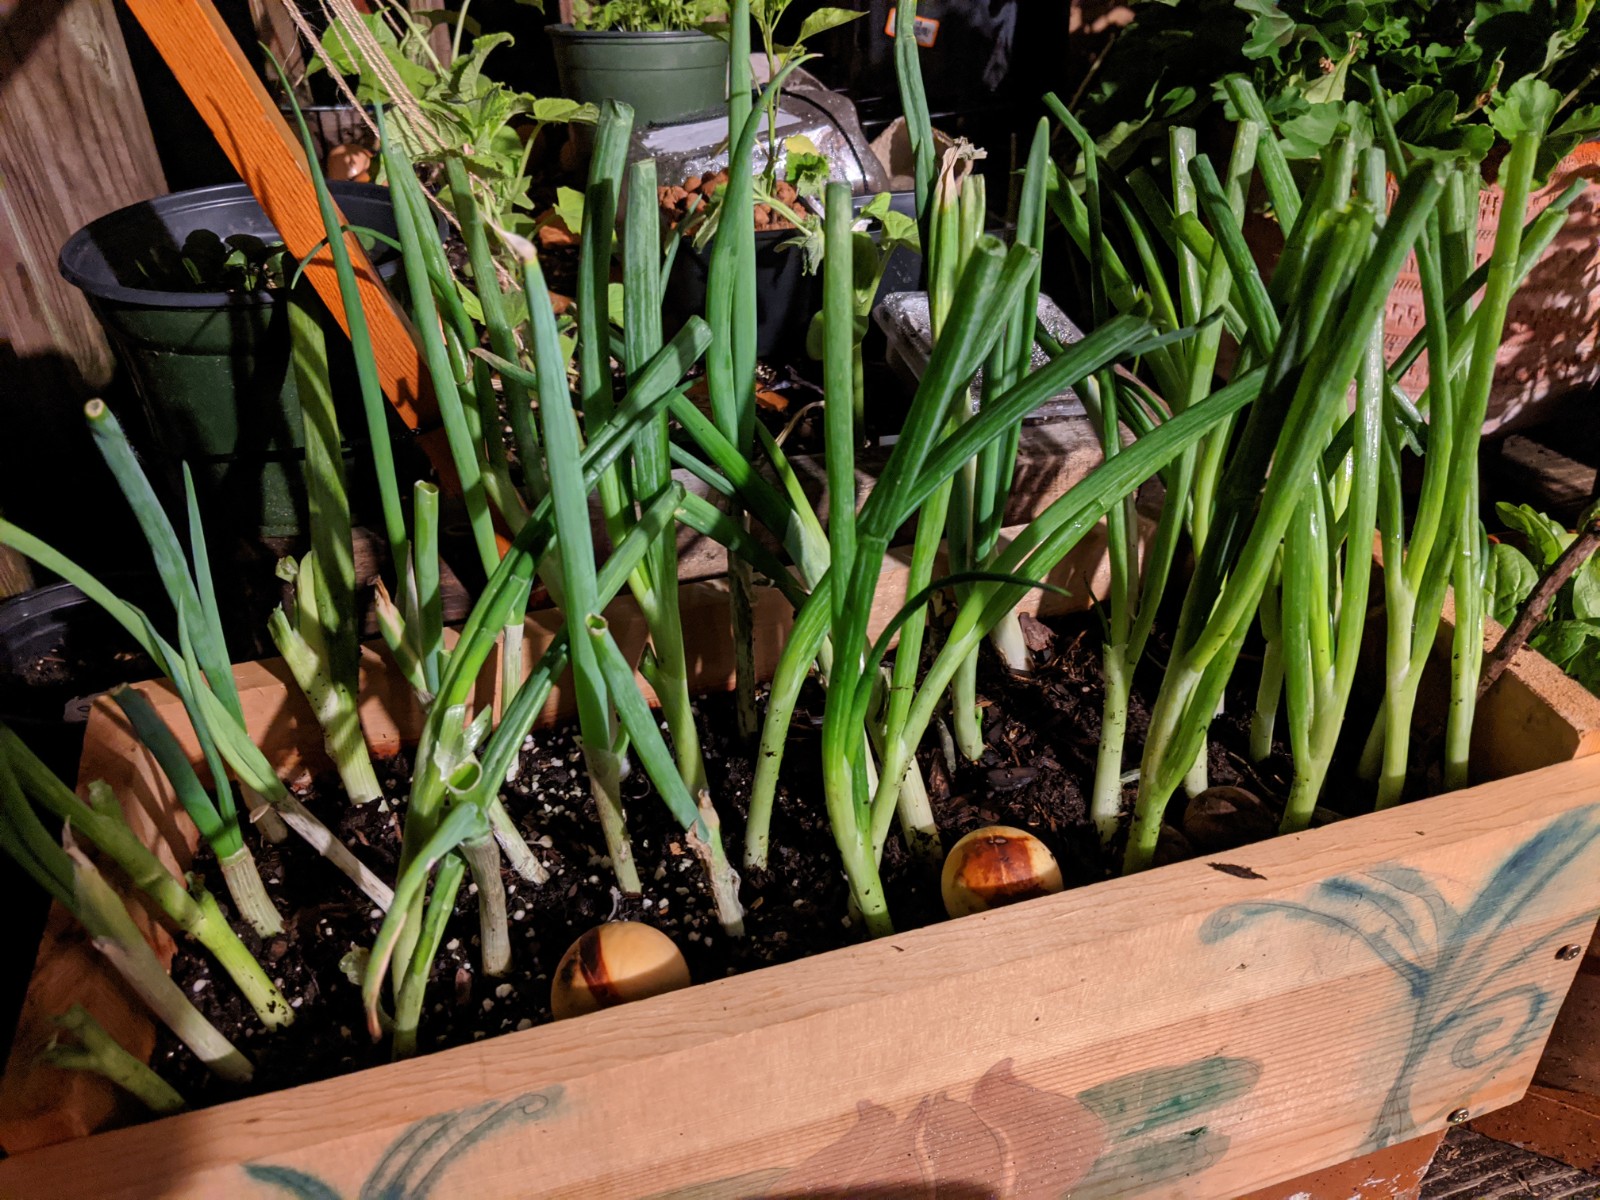
Lucky for this scrap wood planter painting experiment there was a rain event the very same night that I painted this planter and planted it with some scallions. (Yes, those are scallions purchased from the grocery store for 99 cents per bunch that I replanted in the garden.) The photos below shows how much washed away in that first rain event, just hours after the paint had dried.

Scrap wood planter with scallions and faded Art Deco lotus flower motif


Since the paint fades so quickly I wonder if this could be a technique to use if someone wanted to quickly create a 'weathered' look along new wood (it would be someone who had poster paint, but not other traditional aging washes like nails soaked in vinegar).  You could maybe use a mix of white, gray, brown, and black paint applications to mimic varied textures, let it sink into the wood and dry, and then wash the wood.  I have no idea if that would look reasonable or like a decrepit art project from some long-ago children's art attempt. 

This was a fun project, and all for the cost of a few screws and some $2 bottles of poster paint.  

Happy freestyle-garden-ing!


Tuesday, July 21, 2020

Garden of freestyle delights - Scrap wood tomato planter

Garden of freestyle delights

When you see a pile of scrap wood...

Does your mind automatically start calculating how big of a rectangle-ish box you could make? 

Seeing how pieces could be cut up, fit together, drilled through, and screwed into to make yet another thing that can hold dirt?

Well my mind was VERY MUCH in that space this spring when I had the urge to setup a patio garden space and try my hand at growing cherry tomatoes again. It's probably been a decade, but there is never a bad time to return to vegetable gardening!

The wood

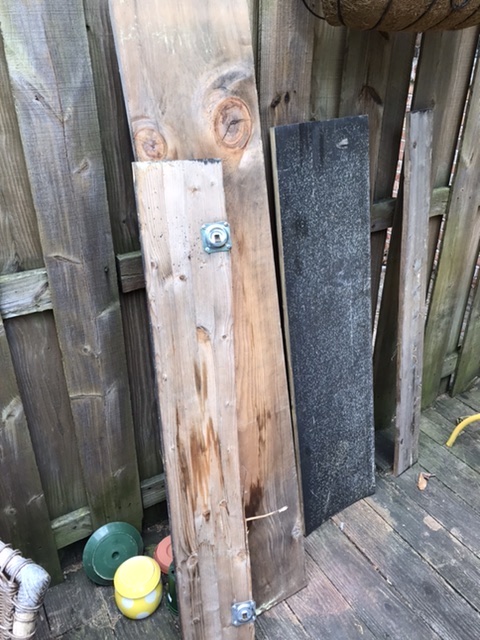
There was a pile of wood that was sitting abandoned for a while, which upon closer inspection turned out to be the remnants of a table. Some of the pieces had this lovely dappled silver pattern from the weathering.

Close-up image of weathered wood texture
Close-up of weathered wood


I have no idea if the wood was deliberately stained grey or if that was a reaction from being left outside. Either way, beautiful! 

Once we got all the pieces to the workspace the design of the planter started to come together a bit more, but first I had to take some pieces apart.  You can see the metal attachment plates for table legs in the picture below.

Pieces of scrap wood from abandoned table
Scrap wood from abandoned table


Luckily I didn't have to try to pry these off with my bare hands, I had a few tools available at this point. The power drill was essential in deconstructing any unwanted parts and then building the planter with the L-brackets that I bought from the hardware store.


Supplies used to construct the scrap wood planter, saw, drill, brackets
Saw, drill, and L-brackets


The planter

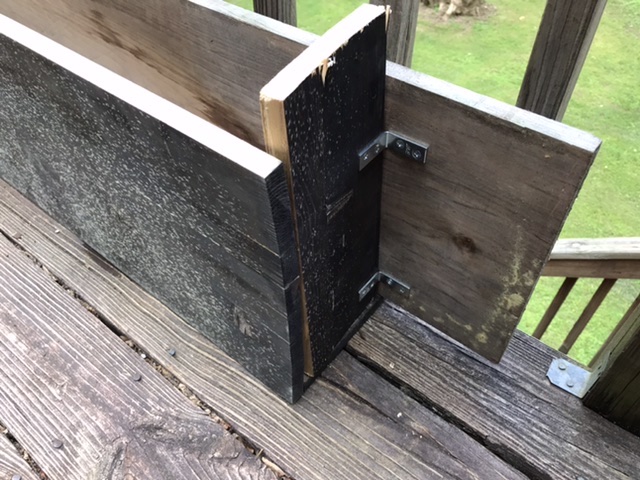
It is much easier to hold pieces in the proper alignment and screw them together with two people, so I'm glad I had a friend to help with this job.  There aren't any pictures of the sawing wood or actually screwing the pieces together with L-brackets, but here is what the basic box looked like when it was done.


Rectangular planter made from scrap wood

In case you are wondering, there is a reason the back wood cross-piece is longer than the front. Aside from trying to minimize the amount of hand-sawing needed for this project I wanted extra space to attached a trellis at some future point since my plan was to grow cherry tomatoes.

Below is a closeup of the end, you can see the L-brackets are on the outside here, because the inner space was simply too small to fit the drill.  You can also see that the front wood had bowed a bit, which is ok because this is a planter.

Scrap wood planter, short end with visible brackets
Planter end with visible L-brackets


From this top view you can see the L-brackets that were used on the inside of the planter box so that they wouldn't show from the font.  You can also see the drainage holes I drilled in the bottom using the largest available drill bit. Always always always consider the drainage!

Scrap wood planter from above with drainage holes visible
Planter from above with drainage holes visible


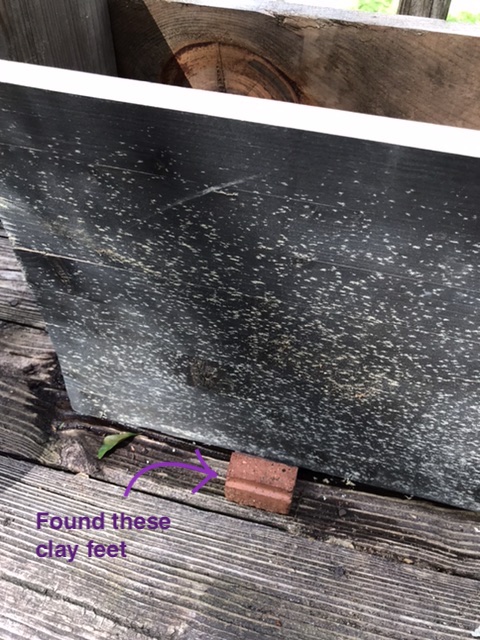
Part of thinking about drainage is looking at where your planter will be sitting. If a planter has drainage holes but is sitting on another surface that traps water then the situation can encourage mold or algae growth.  Similarly, a planter sitting on a wooden surface can trap moisture on top of the wood deck lead to unwanted effects.  So just like drainage, it is also important to consider ventilation and air flow.  In this case I proper up the planter a few inches on some ceramic feet that I had found in a give-away pile.


Scrap wood planter sitting on clay feet for elevation

There were only 3 ceramic feet so I had to space them carefully, but they held up to the weight just fine!  After getting the planter elevated and in the right position all that was left was to fill it with dirt and four tiny tomato seedlings.  For the cherry tomatoes I was limited to what was still available at the hardware store, and ultimately ended up with three 'supersweet 100 hybrid' strains and one 'black cherry tomato' strain.

Scrap wood planter with tomato seedlings


You'll notice in the above picture that there are peppers and rosemary plants attached to the railing above the cherry tomatoes.  I knew while building the tomato planter box that this garden arrangement would have to shift, and eventually I'd need to add a trellis or some sort of support for the tomatoes because I wanted to do string training.  An excellent description of why and how to do string training for tomatoes is available on this website.  Stay tuned for trellis and string-training updates in another post.


Conclusions

Rome wasn't built in a day, your garden doesn't have to be either.  In creating this freestyle garden the goal was to spend as little money (preferably no money) on large heavy objects like planters that won't be making the next move (whenever that happens).  This means keeping an eye out for free scrap wood, free ceramics whether largemedium, or small, and especially free plastic planters (way easier to carry than large pieces of wood).  See the potential!

Happy freestyling!

Tuesday, July 14, 2020

Garden of freestyle delights - metal hay rack planter

The Find

On a perfect spring evening I was out for a neighborhood walk and I can across a freestyle gardener's delight -- a bunch of freebies from someone who was clearly a serious gardener laid out on a lovely sweep of manicured lawn.

Gardening giveaways on trash night
So much potential


Part of me wanted to take it all, the grabby decorator crab part of me.  However, as I only had two hands and was for some silly reason already carrying a water bottle I had to limit myself. Treasure number one was obviously the metal trough (perfect for a fence!).  For treasure number two I was torn between the branch saw and some hedge clippers.  Since I don't have to maintain any trees around here I went with the hedge clippers since they were smaller (although probably heavier).

Metal + Coir = Lovely


These are the treasures after I got them home. There is a LOT of rust on those hedge clippers, which I still haven't cleaned off, but the main hinge still works and the handles are in good shape, so maybe I'll just leave that protective rust layer on the blades until I find I have a need to use them.  Anyway, the metal trough-looking thing is also known as a 'hay rack' or 'hayrack' planter because it looks like what you use to hold hay inside of a horse's stall.

Metal hayrack planter and rusty hedge clippers
Hayrack planter and hedge clippers


My friend was at first skeptical of this particular find (how do you hold the plants?).  But I explained that there were special liners for sale at the local hardware store and that this classic style would look luscious, but not messy, with trailing plants covering up the rusted spots.  So off I went to find a suitable sized liner made of coir (aka coconut fiber).  Lucky for me the local hardware store had one in just the right size.

Coir liner and metal hayrack planter
Planter and liner sitting pretty on a freestyle chair


Conclusion

I didn't want to drill holes through the fence, so instead I used some strong rope to hang the metal part from the top of the fence planks.  Then I placed the coir liner, filled it with potting soil, and added small wave petunia plants in shades of purple. I think the petunias were in 4" pots, I used three or four here.

Metal planter with purple wave petunias
Planted petunias 


Wave petunias are great for their repeated flowering and cascading 'wave' growth pattern, so I expected that it wouldn't take too long for them to grow over the front of the coir liner and soften the edge a bit.

The deep purple color is really lovely, here is a close-up in shot I took using a clip-on macro lens that fits over my cell phone camera.

Purple petunia flower center
Petunia center


Happy freestyling!

Sunday, June 28, 2020

Garden of freestyle delights - Planter for cucumbers

Garden of freestyle delights 

How a scrap wood planter came to be.

The evolution of a patio from a nondescript outdoor space into a garden during this time of quarantine has been a welcome relief. Projects provide purpose. Gardening is known to be therapeutic, and for me, an extra layer of joy is added when the creation of a garden becomes a cross between a freestyle treasure hunt and impulse plant-buying.  In these 'Garden of freestyle delights' posts I'm going to describe different projects that have been part of this garden evolution.
If this space had all been planned - as a whole - from the beginning it would probably look much different and be worthier of Monty Don's approval. As it is, I hope he would appreciate the spirit, the creative reuse, and the adventure of how it has evolved so far. So let's get into it.

It started with finding some free pots set out on recycling night, like these.....


3 gallon black plastic plant pot
Sturdy black plastic pot
Maroon hanging ceramic pot, sitting upside-down
Maroon ceramic hanging pot, upside-down


...and for a while it stayed quite modest.  
A few modest plants hanging out, waiting to see if they would get destroyed by insects, or birds, or the cat. 


Just a few pots on the edge of the patio. 
Nothing special. 
Hardly even noticeable.....


Then I got access to power tools and a whole new world of possibility opened up.
This meant that not only could I use freestyle planters (plastic, ceramic, etc) for gardening, but I could use freestyle scrap wood to MAKE MY OWN PLANTERS!!!!!  

Depending on where you live and the time of year there may or may not be lots of scrap wood out on the sidewalk. But let me tell you, in a warm-weather climate, during a time that coincided with spring cleaning AND a quarantine where people are at home AND beautiful weather for home renovations....
....yeah, there has been a lot of scrap wood out for free.

 If I had a truck to pick it up and a giant lawn I could make raised beds for days. But, as things stand I am mostly only taking what I can carry.  But I digress, let me return to the cucumber box.  I found a slightly rotting wooden table very close to the patio, and convinced a friend to help me move it. In my excitement I didn't take a 'before' picture. But it had two boards across the top, and two rectangles made of 2x4s for legs.


Construction

I realized that I could flip the setup of the existing table, use the table top as a base, and use the leg rectangles - stacked one on top of the other - as the sides for a planter.  I wouldn't even have to make any cuts with my glamorous hand saw.

Here is what the wooden pieces looked like after I removed the legs from the 'table top' pieces and laid them out to see what the planter would look like.  My plan was to secure the rectangles to each other, and secure the lower rectangle to the wooden base pieces using metal L-braces (purchased from a hardware store, using money).


I even saved the screws that I pulled out in case there was a way to reuse them. They were very rusty.


Remember how I mentioned that the table was 'slightly rotting'? Yeah, well, it has clearly been sitting outside for weeks (multiple months?), and there were mushrooms growing in the cracks. 
I took it as a good sign.


Here is the planter box after assembly and placement in the corner of the patio.  If this box were going to be moved often I would add a few more braces and brackets between the different parts, but the current plan is to use this for only one season.


You might notice that the planter box seems to be elevated off the deck. Good eye!  I didn't want the wooden base of the box to be sitting directly on the decking, so I stacked up some pieces of polystyrene to use as 'legs'.  I figured this setup would allow for airflow and better drainage. If polystyrene will last 10,000 years before degrading, then those legs should be able to handle the warm and rainy weather here!


The final step before adding the potting soil was to drill some more drainage holes in the base.  The two flat base pieces already had a slight gap between them from being warped and weathered, but I wanted more drainage. Drainage drainage drainage and no worries about rotting roots.


Since cucumbers are vining plants I wanted to add a trellis. Obviously I did not want to pay for a trellis.  In classic scavenged freestyle beauty fashion I found this pieces that appeared to be an old children's art easel out for the taking. I actually walked by it (along with various other discarded wood pieces) for a few nights before being able to pick it up using a friend's car (separate story there about looking for trellis supplies).  I took apart the V-shaped easel and used one half of it as a trellis base for these cucumber plants. The easel piece was just the right width to fit across the width of the planting box and to sit on top of the little shelf created by the long table-top-turned-planter-bottom pieces.  To give the cucumbers something to climb I added twine strings tied at the top, wrapped around each cross piece on their way down, and tied to another cross-piece of twine at the base. 


Conclusion

There you have it, a freestyle scavenged scrap wood planter box and trellis. The only costs for this project were the L-shaped brackets, the twine, the potting soil, and some small cucumber seedlings -- all from the hardware store.  Check back for other posts about creating a garden on the freap (free+cheap).

Happy freestyling and gardening.

"He that plants trees loves others besides himself."
--Thomas Fuller


Tuesday, May 26, 2020

Patched Pink Patterned Planter

The Find

Thank goodness for people who leave the broken parts with the rest, so that someone could fix it if they wanted. That was the case when I found this large planter with a cool patterned exterior a few weeks ago.

Broken planter, overhead view


Broken planter, side view


I liked the patterns on the outside that reminded me of cuneiform. So even though it was heavy (as large ceramics tend to be), I'm glad I muscled up and carried it home from the neatly arranged trash pile.

The Repair

My friend already had some epoxy on hand.  The brand has worn off the labels, but the epoxy is the kind the is stored in two bottles, you have to mix Part A and Part B together on a mixing surface and apply it within a short amount of time.  So after dry-fitting the broken parts to the main planter I got my gloves on and got to the gluing.  No pictures from the epoxy-application portion because I had to work quickly 

The Results

The epoxy dried clear but still 'wet' looking. The epoxied connections felt quite secure after drying for a few hours.  However, I knew I wasn't going to be attempting to stress the repairs. Whenever I move the planter I pick it up by the main, intact, section. 

Repaired planter with epoxy joints, oblique view


Repaired planter, 3 re-attached pieces, top view


Repaired planter, side view


Conclusion

During a different evening walk I had found a large plastic plant pot in someone's discard pile.  I thought it would be perfect to use as a planter stuck in the corner so the logo wouldn't be visible, or perhaps an insert in a cachepot (although I didn't have one at the time). Really I was just looking for more free dirt-holding containers to use for growing strawberries.  But this it fit perfectly inside this pink pot....
 The pink patterned planter does have a drainage hole in the bottom, but I didn't want dirt pressing directly against the side of the pot and potentially stressing the repaired parts.  **Another** happy coincidence was finding a slightly sad, but large, geranium plant on sale for $2.99.  

Repaired planter with plastic insert and geranium plant


The geranium got repotted into the larger white insert and that got placed inside the newly repaired pink patterned planter.

Geranium in newly repaired planter


Happy Freestyling. Don't be afraid to find your own scavenged beauty.