Showing posts with label disassemble. Show all posts

Tuesday, July 21, 2020

Garden of freestyle delights - Scrap wood tomato planter

Garden of freestyle delights

When you see a pile of scrap wood...

Does your mind automatically start calculating how big of a rectangle-ish box you could make? 

Seeing how pieces could be cut up, fit together, drilled through, and screwed into to make yet another thing that can hold dirt?

Well my mind was VERY MUCH in that space this spring when I had the urge to setup a patio garden space and try my hand at growing cherry tomatoes again. It's probably been a decade, but there is never a bad time to return to vegetable gardening!

The wood

There was a pile of wood that was sitting abandoned for a while, which upon closer inspection turned out to be the remnants of a table. Some of the pieces had this lovely dappled silver pattern from the weathering.

Close-up image of weathered wood texture
Close-up of weathered wood


I have no idea if the wood was deliberately stained grey or if that was a reaction from being left outside. Either way, beautiful! 

Once we got all the pieces to the workspace the design of the planter started to come together a bit more, but first I had to take some pieces apart.  You can see the metal attachment plates for table legs in the picture below.
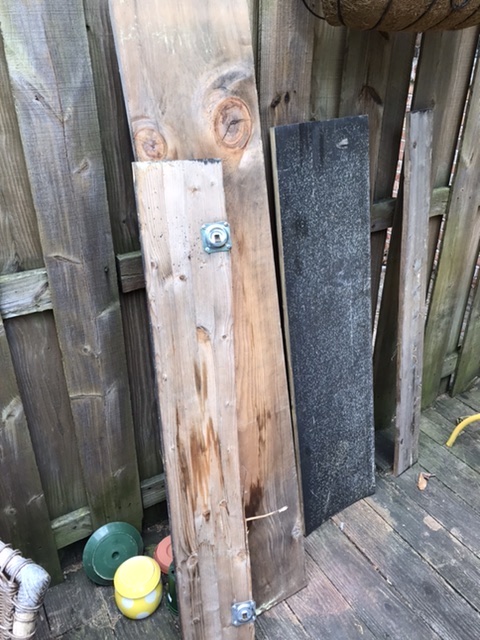
Pieces of scrap wood from abandoned table
Scrap wood from abandoned table


Luckily I didn't have to try to pry these off with my bare hands, I had a few tools available at this point. The power drill was essential in deconstructing any unwanted parts and then building the planter with the L-brackets that I bought from the hardware store.


Supplies used to construct the scrap wood planter, saw, drill, brackets
Saw, drill, and L-brackets


The planter

It is much easier to hold pieces in the proper alignment and screw them together with two people, so I'm glad I had a friend to help with this job.  There aren't any pictures of the sawing wood or actually screwing the pieces together with L-brackets, but here is what the basic box looked like when it was done.


Rectangular planter made from scrap wood

In case you are wondering, there is a reason the back wood cross-piece is longer than the front. Aside from trying to minimize the amount of hand-sawing needed for this project I wanted extra space to attached a trellis at some future point since my plan was to grow cherry tomatoes.

Below is a closeup of the end, you can see the L-brackets are on the outside here, because the inner space was simply too small to fit the drill.  You can also see that the front wood had bowed a bit, which is ok because this is a planter.
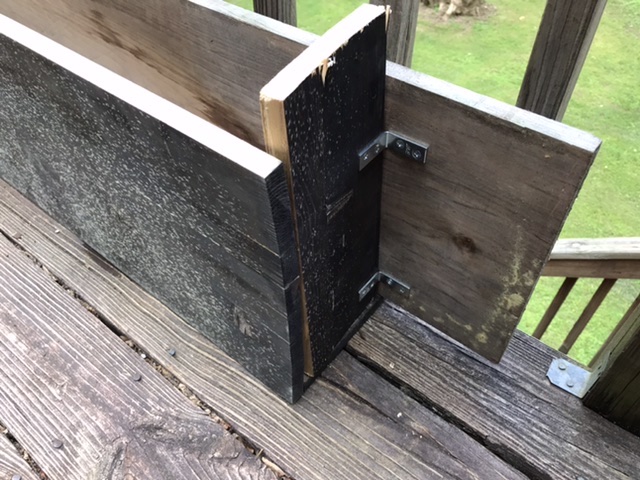
Scrap wood planter, short end with visible brackets
Planter end with visible L-brackets


From this top view you can see the L-brackets that were used on the inside of the planter box so that they wouldn't show from the font.  You can also see the drainage holes I drilled in the bottom using the largest available drill bit. Always always always consider the drainage!

Scrap wood planter from above with drainage holes visible
Planter from above with drainage holes visible


Part of thinking about drainage is looking at where your planter will be sitting. If a planter has drainage holes but is sitting on another surface that traps water then the situation can encourage mold or algae growth.  Similarly, a planter sitting on a wooden surface can trap moisture on top of the wood deck lead to unwanted effects.  So just like drainage, it is also important to consider ventilation and air flow.  In this case I proper up the planter a few inches on some ceramic feet that I had found in a give-away pile.
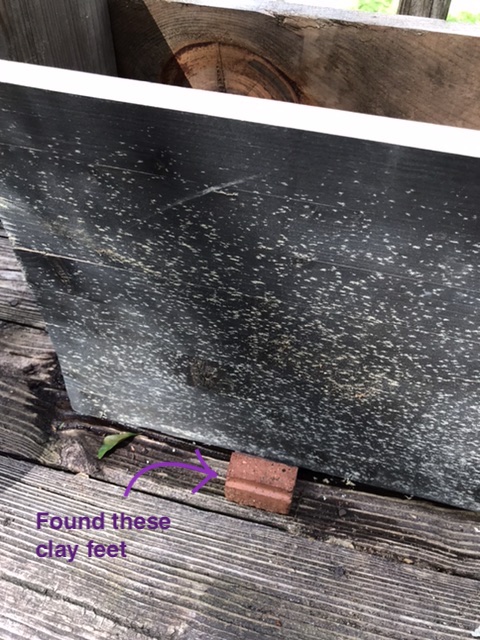

Scrap wood planter sitting on clay feet for elevation

There were only 3 ceramic feet so I had to space them carefully, but they held up to the weight just fine!  After getting the planter elevated and in the right position all that was left was to fill it with dirt and four tiny tomato seedlings.  For the cherry tomatoes I was limited to what was still available at the hardware store, and ultimately ended up with three 'supersweet 100 hybrid' strains and one 'black cherry tomato' strain.

Scrap wood planter with tomato seedlings


You'll notice in the above picture that there are peppers and rosemary plants attached to the railing above the cherry tomatoes.  I knew while building the tomato planter box that this garden arrangement would have to shift, and eventually I'd need to add a trellis or some sort of support for the tomatoes because I wanted to do string training.  An excellent description of why and how to do string training for tomatoes is available on this website.  Stay tuned for trellis and string-training updates in another post.


Conclusions

Rome wasn't built in a day, your garden doesn't have to be either.  In creating this freestyle garden the goal was to spend as little money (preferably no money) on large heavy objects like planters that won't be making the next move (whenever that happens).  This means keeping an eye out for free scrap wood, free ceramics whether large, medium, or small, and especially free plastic planters (way easier to carry than large pieces of wood).  See the potential!

Happy freestyling!

Tuesday, January 21, 2020

Inside of a cheap measuring tape

What to do with a stuck measuring tape? Take it apart!

I found this measuring tape and thought it would be useful. Unfortunately it didn't really work, and by 'didn't really work' I mean it wouldn't retract and wouldn't extend past a few inches.  So I decided to take it apart and see if there was something that could be fixed, and just to see what it looked like inside.


The disassembly started by unscrewing the back screw that also held the belt clip.


A little surprisingly - that one screw was the only thing holding the two halves of the case together.  The black soft plastic case slid off the yellow hard plastic, and the two halves of the yellow plastic just pulled apart.


You can see the measuring tape wound around a central wheel and held under tension with a metal spring.  Unfortunately after taking the whole device apart I wasn't able to fix any part of it, so I gave it to a friend who decided to affix it to a table as a permanent measuring aid.


Conclusion

Be sure to wear eye protection and hand protection if you decide to take apart a measuring tape, or any other device containing metal under tension.  The edge of the measuring tape is really sharp and can cut you if it snaps or releases from tension.

Happy freestyling, and if you can't repair something and decide to take it apart - do so while wearing the proper personal protective equipment. 

Thursday, September 6, 2012

September Celebration of Succulents, continued

You might remember the fabulous wedding centerpiece I showed in the previous post, if not, here it is again.
It took a while to deconstruct this lovely arrangement, but my hope is that the extracted plants will take root in Cambridge and live happily throughout our apartment.  I didn't take any pictures of the deconstruction, but it did take long enough for someone to make cookies, someone else to make gazpacho (both from scratch), and it continued on after the lunch break. whew!

What was involved in all of this? (approximately)
1. Remove the twigs, flowers, and ivy (all the stuff that was easy to pull out)
2. Discover that some of the moss and succulents were glued together, pull them apart gently
3. Rinse out the metal tray and plastic liner, for future use
4. Delicately cut the foam adhesive away from the base of the succulents
5. Make tiny cuts at the base of the succulents, roll in rooting powder
6. Find/decide on planter pots for the re-potting process
7. Put dirt into pots, then plants into dirt (without brushing off the rooting powder)

The end result looks wonderful, I just hope they thrive!

Beauteous variety
 Can you spot the freestyle planters in the photo above? 
The adobe rectangle, the teensy pink & white bowl, and the owls!
The orange bowl and the black bowl are spare plastic cereal bowls from the apartment.

Moss, just moss


 I found the off-white ceramic bowl (above) at the DPW.  Right away I knew I wanted to start a succulents garden, I just hadn't gotten to the plant nursery- good thing I waited.  It was the perfect size for these little beauties.

Rock garden, in a groovy rectangle planter

Piling on the freestyle
Keen-eyed readers might notice that the demi-lune style table against the green wall in our living room was also a summer street find. Freestyle x2.

What a super (succulent) September this has been so far. I can't wait to see what else turns up.

Monday, September 3, 2012

The Start of Some Succulent Love

Weddings are a celebration of love and friendship, and although a small wedding favor gift-to-guests is common I don't usually think of weddings as potential sites for freestyle ingredients.  Maybe some of you have gone home with a lovely cut-flower centerpiece arrangement in the past?  Well, at the ceremony of two dear friends over this past labor day weekend I saw something new-to-me in terms of wedding floral design, a succulent themed flower scheme.  The bride had epiphytes (aka "air plants") in her hair, and all the bouquets were made out of small rosette-type succulents.
Bridal Hair Greenery!
When I was complimenting the bride on the absolute coolness of this idea, she told me to take one when I left.  So thanks to K&F for having part of their wedding transformed into a Cambridge Freestyle first!
Behold my awesomeness!

Ok, the sharp-eyed among you might note that there are a few non-succulents in the mix; e.g. calla lily, yellow orchid, ivy, some other leafy stems I can't identify, and mosses! Such beautiful mosses.  While I didn't want to deconstruct such striking centerpiece the plant-grower in me wanted to get those succulents out of the florist foam and into the dirt.  We'll get to those in the next posting....for now you'll just have to enjoy the vase arrangements that Creative Roommate put together with the pieces I couldn't replant.

A small vase to brighten up a desk.....

A lovely reminder of K & F to grace our kitchen table.
Here's to you K&F: wishing you life, love, and freestyle!

Tuesday, July 3, 2012

Flimsy Frame Find Fabulous Fish

Found: super flimsy frame from Scandinavian superstore.  

Location: Our our own street! Thanks to a friend for calling this one in as soon as he saw it. Yes, I WOULD want to go check out that pile of stuff on the sidewalk, right now!

Made of: cardboard 'backing,' thin flexible plastic front, and mystery materials (MDF?) frame with small flat metal points sticking out of the frame to hold it all together.  I would not recommend anyone buy this type of product, the metal parts fall out during normal handling, but since it was free.....


How did we freestyle it?
1. I cleaned off the frame and left it to dry.
2. Roommate trimmed this piece of goldfish-print decorative paper I had on hand. 
    (I heart Papersource, and I'm not afraid - or paid - to say it!)
3. Roommate re-assembled frame, and wrestled with it while trying to hang it on the wall.  She eventually managed to hang the frame, and get it to stay on the wall, by inserting the nail on the wall into the tiny gap between frame and cardboard backing.  Clever.


It might be a bit askew, or I could have been leaning when I took the picture....

Thursday, June 21, 2012

Freestyle Shoebag from Canvas Shelving

A long time ago, in a land far away, I found some hanging canvas shelves on the sidewalk (and then promptly washed them once they got home). We're talking years ago here. I've used bits and pieces for other projects, but lately I've gotten tired of looking at the old plastic bag I store these remnants in.  So I asked my roommates, what would be useful to you that I could make out of canvas that is already in these odd sack-like shapes?
Answer: A bag for shoes! Something to throw in a backpack, sturdier than a plastic bag, and washable, but not important enough that it matters if it gets dirty/lost/ripped.
Shoelaces from shoes on their way to the donation center. 
To be repurposed!
I decided on a drawstring top bag. There are openings for strings at opposite ends. Since the recipient usually travels via bicycle I made the shoelaces/drawstrings long enough that they could be used to tie this simple freestyle canvas bag to the outside of a backpack if need be. 
Large enough to hold a pair of men's sport shoes.
Partially closed bag.
 
There were some random seams required because of the deconstruction-reconstruction process, I used a contrasting color thread just for kicks.  Any other suggestions for how to freestyle these fabric remnants?  An apartment only needs so many shoe bags.


Saturday, April 7, 2012

Futon, reborn like a phoenix....Fhutonix?

The Futon, long ago.
This apartment has seen its fair share of inhabitants, and as so often happens, people leave stuff behind when they move away.  You don't always have to leave your house to get free stuff!  This was the case with The Futon.  Now, to be clear, The Futon was not so comfortable or beautiful, but it had a could-be-considered-nice-ish wooden frame, was already in the apartment, and in a pinch it could host an overnight guest, an early Saturday afternoon nap, or a few Masterpiece Theater viewers. Did I mention it was free?  We tried to cover it up as much as possible to maximize the comfort factor.  Eventually the day came when The Futon was no longer needed, a newer couch was its way, but what to do with the frame?  It was not nice enough to sell (having already been repaired), and Cambridge is awash in used futon frames anyway. Putting it in the trash was clearly not very freestyle....

 Illustrated below, poorly, is how I saw The Futon frame.

Rough diagram of the frame. (End-pieces are shown in gray for diagrammatic purposes only)


All those nice finished wooden pieces just waiting to be turned into something new.
 It was fun to use power tools to undo the screws holding the various pieces together, but then what?  I had a pile of wooden pieces (each ~23.5 inches long, 1.75 inches wide, and 7/8 in thick, with a hole 1/4 inch from each end, some with webbing still attached) and a vague idea of building a small bookshelf or side table- but without the use of a saw.  When a new, minimalist, roommate moved in she decided to freestyle the pieces into wall art.

Installation #1

Installation #2
I think the varying tones of the wooden pieces work to bring some warmth against the blue wall.

If anyone out there can come up with a design for a shelf or end table, using only pieces with the measurements described above, I'd love to freestyle it, there are still some leftover futon pieces!