Showing posts with label cachepot. Show all posts

Tuesday, April 4, 2023

Beehivey Ribbed Planter Makeover

The Freestyle Find

Those who (successfully) garden indoors eventually face the dilemma of plants that outgrow their pots.  At first the solution is obvious, just get a bigger pot, and for pots below the 6-7-inch diameter range this usually isn't too expensive.  The Swedish superstore has a wide variety, and I'm an owner of various sizes of PAPAJA and MUSKOT-series plant pots.  However, larger and larger ceramics also get heavier and heavier (especially when filled with associated plant material) so at some point it makes weight-sense to switch to some type of plastic outer pot. The problem I have is that lots of plastic pots are ugly and so very plastic-looking and more expensive than the $0 I want to spend on plastic.  Lucky for me I came across this planter that was free, large, and interestingly-shaped-but-ugly-color and thus was crying out for a makeover.  I washed it in the tub and after it dried I got to work painting, and oops I forgot to take a full-size 'before' picture.

Pea green plastic planter close-up view


The Makeover

I knew right away that the makeover for this plastic cachepot would be simple and quick, transform the stained pea-green exterior with some matte white paint so that the planter would blend in with my existing collection.  This process started with some primer (this gallon of primer just keeps on giving, I've been using it for 5 years now).....

Pea green plastic planter halfway covered with white primer
In-progress, applying primer to plastic


....and the process continued with some **free** paint+primer in the form of a quarter-full can that I received from a neighbor, the color was Behr Ultra Pure White 2050 in Interior Eggshell Enamel. I'm wasn't sure what sort of sheen 'eggshell enamel' would have, because eggshell sounds 'not-shiny' and enamel sounds 'shiny'.  All coatings were applied with a low quality chip brush.

Behr Paint-plus-primer product can, color Ultra Pure White, in front of the painted planter
Paint can in front of the painted planter


Conclusion

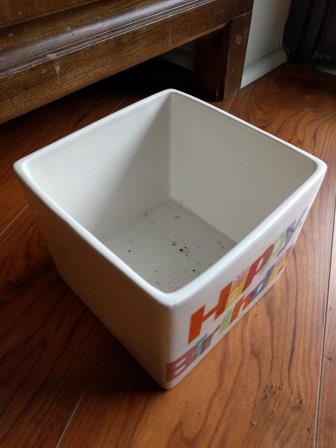
The final result of the multiple coats was a lovely matte white color that shows off the cool ribbed texture while serving as a backdrop for a tall dark green Sansevieria plant (aka Snake Plant).  This might not be the last plastic cachepot that gets this paint treatment.


Close-up of Sansevieria plant in ribbed white plastic planter
A closer view of the painted planter.


Below is a full-length view of the Sansevieria in its new home.  The contrast of the bulbous beehive-shape planter with the strong vertical lines of the plant is just what I was hoping for.

Sansevieria plant in ribbed white plastic planter
Sansevieria plant in a new home.


Happy freestyling, if the item is free why not paint it?  Give it a go.

Tuesday, July 12, 2022

Easy+lazy planter makeover

Freestyle Find

I found this round tapered vessel, and I think it's either a wastebasket or a planter.  It's wood (I think), which makes me lean towards a decorative wastebasket and not a "real" wastebasket that would be expected to hold wet things.  
close up view of wooden wastebasket with vertical grooves
wooden wastebasket


At any rate, it is the right size and shape for a plant cachepot, so that is what I decided it would be.
I found that the plastic top from a takeout container fit snugly (friction fit) inside the vessel an inch or so above the base.  
View Inside the wastebasket with plastic lid insert
Inside the wastebasket with plastic lid insert


This serves the double purpose of catching water and raising up the functional bottom so that the plastic plant pot that I had would sit closer to the top and be easy to remove.

View Inside the wastebasket with plastic lid and plant pot to test for fit.
View Inside the wastebasket with plastic lid
and plant pot to test for fit.


Makeover

In order to make the greenery of a plant stand out I tend to use light or white cachepots, preferably ceramic, but there are a few plastic and metal ones floating about the place.  It is just easier to keep a consistent look that way.  Every time I'm tempted by some scrumptious talavera pottery, funky hand-thrown vessel with a unique glaze, or just something silly and fun from a discount store it is much easier to say 'no' to a purchase if I have a defined palette of allowable plant pots in the home.  So, in its original 'as found' state, this wastebasket-future-cachepot didn't match with there rest of the container garden. Could I have sanded the outside and revealed the lighter wood? Possibly.  Would that have been closer to the rest of the cachepots? Yes.  But do I like sanding? No.  I also had a paintbrush and samples out as part of an ongoing chair project, so this just seemed like the right time for an easy+lazy planter makeover.
 
I used one coat of this sample paint and applied it with a brush because I wanted to get paint into the small grooves running vertically along the outside.  The paint sample color is 'Light Drizzle' with a satin finish, it is a very pale blue.
Paint sample, Light Drizzle color


The first coat didn't give perfect coverage, but I left it like that..... it's cool because it is distressed. Right?
Not just because I didn't want to paint a second coat?
Outside after one coat of paint


Conclusion

I repotted a rubber plant (yes, that had been free too) into the new plastic planter, and placed it inside the newly painted cachepot.  Success!

Newly painted cachepot and new free rubber plant
Newly painted cachepot and new
(also free) rubber plant


Happy freestyling, and don't overlook the power of paint!


Monday, May 11, 2020

Foxy green ceramic gets epoxy clean dynamic

The Scene

While out on an evening walk I cam across a house that was doing some proper spring cleaning. They had placed some once-lovely broken pottery out on the curbside.  One particular green pot had both vertical and horizontal cracks, but surprisingly no large pieces had fallen away. It took me two trips to carry two broken pots home (more on that second pot later), but oh such satisfying repairs!

Green glazed planter with large crack visible
Found planter with old dirt and some volunteer sprouts


The Fix

Using some epoxy that my friend already had on hand I decided to see if this pot could be repaired. First I dug out the dirt that was dried up in the pot. Then I ran water over all the cracks, from the inside and from the outside, to try to wash away as much dirt as possible. Although the cracks made it seem like the pieces should come apart, they would not, so I listed to the pot and just rinsed away what I could. Then I let the pot dry in the sunshine.

I don't have photos from the epoxy application because I had gloves on and had to work quickly. Since I could not really move the pieces of the pot that had separated, I decided to try to over-fill the cracks with epoxy to get as much coverage as possible.  

Outside of ceramic pot with epoxy repair on cracks
Outside of pot, with epoxy


View inside a ceramic pot with epoxy repair along a crack
Inside the repair


Conclusion

The (slightly messy) epoxy repair worked! The cracks were on one side of the pot, so now that the structure of the pot is stable I simply turn the cracked side to the back. Now this discarded pot has a new life as a home for some fragrant rosemary in the (slowly expanding) container garden.  So don't be afraid to repair broken pottery, a little wear and tear can tell an interesting story.  Here is the pot on its first night of its new life.

Green ceramic pot with rosemary plant
Ready for rosemary


Happy freestyling!

Tuesday, January 14, 2020

Woodsy cachepot makeover

Always take the ceramic cachepot

A few types of freestyle items are almost ALWAYS useful.  These almost-always-useful items include metal wire shelving (preferably with shelf clips), picture frames with front glazing intact, and ceramic cachepots and planters (cachepots do NOT have a drainage hole in the bottom, planters generally do have a drainage hole, but sometimes the words are used interchangeably just for extra uncertainty).  I say that cachepots and planters are almost-always-useful items because I do a lot of container gardening, and having spare pots makes it easy to split plants and give them away.  So when I saw this intact ceramic cachepot, you can guess what my reaction was.....take it!


Ceramic cachepot with wood texture and bird detail
Woodsy ceramic cachepot


Now, I know what you might be thinking --  this cachepot featuring faux bark with birds and flower detail looks a bit faded.  The birds might have been painted at one point, you can see a little trace of red on the neck of the leftmost cardinal, and there was a bit of yellow left on the bottom of the flower, but the paint on those details had mostly worn off.  I offered it to a few friends, thinking someone might light the vintage charm of it, but no one was interested in the woodland themed cachepot.  Since the brown color didn't really fit into my white cachepot color scheme I decided to do a quick makeover with white satin spray paint.


Cachepot makeover

I didn't use any sort of primer when spray painting this ceramic cachepot because I don't expect it to get a lot of handling.  I did tape off the inside of the cachepot because the inside already had a shiny white glaze that I didn't want to cover.  I setup a little spray station in the basement and gave a few coats with the suggested drying times in between.  With all the nooks and crannies of the faux bois texture and the bird/flower detail it was important to spray in different directions to get full coverage. The final result is below, after about 2 - 3 coats of satin white on the outside.


Ceramic cachepot after makeover with satin white spray paint
Spray-painted ceramic cachepot


Here is the cachepot in its current home, holding a Caladium plant (itself a freestyle gift from the sub-tropic garden of some friends).  Here it is crowded not-very-prettily with some other plants in a variety of planters - including one made of glass in the back.  Good sunlight is at a premium in my apartment, so crowding happens more often than I'd like!  If I remember to take a better picture I'll replace this one, but for now that's what I have. :)

Ceramic cachepot after makeover with satin white spray paint with Caladium plant
Cachepot with Caladium plant


A Surprise Online Find After The Spray Paint Makeover

After I'd finished this project I was pleasantly surprised to see a not-too-dissimilar planter to mine for sale on rather stylish website ( not-too-dissimilar if you squint and look at mine in dim light that is). Here is a screen grab of the 'Ceramic Rose Pot' for sale, the large size is 6.5 inches tall - about the same size as my freestyle find. 

https://www.shopterrain.com/


Conclusion

The large version of the cachepot on this website sells for $38 - I got mine for the cost of washing a pot and a $5 can of spray paint.  Cheers to seeing the makeover potential of that faded ceramic cachepot in the discard pile!

Happy freestyling, or almost freestyling, whichever way your project takes you.

Tuesday, March 12, 2019

From trashpile top to countertop cachepot

Is there any better way to end an afternoon-into-evening-craft-session-with-snacks than with a trip to the loading dock? Probably not.  The hostess found some small photo frames and a free trash can (because who wants to spend money on a trash can?). I found an interesting glass vase, made in 2009 according to the etched year on the bottom.

The next day I turned the glass object into, what else, a planter.
All I needed was an empty yogurt container with drainage holes cut into it, some potting soil and pothos cuttings.


After a few minutes of arranging, some dirt-pouring, and a little more arranging, I had a new cachepot for a pothos.

Pink glass on top of blue glass, now with a plant!


Nothing like some pothos leaves against subway tile.  The glass object doesn't look right with the countertop, it will find a home somewhere else.


Happy freestyling, and when in doubt, maybe you can turn it into a planter!

Tuesday, March 28, 2017

A happy square

Walking home from a friend's house I passed through a residential neighborhood full of cute houses and a long established practice of leaving free things on the sidewalk.  Could a post-brunch winter walk have any more potential? 

In front of one house I came across this square ceramic cachepot with the words HAPPY BIRTHDAY on one side.  I suspect at one point it contained an arrangement built on florist's foam or perhaps something edible. Either way, I washed it well and it's mine now.


It was the perfect size for a Christmas cactus that had been living in a transparent glass planter surrounded by shells (looked fine, but made it difficult to lift the plant out to check for excess water).
Luckily the wording is only on one side of the planter.


Now this lovely little square pot lives on the shelf near the window next to the hippo planter (with the Haworthia) and near the pothos cuttings that I hope will survive their transplant from water to dirt.


Don't trash it, let someone else treasure it!
Happy freestyling.

Tuesday, March 7, 2017

Everything about this plant was free

Full confession, I collect planters and planting supplies even if I don't have a specific need.
Yes.
I am a plant hoarder who likes to be prepared.

For example, I found some black plastic plant pots while biking home one night, and even though they were a bit awkward to balance on the handlebars they made it home. So far I've used two of the six.   More recently I found a pair of adobe-colored plastic planters with separate trays, score!  I've also found the occasion bag of potting soil, not glamorous but something that I can *always* use.

This preparation meant that when a large aloe cutting showed up on my desk one day I was ready to plant it.  I trimmed the black plastic inner pot so it wouldn't stick out over the top of the adobe-colored outer pot.


I could have planted the entire aloe directly in the adobe-color plastic pot, but the drainage holes are rather small, and I wanted to keep the pot small while the cutting is developing roots. This way there is a large gap below the bottom of the black pot for drainage.


I used some shells on top of the dirt to help hold things in place, and even the shells are free courtesy of my parents and their trip to the beach.


Happy freestyling and plant swapping.

Saturday, February 11, 2017

My kind of bro-mance

More plants, more plants, more plants, and more posts about plants.  This one is about a bro-mance, but in this case the 'bro' stands for 'bromeliad', because its about plants. Duh.
I found a green ceramic piece that once contained a fruit bouquet (judging from the sticker on the bottom), but that happened to be the perfect size for a 4-inch plastic planter.  Now, I didn't necessarily have a plant to put in it when I found it, but the hoarder motto is 'take it now, use it later', although I'm sure there are other hoarder mottos, perhaps so many that they hide under couches and spill out of closets.....

Anyway, enough random words, here is the green ceramic cachepot...


Here is the bromeliad, looking lovely in its greenery.


Happy freestyling!

Tuesday, April 26, 2016

From polluter to air purifier (indoor gardening DIY tutorial)

DIY Tutorial : How to make a cachepot from an old candle

As I was walking by the dumpsters one night, y'know like any common person, I saw this basket of stuff off to the side.  Why didn't I take the basket too??  I was clearly too distractedly excited about finding the two candles inside.  You can see there were two, one blue, one white.


Here are the two candles in my sink, waiting to be cleaned out.


I'm not a candle person to begin with, and those things smelled STRONG. Like crazy perfume strong, no way was I going to keep them around.  I couldn't wait to get the wax out and start the transformation into pretty glass cachepots.

Using a flat screwdriver I was able to break the wax into a few sections and then just flip it out.  It was a little trickier in the blue glass jar because the lip was narrower than the base.After getting the visible wax out I ran the glass through the dishwasher to try to remove the smell and soften up the glue that was attaching the wick to the base. Getting the wick removed from the bottom took a few minutes because it was hard to get a grip on it with the waxy covering that remained. Patience prevailed in the end.

You can see I accidentally scraped the paint in a few places, but its not obvious if you are looking at it from the outside, only when light is shining through from the outside. 


I had another Haworthia succulent that needed a new home, so I cut down a coffee cup to match the height of the blue glass and poked a few holes in the bottom for drainage.


It was just that simple! Voila, a fancy free cachepot saved from the trash pile.


To recap, here are the DIY tutorial steps to make a cachepot from an old candle:

1. find old candle

2. using a flat screwdriver carefully poke through the wax down to the glass and cut the wax up into pieces.

3. Using the screwdriver as a lever, lift out the wax pieces and discard (unless you can think of a great way to reuse candle wax, maybe to wax a sticky drawer slide?)

4. If the wick is glue to the base of the candle try to pry it up with the screwdriver, it may take a few minutes of prying and gently pulling on the wick with your fingers. Keep a paper towel around to wipe off the wax as needed.

5. After you have removed all the wax, wash the glass jar

6. Insert new plant, either directly into glass or via a smaller planter set inside.

Happy freestyling and indoor gardening!

Tuesday, April 19, 2016

Maybe Haworthia *is* a utensil

Almost anything can become a planter, especially if it is ceramic.  I like the shape, and more importantly the price, of this small stoneware crock at a discount store. 


Since planters and cachepots can be more expensive than the plants themselves I've started to keep my eyes open for low priced ceramics wherever they may be.  This one was in the kitchen wares section and only $5.99. I'll take it.

My Haworthia succulents keep producing offsets (plant babies) and I have to keep finding new homes for them or repotting the mother plant into a large container.  This one was pretty simple.   I often use coffee cups for succulent planters, because they are free and its easy to poke holes in the bottom for drainage.  The utensil crock was taller than the coffee cup but that issue was easily solved by adding a little step (made out of part of another coffee cup cut down to size)  for the plant cup to sit on.


Voila!  Another example of kitchenware to cachepot.


Even though I don't usually give my succulents their own chairs I think this ones looks pretty good on the slipper chair, maybe it will just hangout there until it has to move.


Happy freestyling!

Tuesday, March 1, 2016

The chameleon of clay

This is the chameleon in all its glory.


Although this chameleon is made of humble clay and sits affixed to the edge of a pot
I still think its pretty rad. 

Also it was free, natch.

Now watch this awesome video containing true facts about the chameleon  and of course,
happy freestyling.

Tuesday, February 16, 2016

New Home for a Dracena marginata

The Dracena genus of plants includes a variety of beautiful and hardy specimens, very popular for indoor houseplants.  Buy one, help clean your air!  My Dracena is an $8 grocery store purchase that has survived for 3 years on a south-facing windowsill and looks just fine, it might be Dracena marginata since the leaves have red edging.  The plant had been in the same pot for over 2 years, and it had grown steadily during that time, so I unpotted it and found that there was almost no soil left around the roots.  Time to repot!  Unfortunately the hardware store near me does not sell low-cost large flexible plastic plant pots.  But they do sell large expensive-y ceramic pots....no thanks.  Good thing I had a freestyle find to help get the job done.

The plastic on these green plant pots is oddly brittle and the top had split in a few places (maybe why someone discarded them during the summer).  I reinforced the top with a loop of duct tape all around the outside so that any handling wouldn't cause the whole thing to break apart.  Functional, but not very pretty.

 
  On the top of the pot in places where it was split I added tape over the top like in the photo below.


As you can see in the photo above and below I added a layer of rocks over the soil, hopefully this will help prevent fungus gnats from taking up residence in the dirt.  I paid for the decorative rocks. It was a $7 moment of weakness.

To make the whole package a little prettier I put the planter into a cachepot - a fancy term for a ceramic planter without holes in the bottom.  This helps to obscure the duct-tape repairs since the planter sits a few inches below the edge of the cachepot.  This cachepot was one I had on hand, originally purchased at Ikea for $20.


The final repotted Dracena looks lovely in its new home.  I'm glad I found a way to repair and reuse the brittle green plastic planters.


Happy gardening and freestyling!