Showing posts with label mirror. Show all posts

Tuesday, May 11, 2021

Mood Mirrored Indigo

The Find

Textiles can be a tricky freestyle find, there is always a question of the lurking unseen microbial presence on whatever fabric has been sitting outside, unattended, for some amount of time.  And of course, things on the curb could always fall victim to a lifted dog leg. But if something is small enough to go STRAIGHT INTO THE WASHING MACHINE upon arrival at home, well, then, I feel pretty good. I've stayed in hotels, how different could it be?  Now that you've read my thoughts on freestyle textile find hygiene, let me tell you about ... a freestyle textile find!

I came across this cool pillow cover (with separate insert) embellished with numerous tiny mirrors, one of a few options in a giveaway box at the end of someone's driveway. So much sewing detail, possibly done by hand - I appreciate such work.  There is no tag on the pillowcase, but the fabric felt like cotton, so I immediately had an idea for a makeover.

White embroidered pillow sitting on ground
Freestyle pillow find on curb


The Makeover

I had an existing dye bath setup from some exploratory home-shibori fun in the color Indigo, and the dye type was one for natural fibers. So after a hot wash in the washing machine, the pillowcase went into the dye bath to sit for a while and (hopefully) absorb as much dye as possible.  Without any fiber information I wasn't sure how the results would look, but as a hedge I let the pillowcase sit in the dye bath for a long time. As in, it sat in the dye bath for multiple weeks. I also decided to order some dye fixative, since my previous shibori experiments had faded quickly without this critical ingredient.  Lesson learned.

Two bottles, one holding dye, one holding color fixative
Ingredients used to dye pillowcase


This is what the mirrored pillowcover looked like when it finally came out, lots of deep indigo color.  But would it hold?

Dark blue wet pillowcase hanging on towel rod
After the dye bath


There were hopeful signs that the dye fixative had done as promised since the color was dark even after rinsing the textile in cold water until the water ran clear.  But the true test is always the washing machine.

Conclusion

The indigo color held up well after a washing machine cycle, so I'm calling it a success.  Here it is, minimally 'styled' on a couch with two other throw pillows (yes, they were free too, the complimentary colors are a coincidence).

Indigo mirrored pillowcase sitting in front of two orange patterned pillowcases on grey couch.
Mirror mirror on the indigo blue pillowcase


Here are two detail shots that highlight the interesting diamond pattern embroidery.

Embroidery detail: angled view


Embroidery detail: front view


Happy freestyling, don't be afraid of a little elbow grease that might be needed to clean something and make it your own!

Tuesday, December 1, 2020

Water-damaged squoval mirror makeover

 While out and about I saw this mirror out in a discard pile somewhere.  Made all the way back in 1999. 


Too bad! Upon closer inspection it appeared that part of the frame had suffered from water damage.  I think it is a press-wood or press-board frame because the damaged part had expanded when it got wet.
What do you think of the shape? I like the outer shape of a square but the inner part being a pointed oval to reveal the mirror - the best of both worlds.


The front was a bit roughed up, you can see the lighter streaks of discoloration. Luckily the hanging hardware (inset keyhold hardware) was still intact on the back side.


I thought about taking the mirror out of the frame and either cutting a new frame or mounting the mirror on an interesting shape of wood.  However, in the end, I decided to just spray paint the entire frame black in order to hide the uneven bits that had expanded.  I used a gloss black spray paint and the look was fine, buuuuuut a bit severe. It felt a little too goth chic, so I added a pop of green with a stencil in the upper left corner.  And yes, I was not careful enough about overspray. Lesson learned. 


Now it reminds me of a woman wearing a flower in her hair, instead of a look glass towards impending doom..... or something.

Free wall mirrors are always fun to play around with since they are a useful item in almost every kind of space.  Now this one is ready for a new life.

Happy freestyling!


Tuesday, February 26, 2019

Freestyle @ Friends' - Mirror makeover

The freestyle inspiration keeps happening across all the lands!  I got an email from a friend halfway across the country with one line, "This mirror is made out of some cheap wood. What do you think I should do to it if I want to paint it?" (and two attached pictures).  The pictures show a shiny-surface frame, probably a plastic-based veneer over pressboard / particleboard, but with nice proportions and a timeless shape.

free mirror, take 1


free mirror, intact and shiny veneer


My recommendation was to NOT sand the piece because that might cause bubbling later if the pressboard underneath were to absorb liquid from any paint. LEARN FROM MY EXPERIENCE! I had this happen with a scandi-superstore piece before - where I followed generic refinishing instructions and lightly sanded to scuff the surface but that then allowed the liquid paint I later applied to seep through the veneer and into the pressboard (or particleboard).  This ended up causing some low bubbles and didn't ruin the project, but it was visible in angled light. So, anyway, back to this particular mirror. I recommended spray paint primer (optional) and spray paint as opposed to roll-on paint.

The refinished outcome is below, much improved with a lighter wash over the fake wood veneer.
Yay for backyard DIY and free furniture!


Happy freestyling, and if the mirror is intact, take it!

Tuesday, January 8, 2019

An octa-going going gone mirror

Quite some time ago I found this elongated golden octagon mirror. Mirrors are always useful decor items, and one that was not-too-small and not-too-big and not-at-all-broken was definitely a worthy find.  The finish was a bit drab, some sort of reddish-black combo, so iridescent antique gold paint to the rescue.
In painting progress

Close-up of the painting process, exciting.

Painting free things with a tiny brush is oddly satisfying, especially as you see the layers of paint cover the old finish and transform the piece into something much warmer.  Also it's free, so who cares if you mess up?  As much as I adore the final product, there are only so many square feet of walls in my place.   Since I already had multiple mirrors this one was given away to a friend who needed *just* the thing for a small space in her room.

Golden freestyle mirror mirror on the wall

Now this refinished mirror helps a lovely lady get ready for work every day, a happy outcome indeed.

See the potential all around you.

Happy freestyling!

Tuesday, January 5, 2016

A mirror goes from ornate key to simplicity

It isn't often I find unbroken mirrors. 
Much less unbroken mirrors with ornate frames, wedged upright between cardboard boxes, in a dumpster where I can reach them.  Here is the gem that I saved from the trash.

 As you can see some of the outer frame with the Greek key design had broken off. Additionally, the outer frame had become detached from the inner frame on one side and was sort of flopping against the center circle frame where the mirror sits. Hmmm. Still too good to pass up.

I looked on the back and saw this tag. 
Wow. 
$299 .00 for something that got damaged and discarded.

Originally I wanted to replace the missing parts of the Greek key design, perhaps using cardboard and gold paint.... But I realized that attaching the floppy part of the outer frame back to the center would require either a lot of super glue (and then I wouldn't trust it) or some soldering (which I'm not set up for). I let it sit for a few days until I was doing laundry and decided it was time for the solution - break off the entire outer frame. Armed with safety glasses and a hammer that is exactly what I did. It was fun.


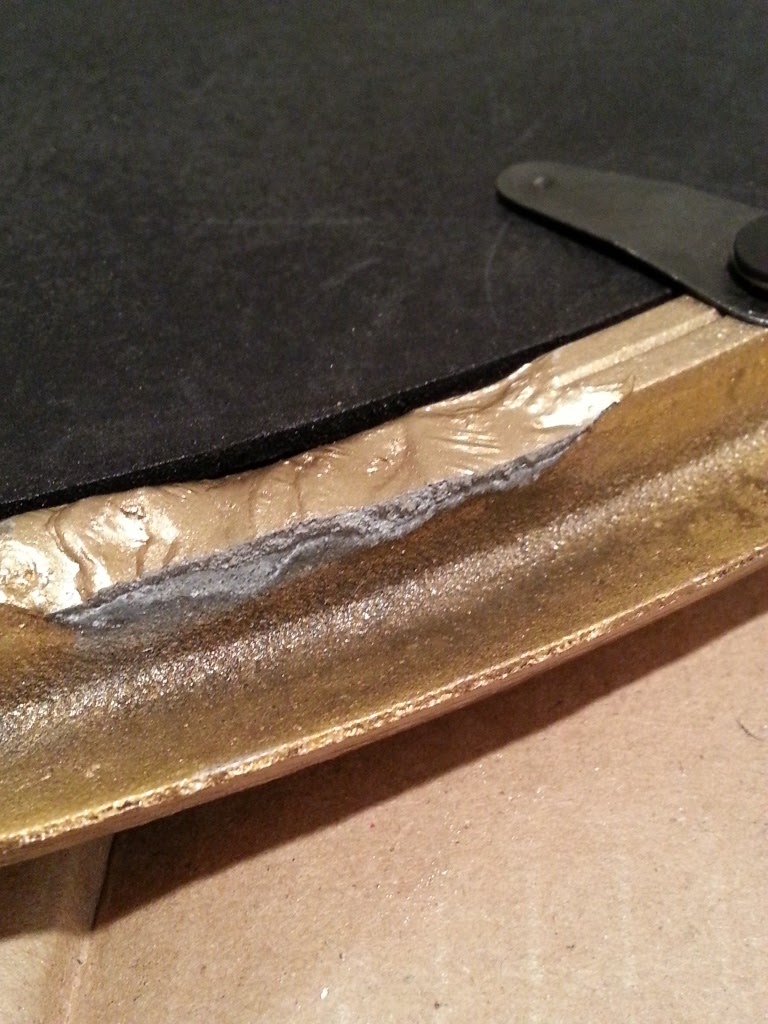
Given how easily the pieces bent and broke off at the connection points and how heavy they are I'm preeeetty sure there is lead in that frame. I definitely washed my hands a few times when it was all over.  In the end I was left with this, a simple gold circle.


Here is a close-up of one of the attachment points where the outer frame broke off. The break was not sharp and you can see the mystery grey metal that lies underneath the gold frame.

 I replaced the mirror and backing, then strung some picture wire across the back.  The only wrap points were the screws, so the wire went around two of them and then I tightened the screw a little bit more, probably didn't need to.
I hung up the final product on a nail that was already in the wall.


In less than 20 minutes (aka one load of laundry) this mirror went from floppy and broken to finished (and lighter!).  
It's smaller, and simpler, but that should make it more versatile.
Happy freestyling and Happy New Year.

Monday, June 23, 2014

Freestyle A Room, The Challenge, Post 3 - Gold mirror for dressing area

A dressing and prep area in your own bedroom is important when living in a one-bathroom apartment with multiple roommates.  Although not an original goal of the Freestyle A Room Challenge, this little octagon mirror was just large enough to be useful when getting ready in the morning.  It only needed some minor fixes.


Some of the gold paint had chipped off on the frame, an easy fix since I had a similar color already on hand.


I also glued small piece of felt onto the back of the sawtooth hanger and along the bottom edge of the mirror so that it wouldn't scrape the recently painted wall if bumped.


Little blue felt protectors
The gold is a nice contrast with the light blue walls.


Happy freestyling!

Monday, June 9, 2014

NQF: From off-white to bold and blue-tiful

Falling in to the Not Quite Free (NQF) category, this $5 purchase from a thrift store originally caught my eye because of the nice scroll/vine detail around the edge. In the picture below there is no glass in the frame, maybe that is why it was so affordable.


Nice curves
I had recently learned that you can get mirrors cut to size at many hardware stores, so this was my 'make a mirror' experiment. I also spray painted the frame with a few light coats of a bold royal blue in a gloss finish.

Here's looking at blue

The mirror insert makes the frame heavier than if it just had a glass frontpiece.  When hanging on the wall I use two small nails through the attached triangular hangers on the back of the frame (with extra measuring to make sure it hangs level).


I think it reflects my style nicely.

Happy freestyling, upcycling, or just plain re-styling!