Showing posts with label gold. Show all posts

Tuesday, June 14, 2022

Free Frame Finds A New Look With Gold Metallic Wax

The Find

As promised, another example of using Antique Gold Rub 'n Buff - in this case to make over a free wooden frame that was set out on the curb.

Here is how it started....
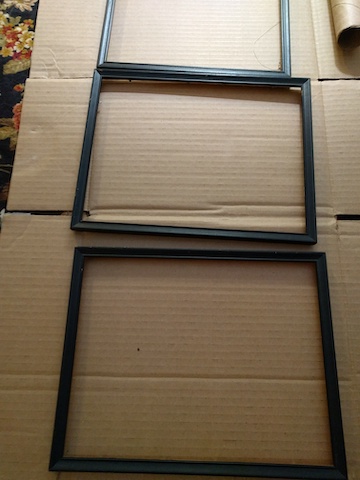
wood frame, back side

wood frame, back corner detail


After removing the glass I used a piece of very fine sandpaper to lightly scuff up the surface of the frame. I'm not sure if this was totally necessary but the original wood seemed to have a bit of sheen and I didn't want any existing coating to interfere with the wax adhesion.

wood frame, sandpaper, tube of Rub 'n Buff


After sanding the frame and wiping it down to remove any dust I got to work on applying the Rub 'n Buff metallic wax to the wooden frame using a scrap from a rag. Here's how it turned out.


Frame after wax application, laying on paper bag, detail view
Frame after wax application, detail view


The wooden frame had some texture to to, and I decide to retain that slightly mottled look by not applying too many coats of RnB - which I could have done if I had wanted a uniform color surface.

Frame after wax application, laying on paper bag
Frame after wax application


Final product

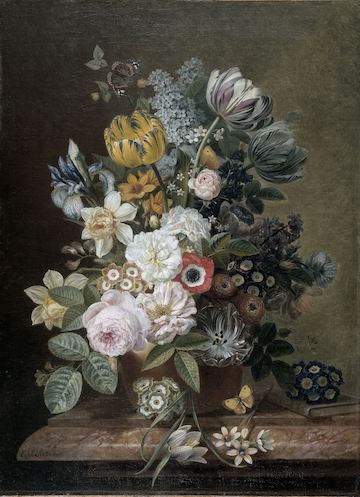
I download an oil painting seascape from the Rijksmuseum using their free Rijksstudio art download options, such a great source for art! Then I resized and cropped the image in order to fit the frame and had it printed out via the Costco Photo site - you do not need a Costco membership to use their photo printing site.

Final product after gold wax on the frame and new artwork
Final product after gold wax on the frame and new artwork.


Happy freestyling! Don't overlook frames that might not match your decor, they can always be painted or waxed to give them a new look.

Tags: makeover; furniture makeover; frame; wooden frame; low cost artwork; metallic wax; rub 'n buff; Rijksmuseum; seascape; Dutch art

Tuesday, September 15, 2020

Sailing into a future involving gold paint, a framing adventure

The Find

While out for an evening walk I came across this LARGE and beautifully framed photo of a sailboat.  Framed with real glass in the front, amazingly unbroken, and reliably heavy.  So what did I do?  I carried it home with only a vague purpose in mind, thinking maybe it would fit some fancy paper that I bought to use as a poster.

Free frame with sailboat picture
The freestyle green-framed find


The Makeover

Normally I love teal. Teal is my jam.  Cerused teal? Are you kidding? I refinished an end table AND refinished a small oak bookshelf to try to achieve a similar look.  With this frame I think the pattern is some sort of overlay, or something printed on, it isn't actually teal-dyed perused wood.  Perhaps it is for the better because a frame made out of solid oak would have been even heavier.

Corner detail of green picture frame
Corner detail or the original frame


With this frame I wasn't feeling the teal, I was feeling the fake gold.  First things first, I had to take it all apart and clean it, oh, and sadly throw out the large intact piece of glass.  Sigh. It made me sad, but having glass in large frames makes them heavy, which makes them harder to hang, and that glass is very breakable which makes me nervous.  Heavy + breakable + suspended from a single nail on a wall is not a reassuring combination.  Anyway, here is what the frame looked like underneath the dust wrapper, pretty standard assembly.


Inside the back of the frame


Lots of little framer's points to pull...and save for later.

Inside of the back of the frame, corner detail


The first coat of gold paint is always a little streaky. I expected it to take a few coats to cover the darker green and bald underneath....and I was right.  Patience is the key, I try to use thin coats with plenty of dry time in between. 
After the first goal of gold paint


After the painted was complete I looked at some decorative papers I'd purchased and with the existing matting they were the right WIDTH but not the right LENGTH...... you can see some of backing board showing at the bottom with printed text on it.

Poster with backing showing


I wanted to use this "Minerologie" paper anyway so I decided to fill in the blank spot at the bottom of the frame with slightly textured watercolor paper. 


Poster with backing covered by watercolor paper


After some generous use of double-sided tape I re-assembled all the pieces, including poking those original framer's points back into their original holes.
You can see the edges between the watercolor paper pieces a little better in the close-up below.


Closeup corner detail of watercolor paper overlapping poster
Closeup, corner detail of watercolor paper overlapping poster


The Final Result

I LOVE the way this turned out, even with the oddity of the watercolor paper at the bottom. I just think of it as a title bar like you sometimes see on posters purchased from museums.  In this case it happens to be a blank title bar, but no matter, I can always fill it in with some script if I ever trust my own handwriting.

Minerals poster in new gold-painted frame


I think the warm shininess of the gold paint is an excellent setting for this colorful poster of minerals.

Happy freestyling, don't be afraid to take the freestyle frame even if you aren't sure what it will turn into.  Finding beauty from scavenged pieces gets easier with practice.


Tuesday, July 7, 2020

Garden of freestyle delights - Painted stone garden markers

Why you need garden markers

Optimistic gardeners might think they will remember where they planted such and such seeds, or which containers contain seeds. Hah.  Experience quickly teaches that it is easy easy easy to forget what you buried in the ground and where. Just ask any squirrel.  To help your memory, why not make some weather-proof garden markers?

How to make your own garden markers using rocks and acrylic paint

I had some luscious acrylic gold paint from a previous project where I was painting picture frames.  But nothing says gardens can't use a bit of bling! So I got out the paint and a pen, since I didn't have any paintbrushes at the time.


At first I tried to use the tip of the pen dipped in the acrylic to 'write' on the rocks by dragging the tip of the pen across the surface. This worked poorly on the uneven rock surface, the words were legible but the letter were uneven and blobby.  Then I thought about some painted rock mandala images I'd seen and thought about trying to using dots to make the letters. That worked out muuuuuch better, and also led to some other fun dot-based designs.  
Fair warning, this activity is addictive and soothing!

At the end of it I had some painted rocks with words for labeling the various seeds I had acquired to date: spinach, cilantro, and basil, along with some other freeform designs I could use for decoration while there was mostly bare dirt in the pots.


Conclusion

The easiest part is that you can just set the rock inside whatever pot you just planted up. No worries about it falling over or blowing away in a stiff breeze. Here is the garden label I made for some Thai basil seeds I got on sale because they were from last year.  Hope they germinate! Happy freestyling!


Update - the basil seeds took a long time to sprout, but they did eventually make it.

Tuesday, April 23, 2019

Who's that knurl? La lalalala la la la.

In an earlier post I described the cheap and easy gold paint makeover of a free frame that had the following layout: a gold outer frame, a fake linen liner, and then a gold inner edge.  So, I finished the outer golden bits a few weeks ago and thought it looked fine.  Then the frame sat around, moved around here and there, put aside, moved back and forth while I hemmed and hawed about what to frame, and at some point I realized that a blinged out frame of that style needed a suitably blinged out piece of artwork.  It just wasn't conducive to a photograph of a sea creature, or a simple snapshot of people.

No.

This much gold needed something from a Golden Age

Enter the Rijksmuseum in Amsterdam and their AWESOME online catalog of ENTIRELY FREE ART DOWNLOADS.

God I love the Rijksmuseum, they do it right.

I loved the Rijksmuseum in person when I visited years ago and now I love it even more because unlike some other national museums the Rijksmuseum has an easy to use section on their website called Rijks Studio.  In Rijks Studio anyone who creates a FREE account can search, create libraries, and download high resolution files of art in the collection to use however you want.

Having been enchanted with the floral still life paintings when I visited the museum in person I immediately started searching for bouquets (search 'still life' or 'flower' on the Rijksmuseum site).
I found some luscious contenders in less than 30 seconds, seriously.
The 1600s were good years for intense paintings of flowers.


flowers flowers flowers


In the end I settled on this badass shell composition that looks like something out of a Shakespearean Tempest fantasy scene. It happens to be the rather generically named "Shells and Marine Plants" by Henricus Franciscus Wiertz from the year 1809. So, ok, not exactly from the 1600s, but whatevs, shells are timeless.


I downloaded a copy, ordered a print from an online vendor, and in a few days had a nice little 8x10 to frame.  When I held it up to the frame something seemed....off. The "linen" border seemed to drain the pizazz from the piece, so I decided to paint that gold too.  My hope was that it would look like a cool knurled pattern next to the thin rope detail, so I got to work with the tube of Antique Iridescent Gold and the small brush that had been chewed up by a cat.

The painted "linen" part of the frame retained the texture as I was hoping.....


Who's that knurl?


.....la la la la la la!
When I finally cleaned the glass and put all the pieces back together I was so happy with the results. 

I was this-brings-me-official-KonMari-levels-of-joy joyous.


(If any of the images seem blurry it is because I shrunk them down, the originals are huge and super sharp.)


So. Money.

When I finally cleaned the glass and put all the pieces back together I was so happy with the results. 

I was this-brings-me-official-KonMari-levels-of-joy joyous.


In case you had forgotten how this all started over a month ago, here's the before and after.


BEFORE


AFTER


Happy freestyling. Don't rush it, find the piece that makes your wall sing.

Tuesday, February 19, 2019

Framed! In gold, and linen, and some more gold for good measure


As part of the great February Frame Find I scored this ornate vintage frame.  I loved the layering of the (fake) gold, linen texture (also probably fake), and more (fake) gold along the innermost edge. 


What I didn't like was the aged looked on the frame achieved with (or because of?) brown speckling.  At first I thought some of brown speckles and grey colors inside the raised ("carved") parts of the frame were just accumulated dust or dirt that could be cleaned off, but nope, that was part of the original paint treatment.


I realize this sort of aged treatment gives the frame a softer look, and is sometimes deliberately used to good effect  to show the detail of the 'carved' details on the frames - often done with glazing.  This softer look is definitely less hard and shiny, but to my eyes it also made the frame look dirty and that made it distracting.  So after a full cleaning it was time to get out the Antique Iridescent Gold paint and my tiny brush (yes, still the one that was chewed up by a previous roommate's cat) and get to work. After two-or-so coats of paint I'm satisfied with the lighter and brighter and glow-ier look.

Post-paint and sitting pretty

The 'carved' design around the outer edge of the frame - which to me looks like apostrophes and quotes - no longer has gray color in the grooves. The inner corner rope-like detail is not so dark as before, and the brown speckles that were along the broad flat areas have been covered over.  In a few spots they still add a bit of shadow from behind the paint, but I'm ok with that because it breaks up the uniformity of color and the very non-uniformity of my uneven brush strokes.

Corner details, from gray to glowing.

I don't have a painting or photo to put in this frame yet, so the full reveal will have to be at some future date.  Perhaps a seascape? 
In the meantime, remember the transformative power of paint, and happy freestyling!

Friday, February 15, 2019

Meow That's A Fun Frame Find

One night a neighbor friend was browsing his building's message board and saw that someone was leaving a bunch of picture frames outside their door, for free, obviously.  He scampered over and grabbed a whole box, following the scavenger-hoarder mantra of 'take it now, figure it out later.' Approve.  After taking what he wanted he offered the box of associated small frames to me, and I managed to find a group of frames the same style, all around 8x10 to 8x12.  Yay for third-hand picking! It felt positively luxurious to lay out the frames on the floor and look at them all instead of grabbing a box and scurrying off into the night.

Here is a snapshot of the 'before', very basic black wooden frames, at least 20 years old.


Basic frames sitting on cardboard

I have a different friend who wanted to add some art to his walls for the bargain price of next-to-nothing, and was into the idea of painting some free frames with gold paint. Below is one of the frames after the first coat, not very encouraging, but I knew that it takes a few coats of gold to really build up the shine.


In process, don't judge it yet.


Here is the final product, with a picture of the beloved cat printed out at a local drugstore.

Kitty says Meow!

Now we just have to finish painting the rest of the frames, find and print some more suitable artwork (probably more cat pictures), and arrange a custom gallery wall. Stay tuned.

Happy freestyling!

Tuesday, January 8, 2019

An octa-going going gone mirror

Quite some time ago I found this elongated golden octagon mirror. Mirrors are always useful decor items, and one that was not-too-small and not-too-big and not-at-all-broken was definitely a worthy find.  The finish was a bit drab, some sort of reddish-black combo, so iridescent antique gold paint to the rescue.
In painting progress

Close-up of the painting process, exciting.

Painting free things with a tiny brush is oddly satisfying, especially as you see the layers of paint cover the old finish and transform the piece into something much warmer.  Also it's free, so who cares if you mess up?  As much as I adore the final product, there are only so many square feet of walls in my place.   Since I already had multiple mirrors this one was given away to a friend who needed *just* the thing for a small space in her room.

Golden freestyle mirror mirror on the wall

Now this refinished mirror helps a lovely lady get ready for work every day, a happy outcome indeed.

See the potential all around you.

Happy freestyling!

Tuesday, July 31, 2018

Vaquero Dorado

A few weeks ago a neighbor told me that their building was having a 'yard sale'. Interesting. What happens after yard sales? People throw out the stuff that didn't sell! Naturally I made a point to walk by their trash area later that day, early enough so that I had the benefit of daylight.
Trash rustling is so much more respectable in the sun... 

You might even come across a dreamboat like this.


Who could resist??? 
Unbroken glass and an intact wooden frame with interesting texture, thank you yard sale.


 The dark red-brown with gold didn't really match my style, but I knew with gold paint it could have a whole new life.

After careful disassembly it was time to get to work. Also I found some matting behind El Vaquero, so the plot thickens, what did this frame hold before?

  I had applied a few coats of Antique Iridescent Gold on the frame when a friend stopped by, and naturally anyone who comes over gets an eyeful of my latest project(s).  She has an upcoming wedding and needed something to hold a WELCOME sign, hmm, gold frame anyone?  Not having any particular plan other than a future of gilded solitude I said, "adieu" to the frame with best wishes for a brighter future.


Hopefully he makes it to the wedding on time!

Happy freestyling.

Tuesday, June 12, 2018

Dresser it up in my love-of-green

Does the song pun resonate with anyone? Or is it two steps too removed? If you find a perfectly nice solid wood piece that's just not right for you, try dressing it up in some paint.

I found this perfectly nice wood dresser, wait, is that a thing that other people say? If something is "perfectly nice" is it perfect? Or nice? Or just a modified, more superlative, type of nice? Which doesn't make it any better....

To recap:
I found a dresser.
It wasn't broken.
It had all it's parts.
It was a manageable size and I felt like I was going to want a dresser.
Perfect.


I lucked out and had a friend with an SUV around to help me move it. After that I was on my own.  I removed the bottom front scrollwork-piece in order to lighten up the shape, to modernize it a tad by giving more clearance above the floor. Also I thought it would let me cram shoes underneath if needed....

Then some sanding (blech), and a bit of spackle on the old dresser pull hardware holes. I didn't know what I was going to do for drawer pulls, but I knew I didn't want to re-use the old handles because they clang about when used. Then off to find the most vibrant emerald green paint possible using only color swatches at the hardware store. Didn't want it too yellow, or olive, or hunter green, just wanted it to glow.

Here it is while being painted. I was happy with the color after seeing it on the piece. Going with a lacquer-style finish would have made it more glow-y, maybe I'll try that in future.

After the paint was dry I agonized over hardware pulls, sort of. I wanted some trendy art-deco-inspired gold pulls with inlay, but they were like $30/knob at that store with really cute and curiously expensive clothes and housewares.... Guess who didn't want to spend hundreds of dollars on drawer pulls for a dresser saved from the junk heap? To compromise on the vintage-inspired look that was dancing around my head I used white ceramic knobs that I already had, salvaged from some previous and forgotten furniture. 


It was fine, not exciting, just.... perfectly nice.
That's how it stayed, until I saw the beetles.


SCARAB BEETLE DRAWER PULLS.

GOLD SCARAB BEETLE DRAWER PULLS.


A combination of Egyptian mythological references, art deco (maybe?), and the catch-all category of nature-y, in full bling. 


Extra bonus is that these drawer pulls are durable souvenirs from a vacation. 
Functional and fun and a reasonable amount of euros per pair.


Now it looks fully dressed.

Happy freestyling.