Tuesday, June 28, 2016

Someone's move-out bonanza find

So much furniture!  That is what it felt like in early June when I found a bunch of furniture pieces on the loading dock, including 2 tv stands, multiple lamps, 2 polypropylene rugs, and a coffee table.  It also happens that two dear friends are moving out of town this summer, leaving their roommates with some furniture gaps.  Enter the freestyle!

Nothing is put in place yet, but here are some photos of the freestyle bounty being loaded up for its journey to a new home.

loading the car

furniture tetris

ready to go, with hardly an inch to spare

The free finds included some moving boxes (surprisingly expensive if you buy them new) and packing supplies.  Stay tuned for future photos of all these freestyle finds in their new home!

Happy freestyling.

Tuesday, June 21, 2016

A mountain of a frame

I found this framed poster of a Greek island scene in May, clearly someone was preparing to move and lightening their load. If it had been in a simple white frame I might have kept it as is, but the red marble paper, beige matting, red inner frame, and mottled beige outer frame just seemed to be too too too much for the simplicity of the image.


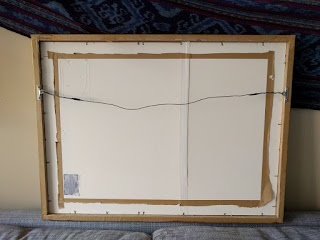
This frame is the real deal, and by that I mean heavy and well made.  The wire was even wrapped with tape so it wouldn't scratch the walls, nice touch!


The glass was intact and had a UV protection coating on it (at least according to the sticker on the back of the frame).  At one point it must have cost a bit of money because the frame was clearly professionally assembled.  But alas, over time its value was reduced to $0 and it ended up in the discard pile.  So I decided to take it, take it apart, and paint the frame.  I wasn't sure what I would put in the frame, but I knew the existing mottled beige/brown finish wouldn't go with anything I owned.  Disassembly involved pulling many little metal 'points' out of the frame, surprisingly satisfying work.  Here it is with all the layers removed, as you can see the red inner frame was attached to the outer mottled beige frame.

bye byre red and beige

After a few layers of 'Antique Iridescent Gold' acrylic paint I was ready to dig through my stuff and find something worthy of this shiny gold treasure.  In truth I had to stop painting because the cat stole my paintbrush and I can't find it, but it will turn up eventually.

Here is the reassembled frame from the back. You can see all the metal points holding the outermost foam core layer to the frame.  There is another foam core layer that is against the item being framed, not visible in this photo.


A little detail of the corners....


And the title of this piece I ended up framing is.... Jungfrau!  
It is a paper map of a Swiss Glacier from when I visited Switzerland many years ago.


 I don't have it hanging on a wall yet, so here it is sitting on the back of the couch.


Due to the size of the map I didn't use the beige matting, thus the paper is right up against the glass.  I know that is a 'conservation framing no-no' because there should be a space between the art and the glass in order for air to circulate.  However, this piece isn't super tightly sealed because the points aren't as tight fitting as they were originally.  Time will tell!

Happy frame-finding and freestyling!


Tuesday, June 14, 2016

In thrall to a throne

Full disclosure, I first found this chair in September 2015 (thank you sequential photo file names!).   At the time I knew I wouldn't be able to deal with it right away, but it was just so unusual and usable I couldn't leave it to the garbage fates.  So I took it, waiting for time to work on it......


....It is now summer 2016.  Things were busy, enough said. 
So here she is, sitting patiently in the kitchen, being all stately despite the mish-mash of decorative styles going on.


Having looked at this chair for many months there were many ideas that floated across my mind.  It obviously needed a new cushion because the existing one was not at all cushy.  I also knew that new fabric would be in order, but what color?  Should I paint the frame? What color does one paint a garbage throne?  In the end I decided to not paint the frame (less work!) and just change the cushion.  I might refinish the frame in the future because it is less-than-perfect, but that's in the future....


My enterprising mother found some dark blue velvety fabric and sent it to me since I don't live near a fabric store, thanks mom!  I also had a very very thick couch cushion that I had saved from the discard pile because holy crap FOAM IS EXPENSIVE and there is NOWHERE to buy it around here.  I knew I would need it for something.


I unscrewed the seat from the frame and was all ready to strip off the covering when a friend showed up and decided that they wanted a little manual-labor time.
"Here, remove these staples from a piece of wood, that should be satisfying."
"Can I have a screwdriver, hammer, and pliers?"
"ok, guess you've done this before"
"thank you. yes."

And it was.  And it was also easier for me. Win win win.

The next step was cutting the foam couch cushion down to size.  As you can see it was an L-shaped end cushion. 


I had a variety of tools at the ready, scissors, a long knife, and a swiss army knife with a serrated blade.  Although the internet suggests using a bread knife with a serrated blade I was able to cut the foam using a combination of a non-serrated blade and scissors.  I'm not claiming millimeter precision though.


The foam was very thick, and I thought about trying to cut it in half, but in the end I decided to keep it super comfy, even if it looks a little odd. Who cares? It's MY garbage throne, not yours.

Here is the foam cut to the shape of the plywood seat (with the white batting removed), the seat is on top.


I played around with the batting in order to have it wrap around the foam and the bottom of the seat.  Eventually I got it all stapled down with my new staple gun.


Some parts of the batting are a little thick, but the blue fabric went over them just fine.  I decided to NOT screw the seat back on to the frame just yet, in case I get super motivated to fix up the frame finish anytime soon.  Here is the new garbage throne in it's present butt-cushioning state.


The  high seat makes the arms seem low, but once you sit on it, trust me, your concerns about armrest proportions will just melt away.


Don't be afraid to change furniture proportions to make something more usable.

Happy freestyling!

Tuesday, June 7, 2016

Giant green monster planter

My alternate title of this post would be "the most recent time I traded muscles for food." When I saw a monster green planter loitering in the loading dock I knew it would be heavy. So I asked a friend if he would help in some freestyle adventuring in exchange for dinner, and tada, I had the muscle all lined up.

In all my excitement I didn't take a dramatic before picture (which would have included some ants running around the black tray when we first picked it up).  Instead I suggest you look at the picture below, but imagine it covered with hard water sedimentation all around the black tray and about two inches up along the green pot.  You can still see a few small flakes clinging stubbornly to the side.


The mineral deposits came off pretty quickly with hot water and vigorous brushing in the shower, but all the moving around for cleaning made me glad I wasn't trying to lift this thing by myself. It's huge!


To give you some sense of scale the green planter is 21 inches high, 21 inches wide at the top, and the walls are 1.5 inches thick. If it were plastic it would be lightweight, easy to move, and far less awesome because it would be a bucket with a hole in the bottom. It is, however, glazed ceramic, as is the black tray underneath it, and thus worth bartering food-for-moving-to-my-house in order to own it.  Does it still count as free?  People who frequent garden centers know that large ceramic planters can be expeeeeensive. I'd peg this one at $60+  when new, quite a find!

Here is the finished setup, with the green planter settled into its corner by the window.


Sharp-eyed readers may notice that technically this qualifies as an update to the 'evolution of a living room corner' series. 
Below is a previous incarnation of this corner (note the different plant):


And in case you've forgotten the earlier image here is the corner now, with the large royal palm (?) tree, some Haworthia succulents, a jade plant, an orchid, and a reading lamp.  The palm tree has been in this spot for a while, but in a plain black plastic planter which is rather meh when compared to the new shiny green monster pot.

Welcome to the jungalow!


Happy freestyling and summer gardening.