Thursday, November 8, 2018

Hook me up!

For over a year I've had a coat rack serving as an all-purpose clothing catch-all, which made sense because it was free and it served the purpose of holding clothes that weren't quite dirty, purses that were probably going to be used again soon, and a big floppy hat with nowhere else to go.  However, at some point I started to realize that having a circular standing item in a corner meant that it was all too easy to loose track of items buried towards the middle, and it just looked a bit......looming.  It made the corner feel cluttered, with all the bulk of the clothes jumbled together.  I'll spare you a picture of the hodgepodge, and instead provide a visual of the item itself.
Coat rack, on the way out the door.

Very functional, and easy to disassemble, but I've posted the coat rack for free, hopefully someone takes it.  I don't need it because I've replaced floating hooks with wall hooks - or rather, drawer pulls attached to the wall to serve as hooks.  Looking online and browsing randomly in stores it seemed like all the hooks were either huge with very visible attachment screws, multiple hooks mounted on some larger wood piece that was probably too large for the given wall space, or pretty but possibly too delicate, and they were all more than I wanted to pay.  I might have seen this online, who knows where the idea came from, but I started to wonder about drawer pulls and if they could be used as wall hooks - probably inspired by those achingly pretty drawer pulls at Anthro*******.  I found two tutorials online that confirmed yes! this can be done and yes! it is quite easy. One tutorial is from this site, so if you don't believe me, believe the professionals at another blog.

I had a set of white ceramic drawer knobs that were scavenged from a dresser somewhere in the distant past, they had even been used as knobs on the green dresser at one point - before being swapped out for gold beetles.  These knobs, sitting in my own bin of salvaged hardware all along, were just what I wanted - sleek, smooth, and free.  I brought my knobs to the hardware store, where luckily I could buy exactly the number of hanger bolts required and test them to make sure they fit the knobs - I appreciate only having to buy the amount needed for a project rather than a bundled set. I did get extra drywall anchors, because those have been known to break during installation.

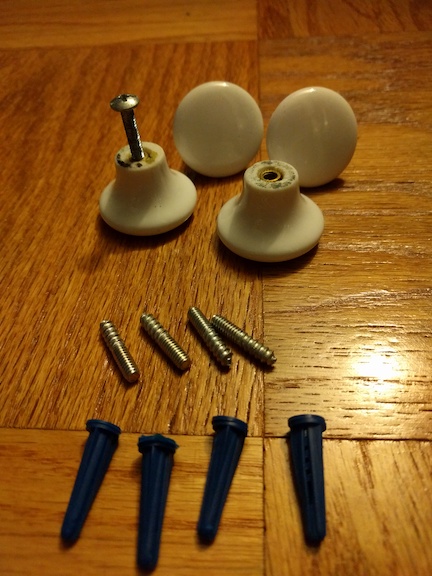
ceramic drawer pulls, hanger bolts, drywall anchors
The hanger bolts have two different halves, a flat end with narrower threads that fits into the knob, and the other end with wood-screw-width threads that goes into the drywall anchor.  It is easy to tell which end is which, I recommend attaching the hanger bolt to the knob first, then screwing the whole thing into the installed drywall anchor.

Hanger bolt, inserted into ceramic drawer knob

Pre-drilling the holes, hammering in the drywall anchors, and screwing in the knobs took less than 10 minutes. So easy!  I started with a small drill bit to pre-drill a hole and then moved my way up until the bit size was still a bit smaller than the drywall anchor, but the was because these were hammer-in rather than screw-in drywall anchors.

Drawer knob, now wall hook

The result, a lovely set of sleek and functional hooks that blend in to the wall, but are ready and waiting to hold the clothing parade of the modern city dweller.

Multiple new wall storage options

Happy freestyling, and don't worry about taking hardware, you never know what new purpose it might serve!

Thursday, November 1, 2018

The cerusing bug strikes again, bookshelf edition.

In a desultory fashion I keep an eye on craigslist for free oak furniture, because I really like free stuff (obvi) and I liked the results from my first attempt at cerusing. You never know when you will hit the jackpot, like seeing a posting for a beautiful oak bookshelf in good condition in a nearby neighborhood!  The giver was accommodating about scheduling a pickup and had exactly the type of home you hope your free furniture comes from, a clean one.

I used a short term car rental service to transport the bookshelf, super easy. The bookshelf was heavy enough to make me think it was solid wood.  I bartered with a friend to have him remove the existing finish, which turned out to just be some stain. There was no polyurethane or finishing oil to strip off. While sanding down the bookshelf he discovered that the "solid oak" of the sides and front casing was really a high quality thick oak veneer over particleboard.  Although cerusing is not recommend for veneers I decided to carry on with the original plan.  Here is the bookshelf after being sanded down to remove the stain.


Next step was to dye the wood, using the blue aniline dye I purchased.  The initial dye layer looked green, probably because of the yellowness of the oak. (Next time I will try to bleach the oak before dying, if that's even possible). After 3 rounds of dying and drying the color looked blue, and I was satisfied. Although in retrospect it might have been better to do another round, because after applying the shellac the color looked green again.

(top half) Dyed blue veneer with shellac layer on top, (bottom half) dyed blue layer.

I like greens, blues, and teal, so while this was not the bright cobalt blue I was going for, it didn't stop the project!  To improve the strength of the finish I applied two coats of shellac to the horizontal surfaces and outside faces of the bookshelf.  This worked out to about 1.5 cans of shellac.

After the shellac dried it was time to apply the liming wax, and to learn a lesson about not following directions.
I did a test run of the wax on one of the removable shelves, by wiping on the wax, working it into the grain and then immediately wiping of the excess with #000 steel wool. This was easy enough and the results looked normal. Then I made the mistake of reading the directions on the tin, which said to let the wax dry for AN HOUR before wiping or sanding off the excess. So that's what I did. Maybe that works if you want an overall whitewashed finish and just want to smooth the surface with a bit of light sanding, but for cerusing over dyed wood this was a huge mistake.  The wax got really hard and was difficult to remove with #000 steel wool through hand sanding.


With a lot of elbow grease I eventually sanded, or buffed, all the surfaces down so that the grain was filled in but without a white haze over the rest of the wood. A day later I applied clear furniture wax to help seal and protect the surface even further.  The furniture wax was easy to wipe on and buff to a shine, and it smelled good too.  The instructions on that product say to let the waxed surface 'cure' for 30 days before any heavy use.  That sounds like a long time, but given how long it takes me to reorganize anything or move furniture around in my apartment I think it will be fine.  In the meantime I've been admiring the naked bookshelf in it's new colorful state. 

This is what a naked shelfie looks like.


If you're interested in cerusing something, go for it! It is a bit more involved than a one-coat paint job, but the intricacy and richness of the final finish are worth it.

Happy freestyling, keep an eye on your local craigslist free section!