Showing posts with label patio. Show all posts

Sunday, April 4, 2021

Repurposing old wooden blinds

 The Find!

A bunch of rolled up wooden (or wooden-ish) window coverings were sitting in a pile of other junk. You know the type of pile I'm talking about, clearly from someone's home renovation project -- with scrap lumber cut to odd unusable sizes, some empty paint cans, maybe a fish tank or two. Window treatments can be expensive, especially custom window treatments, so I was surprised to see a pile containing two different types of wooden slat rollup shades.
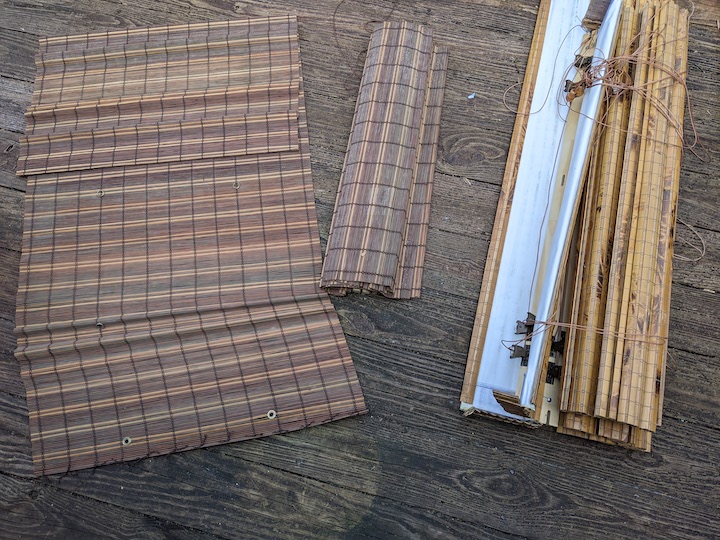
Wooden blinds sitting on wooden decking
Wooden blinds rescued from trash.


The Re-Use of Old Wooden Blinds

As soon as I saw the pile of wooden blinds, I knew knew knew exactly what they could be repurposed into - a patio privacy screen!  The old wooden window coverings would be perfect to screen the edge of a deck that looks towards a view of a dumpster - not really conducive to the restful garden feeling I'm going for.  

This re-use was really simple, here's how I did it.

Step1) Remove the majority of the blinds yardage from the top section that held the shade control mechanisms (the part that would be mounted to a wall). For these blinds that meant cutting the 'warp' in a few spots. Save the original pull cord.

Step 2) Tie together any loose ends (the warp) of the cording that runs between the slats to hold them together.

Step 3) Fold the length of blinds in half, or to the desired length.

Step 4) Run the original pull cord through the folded section of blinds and tie it around the fence support. This allows the blinds to hang without requiring any hardware installation. Check the blinds for level-ness if that matters.

Step 5) Enjoy your new privacy screening.

Wooden blinds tied to fence as privacy screen, blue chair and plants in front.
Newly installed privacy screen


Conclusion

If you're getting rid of window treatments, try offering them up on a local 'buy nothing' group before tossing them in the trash. Someone else might be able to give them a new purpose and extend their useful life! Happy freestyling.

Tuesday, February 2, 2021

Garden of freestyle delights - removable mini-shelf for a fence

 The Idea For the Mini-Shelf

It is always nice to have a proper spot to place a drink, or in these days, a cell phone.  The proper place is not the floor, especially on a patio or other outdoor place, and sometimes putting a drink on your own chair or lap can be ... dicey. The proper answer is stable shelf or side table, something that was lacking within arm's reach of one patio chair nestled into a corner.  So, given my quantity of scrapwood, I thought about how to make a shelf that would fit into the fence, but not require being fastened to the fence with nails or screws.

Pile of scrapwood, cambrige freestyle
Pile of scrapwood, aka inspiration material


The Prototype

The fence has alternating vertical pieces,  these vertical pieces are fastened to horizontal wood pieces running parallel to the ground.  One of the horizontal pieces is approximately 3 ft above the bottom of the fence, making it the perfect height for a mini shelf.  I came up with a T-shaped design for the shelf, with the bottom support provided by a small block of wood.

Mini-shelf, top-view. copyright M. Kress
Mini-shelf, top view.


In the picture ABOVE you can see how the narrow side arms of the 'T' shape had to be no thicker (when laid horizontally) than the space between the  vertical fence posts, which is roughly equal to the thickness of a 2x4.   The screw near the top is what held the small supporting block on the base. In the picture BELOW you can see the nail from the bottom of the shelf, on this prototype the small supporting block of wood split in half when I screwed through it - which is actually kind of helpful for showing the cross-section here.

Mini-shelf, bottom-view. copyright M. Kress
Mini-shelf, bottom-view.

The IMPORTANT part was that my idea worked! The shelf laid flat and stayed put by being braced between the vertical fence posts and was held level by the lower small block.

Mini-shelf, side-view. copyright M. Kress
Mini-shelf, side-view. 


Conclusion

After finalizing the measurements on the prototype mini-shelf I made another version of the shelf, with slightly neater cuts and maybe even some sanding to smooth the edges.  I then used a stencil to apply a purple floral mandala-type design.  After the paint was dry I coated the entire mini-shelf piece with polyurethane for protection from the elements.

Completed removable wooden mini-shelf, copyright M. Kress
Completed mini-shelf


You can see that this mini-shelf is the perfect size to hold a drink, a phone, or as one might expect in a patio space -- some gardening supplies.

Completed removable wooden mini-shelf holding scissors and twine, copyright M. Kress
Completed mini-shelf holding pruning scissors and twine.


Happy freestyling, prototyping, and gardening!