Sunday, November 3, 2019

Framed! A woodblock poster print finds a new home

The discovery

When out looking for stuff with a friend he found this poster of a Japanese woodblock print, sort of rolled up and definitely abandoned but otherwise in good condition. 

In the night, and amongst some other stuff the woodblock poster looked like this....

Woodblock poster rolled up with other free stuff
Poster and other freebies


But when laid on the floor in daylight it looked like this!

Woodblock poster print laying on floor


It sat in his apartment on a shelf for a while because there was no suitable frame for it......... until I remembered the large black poster frame sitting under my desk!
(forehead slap sound)

black poster frame with original poster
Frame with original poster


I had taken this frame because it was intact and lightweight. The topic seems more suitable to a college dorm room, and it had probably had been in one in the recent past, but that's the good thing about frames - they are so easy to repurpose.  This frame isn't particularly high quality, the frame is some sort of dense pressboard or paper-based material, and the glazing (front clear piece) is flexible acrylic, but it looks just fine.


The reframing

After examining the frame a little closer, it turned out the that the woodblock poster was an exact size match for the frame.  Ridiculous that it took me more than an instant to put these things together.
I got out my tool and started the reframing process.

Step 1. Assemble tools: staple puller (pliers), screwdrivers, staple gun, and new staples

Tools used to change out the poster, pliers, screwdrivers, staple gun
Pliers, screwdrivers, staple gun


Step 2. Unscrew the hanging wire across the back if you are going to change the orientation of the frame.  In this case I was switching from a landscape orientation to a portrait orientation, so I also had to adjust the wire (shorter) and re-clamp the little lead-based wrapping pieces.

close-up of hanging wire attachment
Attachment point for hanging wire hardware


Step 3. Pull out staples.  You will probably have to discard these unless you have a clever way to repurpose used and deformed staples. 

used staples in a pile
Spent staples pulled from the frame


Step 4. Clean glazing (clear front layer) if needed, then lay new poster down behind glazing, and backing material behind that.

Step 5. Use a staple gun, held slightly away from the edge of the frame, and staple a few times on each side.

Step 6. Secure the hanging wire in the proper orientation, this might mean unscrewing the screws and moving them.

Step 7. Stand back and enjoy your work!

Conclusion

I loved loved loved making this freestyle connection, and the poster owner loved the final product. Now he has a cool new and totally free piece of artwork to decorate a sleek bachelor pad. I took the frame not knowing what I would use it for, and I'm so glad I did!


woodblock poster in new black frame
The repurposed frame with its new poster


Happy freestyling!

Tuesday, October 15, 2019

Chair season - the angular colonial repro

DIY Furniture makeover of colonial-style chair with numerous spindles

Background

It is rare that I like the lines of a chair, especially upon first sight.
Such was the case with this wooden chair, which I believe to be a reproduction of something colonial, or maybe just colonial-inspired.


The bottom has a stamp that according to some internet research indicates that it was probably made in the middle part of the last century. The stamp says Fitchburg, Mass.

Refinishing the chair


For a while this chair served as a step stool around the house, and by 'a while' I mean about two years. It held up beautifully and was just the right height for so many tasks, from painting the ceiling and installing light fixtures to hanging art.  During that time it also got a little bit scuffed up, although the finish wasn't perfect to start with - free things rarely are.

Eventually, this winter, it might have been March, I decided to refinish the chair. I actually had to chairs to refinish, which apparently is a critical mass when you have limited storage space and want things to be functional and pretty.

Picture of chair that is going to be refinished and various refinishing supplies
Wooden chair holding the refinishing supplies.


First I used citristrip.....

Chair laying on its side, after first round of finish remover was applied.
Wooden chair after the initial Citristrip application.


...and that was a mistake because OH MY GOD ALL THOSE SPINDLES.
Small round spindles are not ideal for a product that you normally remove by scraping with a flat blade, because with each pass of the blade you only remove a tiny amount of the citristrip/old finish, rather than a 1-2inch section like you would on a flat surface.


Eventually I switched to sanding, but OH MY GOD ALL THOSE SPINDLES.  In the photo below you can see that the bottom half of the chair has been sanded (mostly by hand), but the top is still showing only the finish that was removed by citristrip.

Wooden chair after citristrip used on the top,  and sanding on the bottom part.
Wooden chair after citristrip used on the top,
and sanding on the bottom part.


Wooden chair after switching to sanding as  the method to remove the old finish.
Wooden chair after switching to sanding as
the method to remove the old finish.


At one point I finished sanding and moved on to the step of (hopefully) fixing one of the cross brace pieces that had come loose. To stabilize this I used some wood glue and a belt to hold it like a clamp while it dried.

Wooden chair with loose cross brace being glued, secured with belts while the glue dries.
Wooden chair with loose cross brace being glued,
secured with belts while the glue dries.


At this point I think I erred, because I decided to "branch out" and do something different by painting the chair instead of dyeing it with the pigments I had on hand.
Poor choice.
If I had dyed the wood and not liked it I could have eventually painted it, but one does not paint and then dye.  So, lesson learned, don't let haste and fear drive your design decisions.
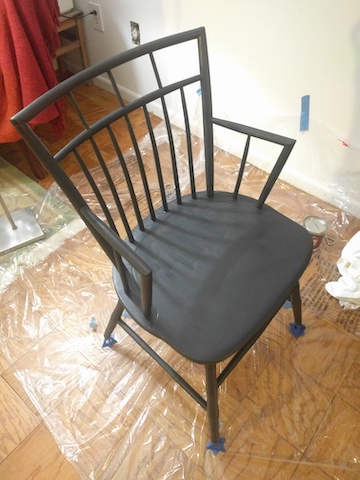
Here it is, painted in Benjamin Moore Black Iron.

Wooden chair after being painted with the first coat of paint.
Wooden chair after being painted with the first coat of paint,
back side.


Wooden chair refinished with black paint, first coat, front side.
Wooden chair after being painted with the first coat of paint,
front side


To my eyes the first coat of paint looked grey, not black.

So I took the paint can back to my hardware store and had them add more pigment. Then I painted another coat.

Better, still not black, but again, the project fatigue was starting to set in. And of course I was peeved AT MYSELF for not dyeing the wood in the first place for fear of having an uneven finish like I had seen on my splat-back chair project.
Silly when I think about it in retrospect.

Conclusion, the finished-for-now chair


Here is how the chair stands (sits?) now.

Spindle-back chair refinished with black paint,  accessorized with decorative pillow.
Spindle-back chair refinished with black paint,
accessorized with decorative pillow.

Spindle-back chair refinished with black paint.


And that is probably how it shall stay for a while, unless I decide to add a top coat.
Do I need a top coat?  How rough am I with my furniture? Polycrylic or shellac?
Or I could try to buy some of that alkyd paint I read about online that supposedly gives a tough enamel finish....  Paint costs can add up quickly and I really don't like a bunch of partially-used cans sitting around.  So many things for the freestylist to consider.

Happy freestyling!


Saturday, September 28, 2019

Chair season - the chair with the vase-shaped splat

DIY Chair Makeover - with pictures

It's always better to have a pair, naturally. But when you only see one of something, whatever, just take that and figure out how to make it work. That was my guiding principle when I spotted this interesting chair on the top of a furniture pile.

Finding the chair to work with


I decided to take it since it was a classic shape, solid wood, and I could see that the seat would be easy to remove and recover with new fabric.  After getting it home I decided to strip the finish and dye it black. The quasi-inspiration was chair shown (below) in navy blue, except with a different back, a fabric seat, and a darker (black) color......


Pottery Barn - Napoleon Chair


The color inspiration came from these gorgeous chairs featured in one of the homes designed by Amber Interiors out in California.  The pulled-together-yet-non-matchy-matchy-ness of this dining space is superb.  Of course I'm not going to go out and buy matching shaped chairs, but I'm definitely going to experiment with black wooden chairs for a while.

credit: amberinteriordesign.com
http://amberinteriordesign.com/project/client-tupac-meets-biggie-to-decorate-the-diggies/


Make sense?

Refinishing the free chair

So here we are, with the citristrip applied.


The key with citristrip is to use so much that you cannot see the wood underneath. This is how it will have enough time to act before it dries out.  After scraping off a goodly amount of citristrip + old finish I got to the point where it became faster to just sand off the remaining bits of old finish.  Eventually I got to the point where the frame, as far as I could tell, was down to the wood.


After all of the stripping and sanding, and more sanding, and more sanding, it was time to dye the wood!  I used an aniline dye dissolved in water and painted it on with a brush.  There is probably a better way to do that type of application, the paintbrush dipped in water is pretty drippy.


The initial round of dye application (above) revealed that some spots were resisting the dye, and hence needed more sanding to remove the stubborn remnants of the original finish.
So I did more sanding.
 Then I applied another round of dye....


As I was applying the dye I was naturally filled with doubt.....
Was black the right choice?
Would it be too dark?
Would the finish be uneven?
Would it end up looking like crap?

Well, after dye, furniture wax, and a recovered seat (including a new layer of foam and batting) I got my answer.

The chair makeover, completed


Here's a close-up of the corner so you can see the detail of the printed fabric (from Spoonflower.com ) and also appreciate the soft lustre of the waxed finish.


So there it is, for better or worse, my dark floral makeover of a classic wooden chair.
If you look closely there are a few spots that resisted the dye, but maybe I can pass that off as the unique variations of a hand-finished piece? (Although we all know the truth is that I just get tired of sanding.)
 Hopefully if you didn't know what a splat was on a chair you've also learned a new furniture word!

Happy freestyling!


Saturday, September 7, 2019

Grilled to meet you - update

Finding a tiny charcoal grill

Remember in early April when I found a small charcoal grill and gave it to a friend who was longing for one? I wrote about it in this post.

Here is the grill as first discovered...

a grill, discarded.


Transporting a tiny charcoal grill, using a laundry basket and towels

Here is the tiny grill ready for transport...


a grill, rescued and slightly disguised for transport


New owner enjoying their new (free) tiny grill for some summer dining


And now, here is one of the overjoyed users, showing just how nice it is to have a patio set and a grill for summer food prep. (See that little folding table? Yes, it was also a freestyle find.)


Happy free styling, share your requests with the universe - you never know what will turn up.