Tuesday, September 28, 2021

Wicker Chair Makeover

The Find

I found two of these worn wicker chairs one night. They were lightweight and had a good shape to them, too bad someone put them out with the trash - but good that they were still salvageable!  I really liked the wide armrest and gracious curve of the backrest - nice lines.

White wicker chair sitting on grass
Wickerness.


The (Half) Makeover

The white paint on these wicker chairs was cracked, flaking, and overall in really poor condition. In addition, on some of the legs the wrapping was coming undone.  I fixed the loose wrapping with some super glue and clamps - that seemed to do the trick!

Wicker chair leg with loose wrapping
Coming undone


cracked paint on wicker chair
Cracked paint


Missing paint section on wicker chair
Paint missing on some fibers


It was clear that these chairs had spent some time exposed to the elements.  I've never refinished wicker furniture before, so this was a new process for me.  I decided that the first step was, AS ALWAYS WHEN PAINTING, surface prep!  So I used a stiff scrub brush to scour off the loose paint as best as I could.  Then I used a can of spray paint to try to get into all the nooks and crannies of the wicker.

Can of spray paint with 2X UltraCover Paint+Primer in color 'Ocean Mist' Gloss.
Ocean Mist spray paint can


The color I used was 'Ocean Mist', a very very pale blue. Wicker has many many nooks and crannies, and I used an entire can of spray paint on one chair without even fully coating it to my satisfaction.  It was maybe 1.5 coats in some spots, but only 1 coat in others.  This resulted in  "uneven" color across the chair.  On some of the chair-front the blue color was much more apparent because that part had received a second coat of spray paint.  I estimated that to spray both chairs and get full coverage with even color would take 3-4 cans of spray paint.  If I were planning to keep these chairs for a long time I would definitely consider that a fair investment in such nice patio furniture.  However, I knew these chairs were only going to be around for a few months, and in peak summer I don't actually spend much time sitting outside. So I stopped at one chair with as much coverage as I could get on the underside and topside.  You can see that the pale aqua color was starting to be visible, but that a few more coats would have helped smooth out the surface.

Detail of wicker after being spray painted
Ocean Mist - 1 coat


Here is the chair in its home-corner after getting as much spray paint as it was going to get from me.

Wicker chair sitting on wooden deck next to plants
Sitting pretty


Conclusion

The color-mismatched pair of wicker chairs hung out for a while and the newly spray-painted one held up nicely.  The chair shape was very comfortable, and if I had a larger and more permanent space I would have hung on to these curvaceous beauties!  But alas, they eventually went on to their next home, where I hope they will bring others comfortable repose.  

Happy freestyling - don't be afraid to shift your plans in response to a reality check!

Light blue wicker chair with pillow, on a wooden deck
Sitting prettier with a freestyle pillow


Tuesday, September 14, 2021

3rd Life For A Pair of Frames

The Frame Finds

A while ago I posted about finding a pair of frames and the subsequent makeover using gold foil (failure) and gold paint (decent).  As part of the continuous parade of ideas, free stuffs, and design 'pivots' in this home space frames are known to come and go - and eventually those frames went on their way too.  But the story doesn't end there! No, these particular frames ended up with a new life and an old identity all at the same time....

The First and SECOND Makeovers

Just a recap, these frames looked like this when I found them with French architectural photographic prints inside:

Black and grey frame with a sepia tone photograph of a building
First Version


Then after the first makeover they looked like this, featuring some vintage bird images downloaded from the Biodiversity Heritage Library, resized, and printed on photo paper:


Gold frame with an illustration of a bird
Second Version


That is the form in which I gave them to a friend who was looking to fill some empty walls.  One day, while we were hanging some *other* art pieces around the house, I let her know that these frames still had their original French architectural prints inside - just hidden in the back under some cardboard.  

Surprise! 

She had, by pure coincidence, recently found and hung a picture of Notre Dame in Paris in another room of the house.  I showed her the original French architectural prints, and a little bit of an idea was planted.

Later on I got a message that she had decided to repaint the frames (second makeover!) to match the green matting on her Notre Dame picture and to reveal the original French architectural photo prints (the birds happily taking a backseat).

Pair of green frames with sepia-tone photographs
Third Version


Conclusion

Is this a conclusion, or will these frames go through a third makeover? The life of a freestyle find is full of surprises. For now these framed prints live on a lovely gray wall, flanking an image of Notre Dame and the Seine on a sunny day in Paris. (Also loving that chair rail and moulding on the lower wall.)

Three framed pictures on a grey wall.
Where it's at.


Happy freestyling, and don't forget you can sometimes store one piece of art behind another in the same frame!


Tuesday, August 31, 2021

DIY Felted Wool Yarn From Old Blazer

The Inspiration

Thrift stores are filled with well made old business attire, things like suite and jackets or blazers.  In some cases you can find items made of 100% wool (except for linings which tend to be polyester, acetate, or something similar).  Those of you who have lived in cold climates might have more experience with the benefits of wool, but it really is an amazing fiber.  In a world full of synthetics that break down but don't biodegrade, maybe it is time to look back to the classics - wool, linen, and other natural fibers.  

For this project I was looking to make my own wool yarn. There is looooots of cheap yarn out there, but most of it is acrylic, and to me acrylic yarns feel sort of plastic-y.  Wool yarns exist but are not always available at the desired price point at your local craft store. All this to say that I decided to make my own wool yarn, and as my "raw material" I used an old wool blazer from the thrift store in a beautiful dark burgundy color.


The DIY Wool Yarn From an Old Blazer Method

Step 1. Find a 100% wool garment and remove any non-wool lining. 

It has to be 100% wool, if it is blended with any other fiber it will not shrink and felt properly. If an item is not labeled properly you can always try to felt it and see how it goes, but be prepared for lack of shrinkage! This happened to me recently with a name brand sweater (purchased at the thrift store) that was labeled as 100% wool. It did shrink a little, but did not fully felt, so I suspect there was some sort of stretchy fiber in the blend.  Removing the lining can be done in many ways, you can either cut the lining fabric close to where it meets the wool fabric, or you can use a seam ripper to cut the thread holding them together. 

Step 2. Wash your garment in hot water with a long agitation cycle.

Depending on how your original garment was dyed, the color may run. Plan accordingly. If you are not sure whether a garment is color-fast, wash it alone.  Once the washing cycle is done you should see that the garment has shrunk (sometimes significantly). If it doesn't look felted, you can wash it again in a hot cycle.

Step 3. Dry your garment in a dryer with hot air.

I've seen suggestions for including a tennis ball or other items to help with the felting process, but I've never used them.  If you forgot to detach the non-wool lining you should notice that it seems larger than the wool pieces by now.

Step 4. If you garment has felted, but not fully, repeat steps 2 and 3.  If your garment has felted to the point where you can't see the warp and weft properly it's ready to cut.

Step 5. Decide how thick you want your wool yard, and if you want many short straight strands, or one continuous piece with a few curves in it.  I chose to make one long piece of yarn from the entire sleeve of a jacket. If you want to trace out a pattern, use a marking pencil that will remain visible on your fabric.

Felted wool fabric, scissors, and white pencil
Felted fabric and supplies


Step 6. Start cutting!  I chose to free-hand cut the sleeve, starting at the outside edge and working around the outside towards the inside like a spiral.  I tried to keep the width of the 'yarn' to approximately 1/4 wide. There were a few places where I had to trim off an extra corner because I was trying to avoid sharp curves.

Cutting the felted fabric, spiral from the outside


Step 7. Examine your completed yarn string. Trim off any excess or rough edges that bother you.
Pile of wool yarn
All cut up and nowhere to go


Step 8. Wind your new yarn up into a ball so it doesn't get tangled. It is now ready to use!
Ball of dark red wool yarn
Ball of yarn, ready to be reborn!


Conclusion

This DIY wool yarn from a felted blazer method yields yarn is is wide and flat, not round. If you want to have yarn that is closer to being 'round' you could cut a narrower width - which would take longer.

Happy freestyling, don't be afraid to reuse and remake!


Sunday, August 15, 2021

Bonanza of Blue Patio Furniture

 The Furniture Finds

One two separate evening walks around the universe I came across a pair of blue patio chairs, and also a metal-frame loveseat with blue cushions.  All of these pieces had seen better days, and I'm guessing they had been sitting outside on a porch or patio for a bit.  But they all seemed intact (no loose legs or fabric rips) and ready to benefit from a good cleaning.

Pair of blue fabric and metal chairs stacked
Blue chair pair (stacked)


Loveseat with metal frame and blue cushions, front
Not feeling the love...seat


Metal loveseat with blue cushions, back
Loveseat, backside


The Cleaning

The two blue chairs were, despite a bit of dirt, in perfect condition. (Thank you curb givers!). So with a little soap + water + brush action they cleaned up nicely.


With the loveseat I was only able to wash the covers and the smaller (upper) cushions in a washing machine.  The seat cushions will have to wait until another solution presents itself, they will just stay as they are since the plan was to keep the piece outside anyway. But again, thank you curb givers for putting this out so it could find a new home.


The Conclusion

I have some friends who just bought a house and mentioned they were looking for patio furniture! 

What coincidence!  I realized that my limited patio space was best used for plants, not for lounge furniture (maybe if this were a large space - but it is not!).  So I offered up the blue beauties (and some orange and white pillows I had found and cleaned) and everyone was happy.

Look at this lovely setup!

two chairs and loveseat on a porch
Sitting pretty on a new covered porch.


Happy freestyling. Don't be afraid to take something, clean it or fix it up, and then offer it back up to the world as an act of kindness - someone will ALWAYS want it.

Tuesday, June 1, 2021

From Dining to Patio Chair via White Vinyl Fabric

The Find

Quite a while ago I found a pair of black metal dining chairs with tan "suede" seats (definitely some kind of polyester fabric) that were just kind of...meh.  

Uninspiring.  

Two dining chairs with blank metal backs and beige seats
Uninspiring chair pair.


A friend was looking for some patio furniture, for which painted metal furniture is pretty well suited. The result of the design consultation was that recovering the chair seats in white vinyl would be a good makeover option. Vinyl is wipe-able and that is a convenient factor in outdoor furniture which gets dusty and exposed to the elements. Onward I went with the seat recovering.

The Makeover Results

The white vinyl fabric was a little thicker the original polyester suede, and thus harder to make perfect corners with, oh well. I think it turned out out very serviceable. 

Two metal chairs with white seats on patio
Chair Pair


Conclusion and Makeover Bonus

Soon after delivering the recovered chairs I found a set of two matching lumbar pillows. Score! The blue pillows on white seats give a nice ocean-inspired vibe to this little corner.

Two metal chairs with white seats and blue lumbar pillows on patio
Chair Pair and Pillow Pair


Happy freestyling, don't be afraid of a little chair seat recovering project!

Tuesday, May 25, 2021

I-Loominating! Scrapwood frame loom for under $2

The Idea

Weaving seems like a fun, low commitment, low pressure hobby. No deadlines, lots of potential yarns and fibers to experiment with. Let's build a frame loom! Even better, let's build a frame loom for almost free using scrapwood, some screws already on hand, and a box of wire brads that cost less than $2. Yeah.

The Creation

I had some easy-to-handle sized scrapwood pieces, so I laid them out on the floor to see how big my loom would be if I didn't make any cuts.  I thought it might be nice to have a wider piece across the bottom, so I just went with these pieces as they were and decided to make a 'vertical' (portrait orientation) loom.

four pieces of wood in a rectangle sitting on the floor
Loom pieces


Not pictured in this post, but I happened to have a vat of indigo blue dye already on hand when building the loom, so I dipped the pieces in the dye bath just for funsies.  After the wood had dried for a few days I gave it a coat or two of shellac (already on hand from another project) because I wanted a smooth surface to minimize any yarn snagging.

Next step was the placement of small brad nails to hold weaving warp.  This stage is where I confirmed that I wanted to make a 'vertical' loom rather than a 'horizontal' loom. I laid out a piece of painters tape on each of the short pieces to make a straight edge and then measured 1 cm increments.  I then nailed in each brad at the marked increment.  I chose to use brad nails because they have a small head which seemed like it would make warping the loom, and later removing the warp, easier.

Loom pieces with green tape and small nails in a row along the tape edge
Tape measurements and nailed in warp supports


Tip: Do not nail your nails through the painters tape, nail it NEXT to the painters tape edge. The small space between each nail can make removing any stuck tape a bit tedious. I think I used tweezers at some point because I couldn't fit my finger between the nails.

Close-up of brads nailed into blue wood loom piece
Brads nailed in place


Once the brads were all in place I assembled the 4 loom pieces together, using two screws at each corner. If you only use one screw there is a possibility that the pieces could get 'out of square' with each other, and nobody wants a wonky loom.

Top of loom with white warp threads
Loom top with warp threads


Conclusion

The loom is heavier than if I had used MDF or some sort of thin plywood, but as far as a scrapwood loom that cost $2 and some time it works juuust fine.  Here it is with a test weaving showing that everything is holding together under the warp tension and (light) weight of the weft fibers.

completed blue loom with in-progress weaving on loom
Loom in action


Happy freestyling, or bargain creating if that is where the wind takes you!

Tuesday, May 18, 2021

Basket liner from thrifted skirt lining

The Find

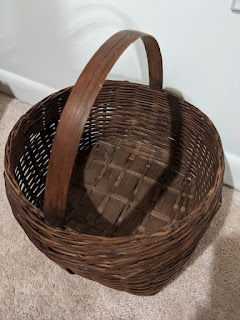
This lovely basket was out on the curb one night, and I liked the color, size, and generous flat handle. It seemed like just the thing to hold some yarn supplies, so home I went with my new-to-me basket. After a thorough vacuuming and  cleaning wipe down it was ready to go back into service.

Brown basket sitting on carpet, side view
Basket: side view


Brown basket sitting on carpet, top view into basket
Basket: top view


Bottom of basket, showing worn label that says 'Handcrafted Philippines'
Basket: worn label on bottom says 'Handcrafted Philippines'


The Makeover

Although the basket is it relatively good shape, since I planned to store yarn inside I didn't want any possible snags on the basket sides.  Luckily I had extra smooth polyester fabric lying around from a thrift store skirt that I had deliberately shrunk in order to make felted wool for an art project.  The skirt lining became basket lining!
 
Lining material with knotted end


How did I turn this skirt lining into a basket lining?  All I had to do was tie a knot in the cut-end of the lining material, put that in the basket, fold down the finished edge over the side of the basket, and tie another small knot around the handle using the edges of the skirt back slit.

Conclusion

Here is the newly lined basket (and re-used skirt lining) ready to start serving as wool storage.
Basket with grey polyester fabric liner and felted wool skirt remnant
Lined basket with felted wool skirt remnant


Happy freestyling, it never hurts to be open to a variety of storage solutions. You never know what the curb-iverse will send your way!

Tuesday, May 11, 2021

Mood Mirrored Indigo

The Find

Textiles can be a tricky freestyle find, there is always a question of the lurking unseen microbial presence on whatever fabric has been sitting outside, unattended, for some amount of time.  And of course, things on the curb could always fall victim to a lifted dog leg. But if something is small enough to go STRAIGHT INTO THE WASHING MACHINE upon arrival at home, well, then, I feel pretty good. I've stayed in hotels, how different could it be?  Now that you've read my thoughts on freestyle textile find hygiene, let me tell you about ... a freestyle textile find!

I came across this cool pillow cover (with separate insert) embellished with numerous tiny mirrors, one of a few options in a giveaway box at the end of someone's driveway. So much sewing detail, possibly done by hand - I appreciate such work.  There is no tag on the pillowcase, but the fabric felt like cotton, so I immediately had an idea for a makeover.

White embroidered pillow sitting on ground
Freestyle pillow find on curb


The Makeover

I had an existing dye bath setup from some exploratory home-shibori fun in the color Indigo, and the dye type was one for natural fibers. So after a hot wash in the washing machine, the pillowcase went into the dye bath to sit for a while and (hopefully) absorb as much dye as possible.  Without any fiber information I wasn't sure how the results would look, but as a hedge I let the pillowcase sit in the dye bath for a long time. As in, it sat in the dye bath for multiple weeks. I also decided to order some dye fixative, since my previous shibori experiments had faded quickly without this critical ingredient.  Lesson learned.

Two bottles, one holding dye, one holding color fixative
Ingredients used to dye pillowcase


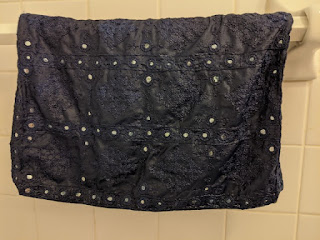
This is what the mirrored pillowcover looked like when it finally came out, lots of deep indigo color.  But would it hold?

Dark blue wet pillowcase hanging on towel rod
After the dye bath


There were hopeful signs that the dye fixative had done as promised since the color was dark even after rinsing the textile in cold water until the water ran clear.  But the true test is always the washing machine.

Conclusion

The indigo color held up well after a washing machine cycle, so I'm calling it a success.  Here it is, minimally 'styled' on a couch with two other throw pillows (yes, they were free too, the complimentary colors are a coincidence).

Indigo mirrored pillowcase sitting in front of two orange patterned pillowcases on grey couch.
Mirror mirror on the indigo blue pillowcase


Here are two detail shots that highlight the interesting diamond pattern embroidery.

Embroidery detail: angled view


Embroidery detail: front view


Happy freestyling, don't be afraid of a little elbow grease that might be needed to clean something and make it your own!

Tuesday, May 4, 2021

From Curtains to Cushion Covers

The Find

Some lovely people left a set of paisley curtains and linen sheer curtains out on the curb, with an even lovelier note that the curtains had been dry cleaned and were free for the taking.  Thank YOU considerate givers!

Curtains wrapped in plastic bags
Ready to go!


Detail of the paisley fabric with brown, gold, and blue colors
Paisley close-up


The Re-Use

I wasn't quite sure what project would use up ALL the fabric, but it was clear that making new seat covers for some thrift store chairs would be a good use for some of the fabric.  We had purchased a set of 4 wooden chairs from the thrift store with lovely lines but less-than-comfortable seats.


Wooden chair with white seat
Thrift store chair


The first step was the remove the seats from the frame, and then remove as many staples from the chair bottom as possible.  I discarded the old foam and batting.

Wooden seat removed from chair, sitting on old fabric
Wooden seat disassembly


All the seats got new foam for cushioning, definitely NOT free, but worth it for a comfortable place to sit.

Green high-density foam, new in package
Foam in package


Due to the size of the chair seats, we needed 4 separate pieces of foam.  I laid the wooden seat onto each piece of foam in order to draw the outline.


Wooden seat sitting on foam to trace the outline
Ready to trace the outline


After cutting and shaping the top of the foam with a slight curve I cut out the required amount of fabric for each seat cover. No photos from these steps, but there are lots of tutorials online. I used a medium-duty staple gun to staple the fabric to the bottom of the wooden seat, carefully checking for fabric wrinkles and pulling the fabric taut as I stapled along each side.

Conclusion

The chairs turned out great, much more comfortable with the new foam!  There was plenty of leftover fabric, so I had some special help in making a table runner out of the same fabric.  Now that's coordination!

Wooden chair with new fabric next to blue table with matching fabric runner
Newly recovered chair seat


Happy freestyling! May the freestyling force be with you wherever the galaxy takes you.

Tuesday, April 20, 2021

NQF: How to dye an Ikea sheepskin in the washing machine

 Not Quite Freestyle (NQF)

How to dye an Ikea sheepskin in the washing machine

The cat is a pampered cat, as befits his status as undisputed apartment ruler. As he has demonstrated a fondness for fleecy and wooly things, his human servants thought he would appreciate a sheepskin.  The human acquired a RENS sheepskin from Ikea for the cost of approximately some-amount-that-the-cat-doesn't-care-about.  

Tag of Ikea RENS sheepskin
Tag on back of Ikea sheepskin


Upon close inspection the cat commented that he didn't think the sheepskin coordinated properly with his eyes, so we decided to dye it purple as befits his royal majesty.

Cat looking at sheepskin and bottle of dye
Inspection 1.


This was pretty simple, fill the washing machine with dye and hot water, but pause the wash cycle before it agitates. Put the sheepskin in, and swish it around with a stick every once in a while. While wearing gloves, pull it out to look if the color is getting any darker.

Purple sheepskin in machine
In-progress view


After a good bit of siting in the washing machine (maybe 2 hours), add some gentle soap, close the lid, and let the gentle wash cycle continue.

Once the washing machine cycle is done, DO NOT PUT THE SHEEPSKIN IN THE DRYER.  Instead, place it somewhere it can fully air dry, like on top of a bucket inside a bathtub.  Wait for the sheepskin to air dry, this could take a while depending on the humidity level.

Purple sheepskin drying on bucket in tub
Drying time


After the sheepskin has dried, fluff the wool generously, then present it to his royal majesty for final inspection.

Cat napping on purple sheepskin
Satisfaction


Conclusion

With its new purple wool the sheepskin passed inspection, and the sheepskin was granted a charter bestowing upon it the royal cat-nap privileges in perpetuity. 

After completion of this project, the humans ran an empty load in the washing machine to flush out any remnant dye, and all was well in the land.