Showing posts with label home decor. Show all posts

Tuesday, May 9, 2023

Fauxbulous Marble Makeover Part 1: Lamp Repair & Painting

 The Find

I found this discarded table lamp in the autumn (along with some others around the same time, maybe lamp season is a thing here too?).  I immediately liked the classical square column, sort of obelisk-y, shape because classical forms speak to my soul, never mind the giant crack across the body....

Brown column table lamp laying on blue towel


Close-up of the crack around the column


The Repair

Cracks can be filled! And filling the crack is what I set out to do, using some Goodfilla brand wood filler (not sponsored, just what I used) in a few layers to try to get the fill material as deep as possible.  I should also mention that I cleaned the entire piece and removed the electrical components.


Lamp body and jar of wood filler
Lamp body and wood filler


Cracked lamp body after wood filler application
Close-up of the repair using wood filler


I fully acknowledge that the **right** way to fill this type of crack is to over-fill and then sand back.  However, I hate sanding, so I try to avoid it, thus I tried to fill to the surface level and then hoped that the paint and pattern brewing in my mind would fool the eye enough.


Cracked lamp body after wood filler application and clean-up of excess
Repaired crack in the original lamp body


The Makeover

My inspiration came from alabaster and marble lamps, but of course I didn't want to pay hundreds of dollars, time for an experiment with fauxbulous finishing!  There are many online tutorials and videos about faux finishing, but the key concept is layering layering layering and some special sauce in the form of scumble.

Step 1 was, of course, primer.  I used Zinsser Bulls Eye Zero Primer For All Surfaces.  I've had this can for a few years and it comes in very handy.  I applied the primer with a brush.

Front table of Zinsser Primer can
primer

The first coat of primer highlighted the repair more than it obscured it.


Lamp body Repaired area after first layer of primer
Repaired area after first layer of primer

After a second coat of primer the base was looking more even, but I wasn't going for a full flat white primed based because the faux marble look is all about layers.

Lamp body repaired and painted with two coats of primer
Repaired and primed

As my base color I used a paint sample I has on hand, Behr Etched Glass, probably mixed with something else that I can't remember right now.  I didn't want a stark stark white because in a natural material I would expect off-white and shades of gray to reflect varying mineral content.

Paint sample lid, Etched Glass

Below is a photo of the various paints I mixed together to achieve the different layers.  There are no set ratios, I just did it by eye. They included the sample of Etched Glass, a free half-used paint in the color 'Canvas' (a pale beige), and some Benjamin Moore Wrought Iron (an almost black but not true black).

Three types of paint colors and a bottle of glue
Paints and glue


Let's talk about scumble. Scumble is the sort of background cloudy layer that will form the base of the more distinct veining that will be layered on later.  To achieve my scumble I used a mix of the paints to get a pale grey, maybe a pale grey-brown?   I dabbed it on with a piece of cut up sponge (shown with the yellow arrow in the photo below) and then dabbed the excess off with a rag (shown with the blue arrow in the photo).  It isn't complicated but you do need to work quickly so that the scumble layer stays faint.


Lamp body after priming, base color application, and scumble application
Scumble on with the sponge, scumble off with the rag

Here is a different side with a fainter scumble.


Lamp with gray scumble layer of faux finish
Lamp with scumble layer of faux finish


After the faintest scumble, do another layer with a slightly darker color and less application overall.  If anything looks to straight-line just wipe it off quickly and start over.


Lamp base closeup after scumble layers
Scumble variation on different sides


The veining is the last part, done with either the edge of a feather or a small paintbrush held very loosely in the hand.  Follow the general direction of the scumble, usually a diagonal, but keep a very fluid line.  Remember, you're mimicking geological uplifting and folding of layers of sedimentary rock, it's not going to be precise.  After finishing with the paints I decided to shellac the surface to protect the paint job, but this step is optional.

Below is a closeup of the bottom part of the lamp body after its repair and faux marble finish. Does the pattern distract enough from the repair?

Detail of fauxbulous faux marble finish on the lamp base
Detail of fauxbulous finish on the lamp base


Conclusion Part 1

After all that fauxbulous painting it was time for a lie down.... with the other electrical components before being reassembled.

Repainted lamp with other electrical components sitting on green background
Lamp body with new faux marble finish and electrical components


Happy freestyling, why not give faux finishing a try? You might get some fauxbulous results!


Tuesday, February 9, 2016

A matched pair of black torchiere lamps (if you ignore the fact that one is a wee bit wonky)

Lamp kits cost approximately $15, and you can make a lamp out of just about anything (says this tutorial).  So why are decent lamps so expensive in stores? 
And yes, I realize how curmudgeonly that sounds.
 ...grumble grumble, store bought lamps? Who are you, Rockefeller?...
 The point is that when I find a pair of lamps, even if one of them is slightly wonky, I'm totally going to take them. 
Such was the case with a pair of 6-foot tall lovely matte black torchiere lamps with frosted glass shades.
See?
With that description you'd take them too, especially since they still had working CLF bulbs.

The lamps had both been partially disassembled because the center post has 3 sections that can be unscrewed from on another.  They looked like this when I found them.


 One lamp was just fine, and needed reassembly but no fixing, it now stands near the entryway and looks rather normal.  Maaaaybe it leans ever so slightly.  Not a problem for me, because free.


The other lamp however, had a problem in its base.  Under the metal base there was a large donut-shaped ballast (probably made of lead and cement dust).  On the normal lamp it looks like this from the side, with the gray heavy ballast extending down past the metal top with a channel for the cord to go through.
Lamp base, side view


From the bottom it should look like this, with an intact ballast.


 Note than on the intact lamp the ballast sticks down far enough so that the nut (at the end of the red arrow in the picture) does NOT touch the floor, because to balance a lamp on the bend of a cord would be silly, and tippy, and useless.

Unfortunately, the wonky lamp had only half its ballast-donut when I found it, and after handling the ballast I realized what was left was beyond saving.  Sadz.  Also, major design flaw, the black metal base top does not extend down past the nut/hole/cord bend.  So without balancing a lamp on the bend of a cord, and scratching the floor to hell, how to get some more light out of this lamp? 
Answer: Make a different kind of ballast, for cheap. 
I thought about trying to cast some cement.... No.  Acrylic? No. All too messy and expensive.  But eventually I hit upon a very economical solution.

Now the wonky lamp stands up all nice like this.Standing tall next to the couch with its freestyle cover, illuminating the very living room where I'm writing this post.


Curious how I did it?  Let's zoom in to the base a little more. 
You can see a blue blanket wrapped around something at the base of the lamp. Oooh, secrets, exciting!

Secret Yoda maybe?


Peel back the blue blanket and we see that that something is a purple bucket with another blanket on it.  Less exciting, but much more snuggly, than bricks.


Under that multi-colored blanket, inside the bucket, are some assorted heavy items to balance the lamp and fill up the bucket so that the lamp stands straight.  This magical ballast is a few large bags of dried beans, assorted textbooks, and one copy of the new edition Joy of Cooking.


The lamp itself is sitting on some strategically placed magazines so that the nut/cord situation doesn't throw everything off.  I don't have pictures of those, because by the time I got around to writing this I didn't feel like disturbing the bean/book balancing act.

The only things I bought as part of this solution were the purple bucket (reusable in many ways) and the dried beans (edible!).  So if I ever part ways with this particular freestyle project I won't be heartbroken about the sunk cost, all $9 of it.  However, given that both lamps have been going strong for over 10 months I'd say this was a big win. 

Happy freestyling and let your creative re-use light shine!

Tuesday, January 26, 2016

@Friends' - From stock photo to original abstract art. Yes you can-vas!

During one of my of my regular rounds through the local trash heaps I came across these mirror image tree prints on 'canvas'.  It was not woven like a textile, but had a slightly textured matte surface one one side to make it look different than a standard enlarged photo.  Is there a specific name for this type of material? Photo-canvas paper?  Whatever.  The important thing is that the canvases were free.
Front and Back


The prints were a nice size, nice square shape, and had a sawtooth hangar on the back.  I wasn't going to paint anything on them, let's be honest about that right up front.  So I handed them off to the same friend who had done a lovely turquoise painting on another found canvas.

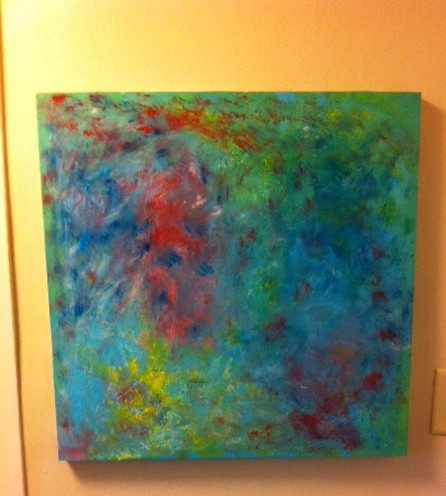
The photo below shows her first lovely result.  This abstract mix of rich colors reminds of the water in an impressionist painting.  Yeah .... I would not have been able to come up with that.

Canvas 1


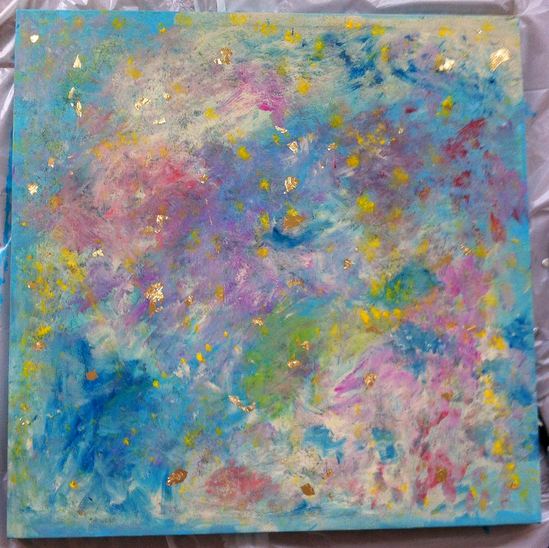
This was her similarly dreamy treatment of the second canvas.
She used a similar process but with lighter colors.  Pinks and whites instead of reds and dark green.
Note the gold leaf sparkle fun!

Canvas 2
Both canvases now hang in her entryway to brighten otherwise muted beige interior hall.

Happy freestyling, unleash that creativity!


Tuesday, January 19, 2016

The Freestyle Plant, A Retrospective

Over the years I've given away many plant cuttings in the spirit of freestyle gardening for all!  One small Sansevieria purchased in approximately 2004 has been the gift that keeps on giving.  Really.  If you think you can't keep a house plant, you're wrong.  Just buy a snake plant and grow your confidence.  The variety I so casually purchased back then doesn't grow very tall, maybe 8 inches (other varieties can be 4 feet high), so it is a great option for small spaces -- and for giveaways.

So, how are those giveaways doing today?
Today's Sansevieria retrospective looks at two examples.

Example 1.
A freestyle blue ceramic pot and plant cuttings gifted to the fabulous Lady K in 2012.  The blue pot was from le dump and had no bottom drainage hole, but Sansevieria isn't picky.  Besides, look at that awesome red dresser, what plant wouldn't look good against that?


Here is the same plant photographed about three years later, sometime in late 2015.
Look at that lush greenery!  Even on a northwest facing windowsill it is still going strong.
The original blue pot went to a farm in the countryside.
~~~

Example 2.
We're not quite sure what this plant looked like when it was given away.  I wasn't expecting to keep track of these giveaways when I was thinning out my container garden collection.  It was probably one of the ones featured in this 2012 post about paying it forward with plants.  Safe to say that it was smaller, but after a few years and a fancy new pot this one is definitely still happy. Also, this is now on a north-facing windowsill in a bright kitchen, but with no direct light.  In true Sansevieria style it doesn't seem to care one bit.

 So there you have it, anecdotal evidence of the tough-as-old-boots qualities of this modestly sized Sansevieria variety.  It doesn't grow fast, but it can survive just about any home environment.

Happy freestyle gardening!

Tuesday, September 22, 2015

A square canvas gets the turquoise treatment

If you want to buy a large canvas at an art supply store it will cost you a pretty penny.  If luck is on your side you just might find one for free, with something already painted on it.... that you don't mind covering up and making into something pretty.  Example, this large canvas (or imitation canvas?) picture of Charlie Chaplin I found back in early summer.


 The dimensions are something like 30 inches by 30 inches. At first I didn't know what I would do with it, but that doesn't usually stop me from saving something from the landfill if the possibility of creative re-use is in the air.  Soon after acquiring Mr. Chaplin's image I learned that a friend had signed a lease on her very own studio apartment and wanted help decorating it.  Perfect!  I told her about the giant canvas and an idea to do some sort of abstract painting.  She was open to the idea of creative re-use to make a custom piece, so I delivered the canvas, she painted it white to cover up the previous image, and then added shades of turquoise paint to resemble an ocean surface. 


Her living area furniture (2 leather sofas inherited from a former roommate), wall paint, and carpet are all in earthy shades of brown and beige so the bright blue square contrasts and brings in a nice accent color.  The blue painting also brings some interesting texture to an otherwise flat beige wall.  The decorating continues, perhaps with more freestyle inputs.

Happy freestyling-- keep an eye out for free art supplies, someone will want them!

Tuesday, September 15, 2015

Vellllllllvehhhhhhht pillllllloooooooows

Pillows are a rare find on the loading dock. 
Perhaps because they are lightweight and easy to move, perhaps people here just don't go for throw pillows, perhaps people throw them out in trashbags and I never see them. Whatever the case, I was surprised (delighted) to see these lovely throw pillows late at night, clearly part of a massive moving-out discardfest.
 No, I did not take the couch, or the blanket.
Maybe I should have, but the couch had a few bites taken out of it from a pet and I don't really need another blanket...... Anyway, look at those pillows!  Do people know how expensive those pillow inserts can be??? These pillows didn't smell, had no rips or stains, and had clearly only been on the loading dock for a few hours, so into the washing machine they went. After I washed them I took the inserts out to read the labels (wow, real down, survived the machine wash just fine) and found out they are brand name pillowcases with nice hidden zippers. Did I mention they're velvet, velvet, and velllllllvehhhhhhht?

Now they sit like lovely jewels on the couch, waiting to support your head, and to look darn good while doing just that.

Happy freestyling.