Tuesday, January 21, 2020

Inside of a cheap measuring tape

What to do with a stuck measuring tape? Take it apart!

I found this measuring tape and thought it would be useful. Unfortunately it didn't really work, and by 'didn't really work' I mean it wouldn't retract and wouldn't extend past a few inches.  So I decided to take it apart and see if there was something that could be fixed, and just to see what it looked like inside.


The disassembly started by unscrewing the back screw that also held the belt clip.


A little surprisingly - that one screw was the only thing holding the two halves of the case together.  The black soft plastic case slid off the yellow hard plastic, and the two halves of the yellow plastic just pulled apart.


You can see the measuring tape wound around a central wheel and held under tension with a metal spring.  Unfortunately after taking the whole device apart I wasn't able to fix any part of it, so I gave it to a friend who decided to affix it to a table as a permanent measuring aid.


Conclusion

Be sure to wear eye protection and hand protection if you decide to take apart a measuring tape, or any other device containing metal under tension.  The edge of the measuring tape is really sharp and can cut you if it snaps or releases from tension.

Happy freestyling, and if you can't repair something and decide to take it apart - do so while wearing the proper personal protective equipment. 

Tuesday, January 14, 2020

Woodsy cachepot makeover

Always take the ceramic cachepot

A few types of freestyle items are almost ALWAYS useful.  These almost-always-useful items include metal wire shelving (preferably with shelf clips), picture frames with front glazing intact, and ceramic cachepots and planters (cachepots do NOT have a drainage hole in the bottom, planters generally do have a drainage hole, but sometimes the words are used interchangeably just for extra uncertainty).  I say that cachepots and planters are almost-always-useful items because I do a lot of container gardening, and having spare pots makes it easy to split plants and give them away.  So when I saw this intact ceramic cachepot, you can guess what my reaction was.....take it!


Ceramic cachepot with wood texture and bird detail
Woodsy ceramic cachepot


Now, I know what you might be thinking --  this cachepot featuring faux bark with birds and flower detail looks a bit faded.  The birds might have been painted at one point, you can see a little trace of red on the neck of the leftmost cardinal, and there was a bit of yellow left on the bottom of the flower, but the paint on those details had mostly worn off.  I offered it to a few friends, thinking someone might light the vintage charm of it, but no one was interested in the woodland themed cachepot.  Since the brown color didn't really fit into my white cachepot color scheme I decided to do a quick makeover with white satin spray paint.


Cachepot makeover

I didn't use any sort of primer when spray painting this ceramic cachepot because I don't expect it to get a lot of handling.  I did tape off the inside of the cachepot because the inside already had a shiny white glaze that I didn't want to cover.  I setup a little spray station in the basement and gave a few coats with the suggested drying times in between.  With all the nooks and crannies of the faux bois texture and the bird/flower detail it was important to spray in different directions to get full coverage. The final result is below, after about 2 - 3 coats of satin white on the outside.


Ceramic cachepot after makeover with satin white spray paint
Spray-painted ceramic cachepot


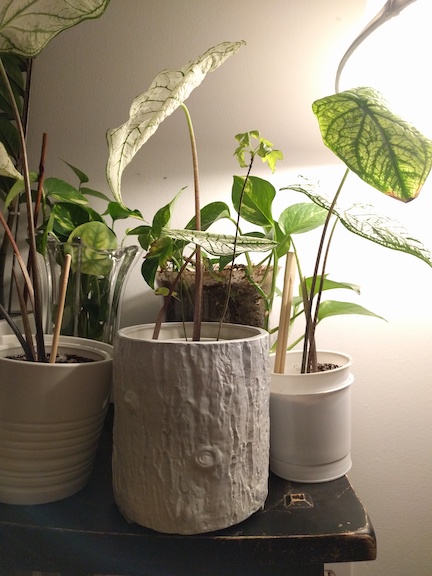
Here is the cachepot in its current home, holding a Caladium plant (itself a freestyle gift from the sub-tropic garden of some friends).  Here it is crowded not-very-prettily with some other plants in a variety of planters - including one made of glass in the back.  Good sunlight is at a premium in my apartment, so crowding happens more often than I'd like!  If I remember to take a better picture I'll replace this one, but for now that's what I have. :)

Ceramic cachepot after makeover with satin white spray paint with Caladium plant
Cachepot with Caladium plant


A Surprise Online Find After The Spray Paint Makeover

After I'd finished this project I was pleasantly surprised to see a not-too-dissimilar planter to mine for sale on rather stylish website ( not-too-dissimilar if you squint and look at mine in dim light that is). Here is a screen grab of the 'Ceramic Rose Pot' for sale, the large size is 6.5 inches tall - about the same size as my freestyle find. 

https://www.shopterrain.com/


Conclusion

The large version of the cachepot on this website sells for $38 - I got mine for the cost of washing a pot and a $5 can of spray paint.  Cheers to seeing the makeover potential of that faded ceramic cachepot in the discard pile!

Happy freestyling, or almost freestyling, whichever way your project takes you.

Tuesday, January 7, 2020

Cross-Country Caladium Caper

Caladium Acquisition & Transport

While visiting some friends with a sub-tropical outdoor garden the discussion turned to....plants. Naturally.  They generously agreed to let me take some cuttings home for my own container garden, but the only catch was that I'd have to take them on an airplane.  This might sound tricky but it's actually not, as long as you are flying within the lower 48 states.  I didn't have a hard-sided box, so we dug up some of the Caladium plants and wrapped the roots in damp paper towels, then put the plants into large plastic bags with the tops slightly open.

Here are the Caladium cuttings prepped for transport in their plastic bags.


When on the airplane I carefully placed the plastic bags on top of my backpack in the space under the seat in front of me.  This worked just fine for a short flight.


Post-Transport Plant Results

The plants survived with no damage to the leaves and stems.  Lucky!


I prepped a few cleaned out yogurt containers to serve as planters by cutting a series of triangles out of the base.  These were then stacked inside of another yogurt container to serve as a cachepot.


Caladium Conclusion

The final transplanted Caladiums in their new freestyle homes!


Happy freestyling, and don't be afraid to try something new in your container garden!

Tuesday, December 31, 2019

Can hemp oil restore a wooden knife handle?

Can hemp oil restore a wooden knife handle?


I'd acquired this kitchen knife some time ago, at least a few years. It wasn't pretty when I got it, but, hey, free kitchenware usually comes in handy.  I'm also sure it has gone through the dishwasher a few times, so I was curious to see if hemp oil could restore the much dried-out wooden handle.  So this post is not so much about the freestyling, as it is about how to possibly renourish old wooden items with a natural product.

The product I tested was Miss Mustard Seed Hemp Oil, used for furniture finishing (this is not a sponsored post, I was using the product for furniture refinishing). Here we have the hemp oil bottle and the untreated knife handle, sitting on a cutting board in my kitchen.

Hemp oil bottle and untreated knife handle
Hemp oil and knife handle

This is a close-up of the untreated knife handle.  You can see how the wood is a little rough, especially near the back edge of the handle, and the color is rather faded.

Picture of untreated knife handle
Untreated knife handle

In the photo below I've applied hemp oil to one side of the handle (towards the bottom of the picture).  The wood was clearly VERY dried out, it absorbed the hemp oil right away, you can see how it looks darker and shinier.


Knife handle after one side was treated with hemp oil
Knife handle after half treatment with hemp oil

The results of hemp oil treatment

The results indicate that the hemp oil *did indeed* make this knife handle look better.  The wood was darker, the grain of the wood visible again whereas before it was rather faded and gray.  The handle also felt a little smoother after the hemp oil was applied and given time to soak in.

Picture of knife handle after hemp oil treatment
Knife handle after hemp oil treatment, looking nicer.


The conclusion - hemp oil made the worn out knife handle look nice again.  This is probably a treatment I'll have to repeat if the knife handle gets dried out again from general use, but it only takes a few minutes and smells nice, sort of like grass.  An upside is that I didn't have to worry about any toxic substances, and I was able to compost the paper towel I used to apply the oil. 

Happy freestyling and fixing!