Tuesday, July 21, 2020

Garden of freestyle delights - Scrap wood tomato planter

Garden of freestyle delights

When you see a pile of scrap wood...

Does your mind automatically start calculating how big of a rectangle-ish box you could make? 

Seeing how pieces could be cut up, fit together, drilled through, and screwed into to make yet another thing that can hold dirt?

Well my mind was VERY MUCH in that space this spring when I had the urge to setup a patio garden space and try my hand at growing cherry tomatoes again. It's probably been a decade, but there is never a bad time to return to vegetable gardening!

The wood

There was a pile of wood that was sitting abandoned for a while, which upon closer inspection turned out to be the remnants of a table. Some of the pieces had this lovely dappled silver pattern from the weathering.

Close-up image of weathered wood texture
Close-up of weathered wood


I have no idea if the wood was deliberately stained grey or if that was a reaction from being left outside. Either way, beautiful! 

Once we got all the pieces to the workspace the design of the planter started to come together a bit more, but first I had to take some pieces apart.  You can see the metal attachment plates for table legs in the picture below.

Pieces of scrap wood from abandoned table
Scrap wood from abandoned table


Luckily I didn't have to try to pry these off with my bare hands, I had a few tools available at this point. The power drill was essential in deconstructing any unwanted parts and then building the planter with the L-brackets that I bought from the hardware store.


Supplies used to construct the scrap wood planter, saw, drill, brackets
Saw, drill, and L-brackets


The planter

It is much easier to hold pieces in the proper alignment and screw them together with two people, so I'm glad I had a friend to help with this job.  There aren't any pictures of the sawing wood or actually screwing the pieces together with L-brackets, but here is what the basic box looked like when it was done.


Rectangular planter made from scrap wood

In case you are wondering, there is a reason the back wood cross-piece is longer than the front. Aside from trying to minimize the amount of hand-sawing needed for this project I wanted extra space to attached a trellis at some future point since my plan was to grow cherry tomatoes.

Below is a closeup of the end, you can see the L-brackets are on the outside here, because the inner space was simply too small to fit the drill.  You can also see that the front wood had bowed a bit, which is ok because this is a planter.

Scrap wood planter, short end with visible brackets
Planter end with visible L-brackets


From this top view you can see the L-brackets that were used on the inside of the planter box so that they wouldn't show from the font.  You can also see the drainage holes I drilled in the bottom using the largest available drill bit. Always always always consider the drainage!

Scrap wood planter from above with drainage holes visible
Planter from above with drainage holes visible


Part of thinking about drainage is looking at where your planter will be sitting. If a planter has drainage holes but is sitting on another surface that traps water then the situation can encourage mold or algae growth.  Similarly, a planter sitting on a wooden surface can trap moisture on top of the wood deck lead to unwanted effects.  So just like drainage, it is also important to consider ventilation and air flow.  In this case I proper up the planter a few inches on some ceramic feet that I had found in a give-away pile.


Scrap wood planter sitting on clay feet for elevation

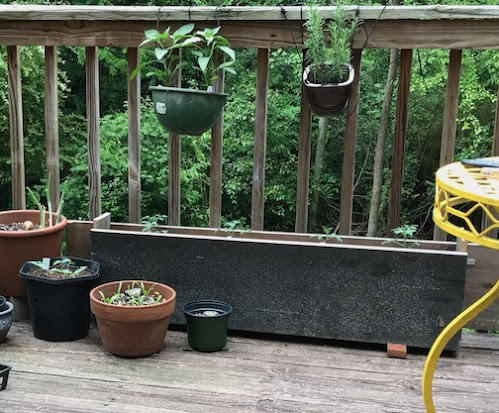
There were only 3 ceramic feet so I had to space them carefully, but they held up to the weight just fine!  After getting the planter elevated and in the right position all that was left was to fill it with dirt and four tiny tomato seedlings.  For the cherry tomatoes I was limited to what was still available at the hardware store, and ultimately ended up with three 'supersweet 100 hybrid' strains and one 'black cherry tomato' strain.
Scrap wood planter with tomato seedlings


You'll notice in the above picture that there are peppers and rosemary plants attached to the railing above the cherry tomatoes.  I knew while building the tomato planter box that this garden arrangement would have to shift, and eventually I'd need to add a trellis or some sort of support for the tomatoes because I wanted to do string training.  An excellent description of why and how to do string training for tomatoes is available on this website.  Stay tuned for trellis and string-training updates in another post.


Conclusions

Rome wasn't built in a day, your garden doesn't have to be either.  In creating this freestyle garden the goal was to spend as little money (preferably no money) on large heavy objects like planters that won't be making the next move (whenever that happens).  This means keeping an eye out for free scrap wood, free ceramics whether largemedium, or small, and especially free plastic planters (way easier to carry than large pieces of wood).  See the potential!

Happy freestyling!

Tuesday, July 14, 2020

Garden of freestyle delights - metal hay rack planter

The Find

On a perfect spring evening I was out for a neighborhood walk and I can across a freestyle gardener's delight -- a bunch of freebies from someone who was clearly a serious gardener laid out on a lovely sweep of manicured lawn.

Gardening giveaways on trash night
So much potential


Part of me wanted to take it all, the grabby decorator crab part of me.  However, as I only had two hands and was for some silly reason already carrying a water bottle I had to limit myself. Treasure number one was obviously the metal trough (perfect for a fence!).  For treasure number two I was torn between the branch saw and some hedge clippers.  Since I don't have to maintain any trees around here I went with the hedge clippers since they were smaller (although probably heavier).

Metal + Coir = Lovely


These are the treasures after I got them home. There is a LOT of rust on those hedge clippers, which I still haven't cleaned off, but the main hinge still works and the handles are in good shape, so maybe I'll just leave that protective rust layer on the blades until I find I have a need to use them.  Anyway, the metal trough-looking thing is also known as a 'hay rack' or 'hayrack' planter because it looks like what you use to hold hay inside of a horse's stall.

Metal hayrack planter and rusty hedge clippers
Hayrack planter and hedge clippers


My friend was at first skeptical of this particular find (how do you hold the plants?).  But I explained that there were special liners for sale at the local hardware store and that this classic style would look luscious, but not messy, with trailing plants covering up the rusted spots.  So off I went to find a suitable sized liner made of coir (aka coconut fiber).  Lucky for me the local hardware store had one in just the right size.

Coir liner and metal hayrack planter
Planter and liner sitting pretty on a freestyle chair


Conclusion

I didn't want to drill holes through the fence, so instead I used some strong rope to hang the metal part from the top of the fence planks.  Then I placed the coir liner, filled it with potting soil, and added small wave petunia plants in shades of purple. I think the petunias were in 4" pots, I used three or four here.

Metal planter with purple wave petunias
Planted petunias 


Wave petunias are great for their repeated flowering and cascading 'wave' growth pattern, so I expected that it wouldn't take too long for them to grow over the front of the coir liner and soften the edge a bit.

The deep purple color is really lovely, here is a close-up in shot I took using a clip-on macro lens that fits over my cell phone camera.

Purple petunia flower center
Petunia center


Happy freestyling!

Tuesday, July 7, 2020

Garden of freestyle delights - Painted stone garden markers

Why you need garden markers

Optimistic gardeners might think they will remember where they planted such and such seeds, or which containers contain seeds. Hah.  Experience quickly teaches that it is easy easy easy to forget what you buried in the ground and where. Just ask any squirrel.  To help your memory, why not make some weather-proof garden markers?

How to make your own garden markers using rocks and acrylic paint

I had some luscious acrylic gold paint from a previous project where I was painting picture frames.  But nothing says gardens can't use a bit of bling! So I got out the paint and a pen, since I didn't have any paintbrushes at the time.


At first I tried to use the tip of the pen dipped in the acrylic to 'write' on the rocks by dragging the tip of the pen across the surface. This worked poorly on the uneven rock surface, the words were legible but the letter were uneven and blobby.  Then I thought about some painted rock mandala images I'd seen and thought about trying to using dots to make the letters. That worked out muuuuuch better, and also led to some other fun dot-based designs.  
Fair warning, this activity is addictive and soothing!

At the end of it I had some painted rocks with words for labeling the various seeds I had acquired to date: spinach, cilantro, and basil, along with some other freeform designs I could use for decoration while there was mostly bare dirt in the pots.


Conclusion

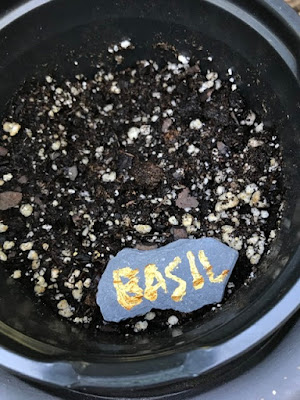
The easiest part is that you can just set the rock inside whatever pot you just planted up. No worries about it falling over or blowing away in a stiff breeze. Here is the garden label I made for some Thai basil seeds I got on sale because they were from last year.  Hope they germinate! Happy freestyling!


Update - the basil seeds took a long time to sprout, but they did eventually make it.