Tuesday, September 22, 2020

Garden of Freestyle Delights - Ornamental Ginger While Out for a Walk

The Find: Free Ornamental Ginger

While out for an evening walk I came across a very exciting sign in someone's yard next to the side of the road.  It said, " FREE ................. ORNAMENTAL GINGER" and there was a plastic bag with pieces of root inside.  I even took a picture for posterity.

Free ornamental ginger root, with sign


I let the root sit around for a few days until I acquired another set a free planters.  Spring is a good time for getting unwanted plastic (or broken ceramic) planters.


Stack of free plastic plant pots


Growing Ornamental Ginger


I planted the ornamental ginger in some potting soil, unsure if it would every sprout. Had I ignored it for too long? Had I planted it too shallow? Would it rot instead of revive? These are the doubts that plague a gardener. 

But plants can surprise you with their hardiness, at least this ornamental ginger root cutting did. 


First ornamental ginger sprout of red and green
First ornamental ginger sprout


And then it got a little taller....

Ornamental ginger sprout approximately 4inches tall


And then it got this tall and has stayed like that for a while!  I'm still waiting on flowers though...

Ginger plant and Clematis plant on staircase
Ornamental ginger co-planted with an impulse purchase clematis


In addition to the vertical growth (a.k. the plant's "habit" in the parlance of the horticultural world) I like the slight striping (variegation) of the leaves, which is visible in the photo below.

Close-up view of slightly variegated ginger plant leaf
Slightly variegated ornamental ginger plant leaf


Conclusion

When taking plant cuttings or roots, be aware of the risk of spreading invasive species or pests.  In this case the root cuttings were from the same neighborhood, and I was planning to grow the plant in an isolated container on a patio - not in the ground.  I'm not sure whether this plant would get taller if it were planted in the ground and could develop deeper roots, but that is not something I can experiment with right now!

Happy freestyle gardening, don't be afraid to scavenge for beauty!

Tuesday, September 15, 2020

Sailing into a future involving gold paint, a framing adventure

The Find

While out for an evening walk I came across this LARGE and beautifully framed photo of a sailboat.  Framed with real glass in the front, amazingly unbroken, and reliably heavy.  So what did I do?  I carried it home with only a vague purpose in mind, thinking maybe it would fit some fancy paper that I bought to use as a poster.

Free frame with sailboat picture
The freestyle green-framed find


The Makeover

Normally I love teal. Teal is my jam.  Cerused teal? Are you kidding? I refinished an end table AND refinished a small oak bookshelf to try to achieve a similar look.  With this frame I think the pattern is some sort of overlay, or something printed on, it isn't actually teal-dyed perused wood.  Perhaps it is for the better because a frame made out of solid oak would have been even heavier.

Corner detail of green picture frame
Corner detail or the original frame


With this frame I wasn't feeling the teal, I was feeling the fake gold.  First things first, I had to take it all apart and clean it, oh, and sadly throw out the large intact piece of glass.  Sigh. It made me sad, but having glass in large frames makes them heavy, which makes them harder to hang, and that glass is very breakable which makes me nervous.  Heavy + breakable + suspended from a single nail on a wall is not a reassuring combination.  Anyway, here is what the frame looked like underneath the dust wrapper, pretty standard assembly.


Inside the back of the frame


Lots of little framer's points to pull...and save for later.

Inside of the back of the frame, corner detail


The first coat of gold paint is always a little streaky. I expected it to take a few coats to cover the darker green and bald underneath....and I was right.  Patience is the key, I try to use thin coats with plenty of dry time in between. 
After the first goal of gold paint


After the painted was complete I looked at some decorative papers I'd purchased and with the existing matting they were the right WIDTH but not the right LENGTH...... you can see some of backing board showing at the bottom with printed text on it.

Poster with backing showing


I wanted to use this "Minerologie" paper anyway so I decided to fill in the blank spot at the bottom of the frame with slightly textured watercolor paper. 


Poster with backing covered by watercolor paper


After some generous use of double-sided tape I re-assembled all the pieces, including poking those original framer's points back into their original holes.
You can see the edges between the watercolor paper pieces a little better in the close-up below.


Closeup corner detail of watercolor paper overlapping poster
Closeup, corner detail of watercolor paper overlapping poster


The Final Result

I LOVE the way this turned out, even with the oddity of the watercolor paper at the bottom. I just think of it as a title bar like you sometimes see on posters purchased from museums.  In this case it happens to be a blank title bar, but no matter, I can always fill it in with some script if I ever trust my own handwriting.

Minerals poster in new gold-painted frame


I think the warm shininess of the gold paint is an excellent setting for this colorful poster of minerals.

Happy freestyling, don't be afraid to take the freestyle frame even if you aren't sure what it will turn into.  Finding beauty from scavenged pieces gets easier with practice.


Tuesday, August 4, 2020

Garden of freestyle delights - (another) scrap wood planter and a painting experiment

Upcycled Scrapwood into Painted Planter


When life gives you scrap wood, make scrap wood planters!  That has been my motto lately, and it has been fun to see what can be created out of a few leftovers by making as few cuts as possible.  The picture below is the bottom of the assembled planter while I was completing the last construction step -- drilling drainage holes into it. It's definitely made of leftover pieces, you can see someone else's pencil marks.

Bottom of scrap wood planter with drainage holes being drilled.


For this scrap wood planter I decided to try painting the outside with some really cheap poster paint.  The paint CLEARLY SAYS it is water-soluble, so I did not expect my paintings on the wood to last very long past the next rainstorm. But I was also curious about how much paint would sink into the wood and how long it might persist while living outside in the elements.

Here is the assembled planter before any painting.

Scrap wood planter and poster paint ready to use


I looked for some Art Deco inspiration, in the very loosest sense, and found a butterfly and a lotus - both of which seem like appropriate themes for garden art.  I have near-zero decorative painting skills, but this seemed like a good place to play around and try something new.

Painted Planter Results


I had 6 colors of the poster paint but didn't try to use them all, in this case simple was the goal.  

Below is the first side, painting inspired by an Art Deco jewelry piece I saw online.


Scrap wood planter painted with Art Deco butterfly motif

Below is the side that I painted with a lotus-inspired design. Van Gogh I am not, nor Monet.


Scrap wood planter painted with Art Deco lotus flower motif

Conclusion

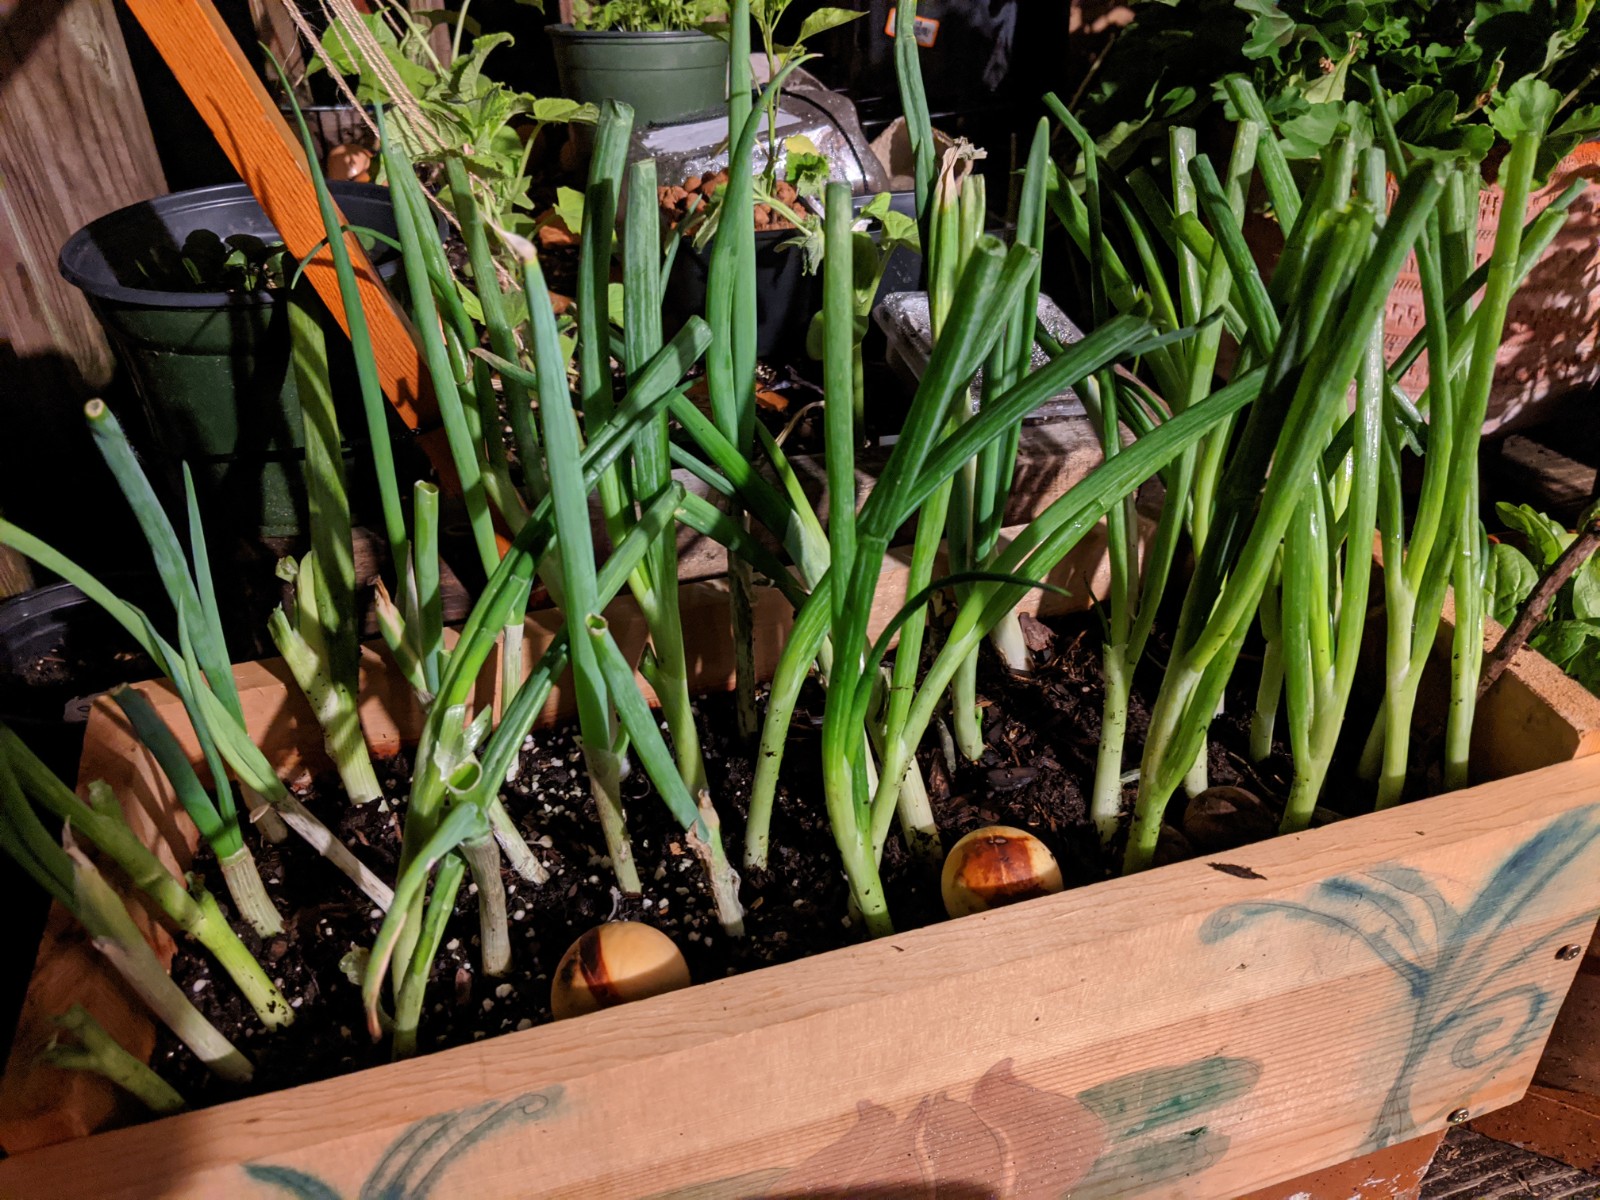
Lucky for this scrap wood planter painting experiment there was a rain event the very same night that I painted this planter and planted it with some scallions. (Yes, those are scallions purchased from the grocery store for 99 cents per bunch that I replanted in the garden.) The photos below shows how much washed away in that first rain event, just hours after the paint had dried.

Scrap wood planter with scallions and faded Art Deco lotus flower motif


Since the paint fades so quickly I wonder if this could be a technique to use if someone wanted to quickly create a 'weathered' look along new wood (it would be someone who had poster paint, but not other traditional aging washes like nails soaked in vinegar).  You could maybe use a mix of white, gray, brown, and black paint applications to mimic varied textures, let it sink into the wood and dry, and then wash the wood.  I have no idea if that would look reasonable or like a decrepit art project from some long-ago children's art attempt. 

This was a fun project, and all for the cost of a few screws and some $2 bottles of poster paint.  

Happy freestyle-garden-ing!


Tuesday, July 21, 2020

Garden of freestyle delights - Scrap wood tomato planter

Garden of freestyle delights

When you see a pile of scrap wood...

Does your mind automatically start calculating how big of a rectangle-ish box you could make? 

Seeing how pieces could be cut up, fit together, drilled through, and screwed into to make yet another thing that can hold dirt?

Well my mind was VERY MUCH in that space this spring when I had the urge to setup a patio garden space and try my hand at growing cherry tomatoes again. It's probably been a decade, but there is never a bad time to return to vegetable gardening!

The wood

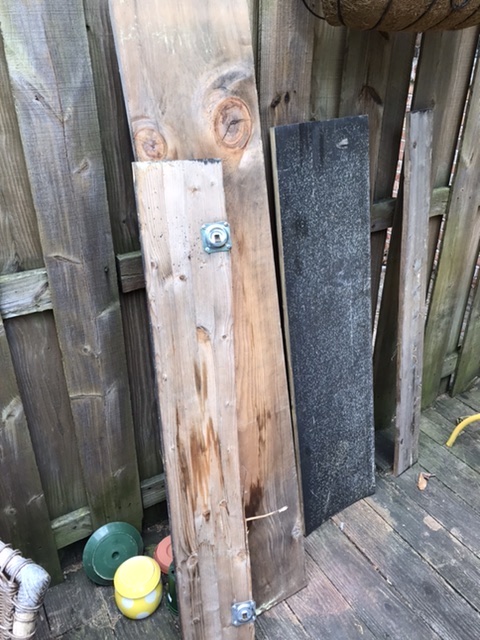
There was a pile of wood that was sitting abandoned for a while, which upon closer inspection turned out to be the remnants of a table. Some of the pieces had this lovely dappled silver pattern from the weathering.

Close-up image of weathered wood texture
Close-up of weathered wood


I have no idea if the wood was deliberately stained grey or if that was a reaction from being left outside. Either way, beautiful! 

Once we got all the pieces to the workspace the design of the planter started to come together a bit more, but first I had to take some pieces apart.  You can see the metal attachment plates for table legs in the picture below.

Pieces of scrap wood from abandoned table
Scrap wood from abandoned table


Luckily I didn't have to try to pry these off with my bare hands, I had a few tools available at this point. The power drill was essential in deconstructing any unwanted parts and then building the planter with the L-brackets that I bought from the hardware store.


Supplies used to construct the scrap wood planter, saw, drill, brackets
Saw, drill, and L-brackets


The planter

It is much easier to hold pieces in the proper alignment and screw them together with two people, so I'm glad I had a friend to help with this job.  There aren't any pictures of the sawing wood or actually screwing the pieces together with L-brackets, but here is what the basic box looked like when it was done.


Rectangular planter made from scrap wood

In case you are wondering, there is a reason the back wood cross-piece is longer than the front. Aside from trying to minimize the amount of hand-sawing needed for this project I wanted extra space to attached a trellis at some future point since my plan was to grow cherry tomatoes.

Below is a closeup of the end, you can see the L-brackets are on the outside here, because the inner space was simply too small to fit the drill.  You can also see that the front wood had bowed a bit, which is ok because this is a planter.

Scrap wood planter, short end with visible brackets
Planter end with visible L-brackets


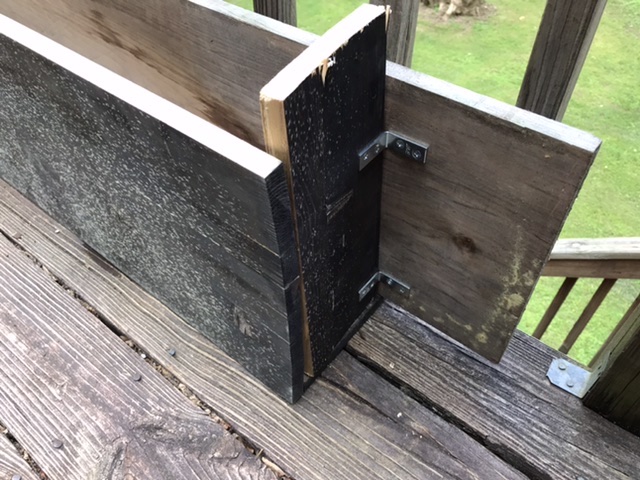
From this top view you can see the L-brackets that were used on the inside of the planter box so that they wouldn't show from the font.  You can also see the drainage holes I drilled in the bottom using the largest available drill bit. Always always always consider the drainage!

Scrap wood planter from above with drainage holes visible
Planter from above with drainage holes visible


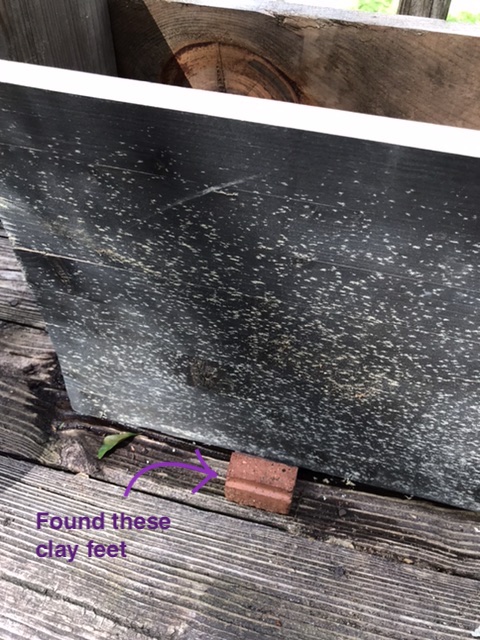
Part of thinking about drainage is looking at where your planter will be sitting. If a planter has drainage holes but is sitting on another surface that traps water then the situation can encourage mold or algae growth.  Similarly, a planter sitting on a wooden surface can trap moisture on top of the wood deck lead to unwanted effects.  So just like drainage, it is also important to consider ventilation and air flow.  In this case I proper up the planter a few inches on some ceramic feet that I had found in a give-away pile.


Scrap wood planter sitting on clay feet for elevation

There were only 3 ceramic feet so I had to space them carefully, but they held up to the weight just fine!  After getting the planter elevated and in the right position all that was left was to fill it with dirt and four tiny tomato seedlings.  For the cherry tomatoes I was limited to what was still available at the hardware store, and ultimately ended up with three 'supersweet 100 hybrid' strains and one 'black cherry tomato' strain.
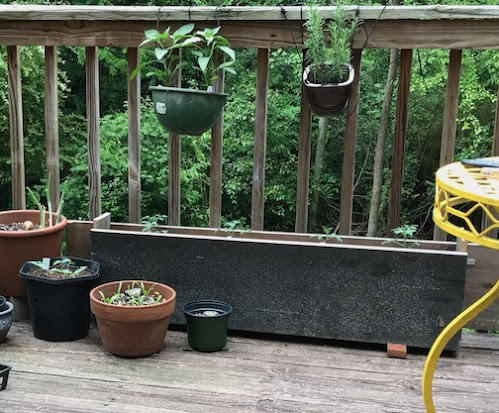
Scrap wood planter with tomato seedlings


You'll notice in the above picture that there are peppers and rosemary plants attached to the railing above the cherry tomatoes.  I knew while building the tomato planter box that this garden arrangement would have to shift, and eventually I'd need to add a trellis or some sort of support for the tomatoes because I wanted to do string training.  An excellent description of why and how to do string training for tomatoes is available on this website.  Stay tuned for trellis and string-training updates in another post.


Conclusions

Rome wasn't built in a day, your garden doesn't have to be either.  In creating this freestyle garden the goal was to spend as little money (preferably no money) on large heavy objects like planters that won't be making the next move (whenever that happens).  This means keeping an eye out for free scrap wood, free ceramics whether large, medium, or small, and especially free plastic planters (way easier to carry than large pieces of wood).  See the potential!

Happy freestyling!